Crochet Pig In A Granny Square Blanket Pattern


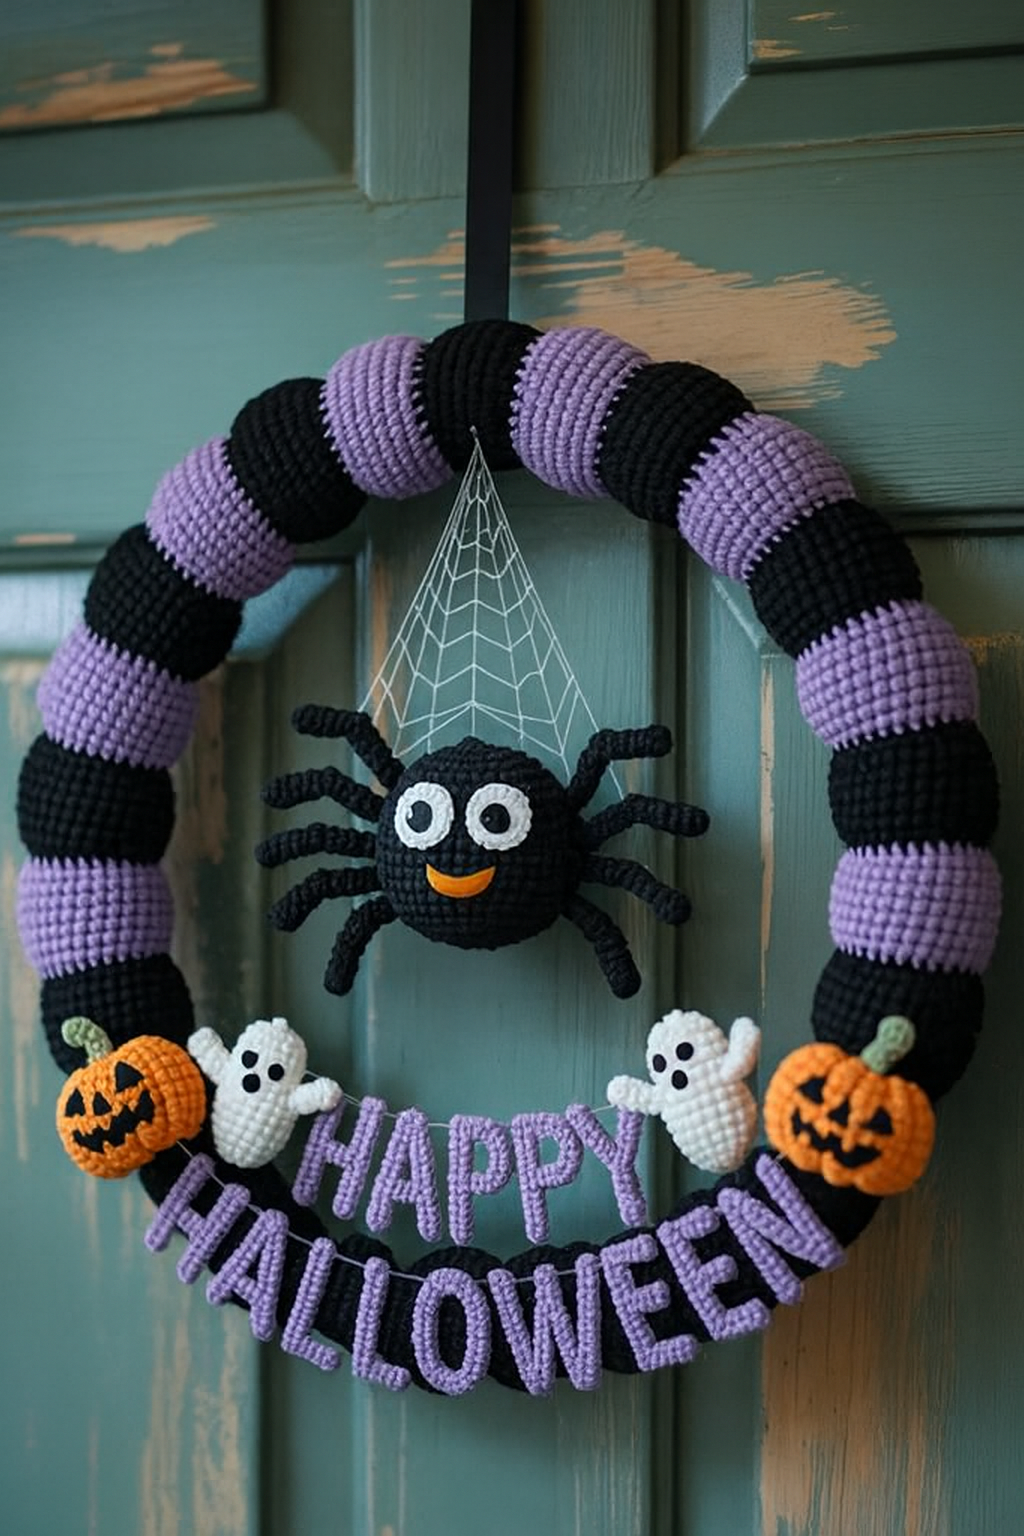
Creating a Happy Halloween Wreath – FREE Crochet Pattern is one of the most enjoyable seasonal projects for crochet lovers. A Halloween wreath is more than just decoration.
Crocheting a Happy Halloween Wreath – FREE Crochet Pattern allows you to experiment with vibrant seasonal colors and fun shapes like pumpkins, ghosts, and spiders.
The beauty of a Happy Halloween Wreath – FREE Crochet Pattern lies in the endless possibilities. Some people make theirs colorful with bright oranges, purples, and greens, while others keep it more classic with black and white tones.
To make your Happy Halloween Wreath – FREE Crochet Pattern, it is essential to gather the right materials before you start. Having everything on hand ensures a smooth process and allows you to focus on creativity instead of interruptions. The most important supply is the wreath base, which can be foam, wire, or even a crocheted ring. Foam bases are very popular because they are lightweight and easy to cover with yarn or fabric.
Next, you will need yarn in typical Halloween colors: orange, black, white, purple, and green. Acrylic yarn is often the best choice for decorations since it holds shape well and is affordable. Depending on your preference, you can also use cotton yarn if you like a sturdier texture. A set of crochet hooks in different sizes will also be helpful, especially when working on small appliqués like pumpkins or ghosts.
Don’t forget a good pair of scissors, a tapestry needle, and some stitch markers. These small tools make a big difference in keeping your project organized and neat. For added decoration, you might want to include ribbons, felt, or even buttons shaped like bats or spiders. These little touches bring extra personality to your wreath.
A hot glue gun can also come in handy if you decide to attach non-crocheted embellishments to your wreath. However, for all the crochet appliqués, sewing them directly with yarn will make the wreath more durable. By combining these supplies, you set the stage for a creative and joyful Halloween project.
Preparing your workspace is also a part of the process. Keep your yarns organized, your tools in a small basket, and a comfortable chair with good lighting. Crochet is not just about the final product but also about enjoying the crafting journey. With everything ready, you can dive into the fun part: creating your Halloween masterpiece.
Lastly, remember that you do not need to spend a fortune on materials. The charm of a Happy Halloween Wreath – FREE Crochet Pattern is that it can be made with leftover yarn and recycled decorations. This makes it both budget-friendly and eco-friendly, allowing you to celebrate Halloween creatively while saving resources.
The base of your Happy Halloween Wreath – FREE Crochet Pattern is what gives structure to the project. A foam wreath base is the easiest to work with because you can wrap it with yarn or crochet a long strip to cover it completely. This creates a clean surface to attach all your decorations later.
If you prefer something sturdier, a wire wreath frame can also be used. In this case, crocheting around the wire gives you a secure and flexible foundation. Many crafters like to wrap the wire with fabric before adding the crochet elements to make it softer. This ensures the appliqués stay in place without sliding.
Crocheting a base from scratch is another creative option. You can make a thick ring by crocheting in the round and stuffing it with fiberfill to give it volume. This method requires more time but results in a completely handmade wreath. It is perfect for those who enjoy a fully crocheted look without mixing in other materials.
Once the base is ready, think about how you want to divide the colors. Some people cover the entire base in one solid shade like black, while others alternate stripes of orange and purple for a more playful effect. The way you decorate the base sets the tone for the rest of the wreath.
Securing the yarn to the base is simple. Start by tying a knot at the back, then wrap the yarn tightly until the entire base is covered. If crocheting a cover, measure carefully so it fits snugly around the base and sew the ends together. A neat base makes the final decoration look polished and professional.
At this stage, your wreath may look plain, but remember that this is only the foundation. The fun begins when you start making and attaching the Halloween crochet appliqués that bring the entire project to life.
The heart of your Happy Halloween Wreath – FREE Crochet Pattern lies in the appliqués. These small pieces are what make your wreath unique and festive. The most common ones are tiny pumpkins, which are made using basic crochet stitches. By working in the round with orange yarn, you can easily create a 3D pumpkin. Adding a small green stem completes the look.
Ghost appliqués are also very popular. They are usually crocheted in white yarn with simple shapes like triangles or ovals. A couple of embroidered black eyes or small buttons give them personality. Cute or spooky, ghosts add the perfect Halloween touch.
Spiders and bats are slightly more detailed but still manageable even for beginners. For spiders, crochet a small black circle for the body and add thin chains as legs. Bats can be made with simple wing patterns that are sewn onto a small round body. Both of these motifs instantly bring a spooky vibe to your wreath.
Candy corn appliqués are fun to make and add a pop of color. Using yellow, orange, and white yarn, you can crochet small triangular pieces that resemble the popular Halloween candy. These brighten up your wreath and add a playful element.
If you want a more whimsical design, you can include witch hats, black cats, or even small skulls. These can be placed around the wreath in any arrangement that suits your style. The combination of different appliqués creates depth and variety, making the wreath visually appealing.
Remember to make enough appliqués to cover a good portion of the base without overcrowding it. Balance is key: too few decorations can look empty, while too many can hide the structure of the wreath. Aim for a mix of large and small appliqués for the best effect.
Once all your appliqués are ready, it is time to bring the Happy Halloween Wreath – FREE Crochet Pattern together. Lay out the pieces on the base before attaching them so you can experiment with different arrangements. This helps you visualize the final look and ensures everything is balanced.
Start by placing larger pieces like pumpkins or big ghosts first. Then, fill in the gaps with smaller motifs such as spiders or candy corn. Think of your wreath as a canvas: larger shapes form the background, while smaller ones add detail and interest.
Sew the appliqués securely onto the base using a tapestry needle and yarn. Avoid only gluing them, as sewing ensures durability and allows you to store the wreath for future Halloweens. If you want to add non-crocheted decorations like ribbons or bells, those can be glued after all the yarn work is done.
Adding a bow at the bottom or top of the wreath gives it a finished, polished look. You can crochet the bow yourself or use a fabric ribbon in matching Halloween colors. This acts as the final touch that ties the whole design together.
Don’t forget to create a loop at the back of the wreath for hanging. A simple yarn chain or ribbon works perfectly and ensures your wreath is easy to display on your door or wall. Practical details like this make your project functional as well as beautiful.
Finally, step back and admire your work. The combination of textures, colors, and motifs brings the Happy Halloween Wreath – FREE Crochet Pattern to life, making it a standout decoration for the season.
Q: Is the Happy Halloween Wreath – FREE Crochet Pattern suitable for beginners?
A: Yes, this project is beginner-friendly. Most appliqués use simple stitches like single crochet, double crochet, and slip stitch.
Q: How long does it take to make the wreath?
A: Depending on your crochet speed, it can take a weekend or a few evenings. The appliqués are small and quick, but assembling everything takes some time.
Q: Can I use leftover yarn for this project?
A: Absolutely. One of the best parts of this wreath is that it is perfect for using leftover yarn scraps in seasonal colors.
Q: Do I need to block the appliqués before attaching them?
A: Blocking helps keep the shapes neat, especially for flat motifs like bats or candy corn. It is not mandatory but highly recommended.
Q: How should I store the wreath after Halloween?
A: Keep it in a dry place, preferably inside a box, to protect it from dust and moisture. This way, you can reuse it year after year.
Q: Can I customize the pattern with other motifs?
A: Yes, feel free to add any Halloween-themed crochet appliqués you like. Black cats, witches, or skeletons all make great additions.
Making a Happy Halloween Wreath – FREE Crochet Pattern is a rewarding and fun seasonal project. You now know how to gather materials, create a sturdy base, crochet festive appliqués.
If you try this project, share your experience, leave your honest opinion, and suggest new ideas for future patterns. Your feedback helps keep the crochet community inspiring and connected.


