Crochet Pig In A Granny Square Blanket Pattern


Crochet Basic Granny Square Pattern is one of the most timeless and beloved designs in the crochet world. Whether you are a complete beginner or an experienced maker, this classic square offers endless creative opportunities. In this article, you will learn how to make a traditional granny square using simple stitches, all explained in a clear, humanized, and SEO-optimized way. Throughout the text, the key term Crochet Basic Granny Square Pattern will appear naturally so search engines can understand the relevance of this topic while keeping everything within Google AdSense policies.
The beauty of the Crochet Basic Granny Square Pattern lies in its simplicity and versatility. With just a hook and yarn, you can create beautiful squares that can be joined together to make blankets, scarves, clothing pieces, home décor items, and so much more. Beginners love it because it offers quick results, while advanced crafters use it as a foundation for more complex techniques. In this guide, you will discover how to build your square step by step, what materials are best, and how to troubleshoot the most common issues.
Another reason people love working with a Crochet Basic Granny Square Pattern is its flexibility in color combinations. You can use a single shade for a minimalist design or choose multiple colors for a vibrant and playful effect. This pattern also teaches you the structure of crochet rounds, increasing stitches, and forming geometric shapes. Once you master this project, you can apply similar techniques to many other crochet creations.
Learning the foundation of the Crochet Basic Granny Square Pattern starts with understanding the basic stitches involved. Most granny squares use chains, slip stitches, and double crochets, making it a wonderful introduction for beginners. These stitches work together to create the iconic clusters and open spaces that define this pattern. Knowing how these elements function will help you build a steady rhythm as you crochet.
A traditional granny square begins with a center ring made of chains. From there, you build outward in a series of rounds. Each round increases the size of the square, giving it structure and shape. This method makes it easy to customize your final size since you can stop or continue working rounds as desired.
Another important aspect is tension control. Keeping consistent tension ensures your granny square lays flat and does not buckle or curl. Many beginners struggle with this at first, but practice quickly improves results. Smooth, even stitches make your square look neat and professional.
Color selection also plays a role in creating a visually appealing Crochet Basic Granny Square Pattern. You can choose contrasting colors for bold effects or subtle tones for a calm and elegant result. Changing colors at the beginning of each round is a popular technique that adds charm and personality to your work.
Materials matter too. Soft, medium-weight yarns are ideal for learning granny squares because they are easy to handle. Pairing your yarn with the correct hook size helps maintain proper stitch definition and ease of crocheting. Starting with comfortable materials allows beginners to focus fully on technique.
Finally, understanding counting and spacing is essential. Many errors occur when crocheters lose track of stitches or misplace clusters. Keeping your work organized ensures the final square is symmetrical and properly shaped, which is important when making several squares to join together.
To begin your Crochet Basic Granny Square Pattern, first create a slip knot and chain four stitches. Join the last chain to the first with a slip stitch to form a small ring. This tiny center is the foundation of your entire square and will gradually expand as you add more rounds.
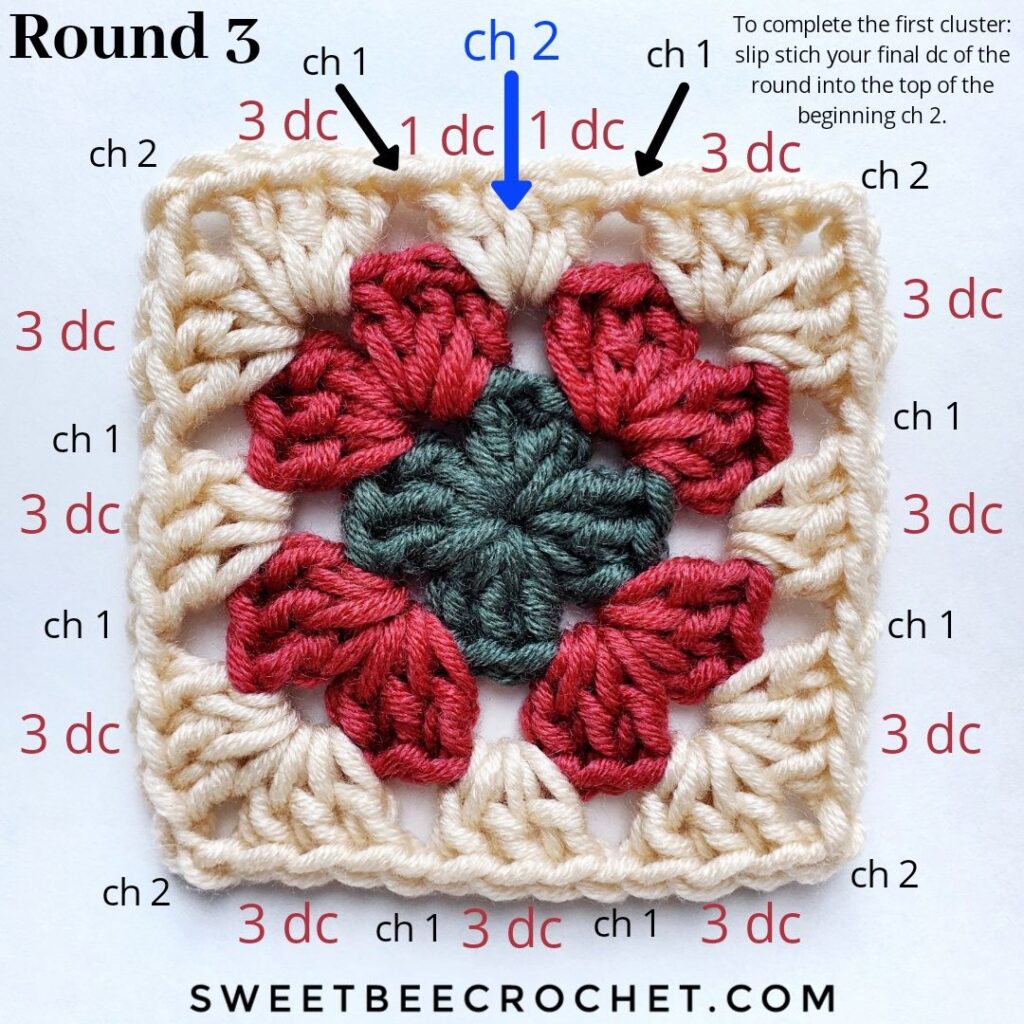
Next, chain three stitches to represent your first double crochet. Then work two double crochets into the center ring. These three stitches create your first cluster. The granny square is built using clusters, typically sets of three double crochets worked into the same space, so understanding this first cluster is key.
After completing the first cluster, chain two. This chain space forms the corner of the square. Crochet three more clusters separated by chain-two spaces until you have four clusters total. Slip stitch to the top of the initial chain-three to close the round. You’ve now created the first shape resembling a square.
For the second round, begin in any corner space by chaining three and making two more double crochets. Chain two and work another cluster into the same corner. Each corner of the square contains two clusters separated by a chain-two space to maintain the square shape.
Continue working in each corner around the square. Make sure to maintain consistent spacing and stitch placement. When the round is complete, join again with a slip stitch. With each new round, the corners grow, and the sides lengthen, forming a larger square.
You can continue adding rounds until your Crochet Basic Granny Square Pattern reaches the size you want. Each new round follows the same basic rules—clusters in the spaces, two clusters in each corner, and chain-two spaces to form strong edges. This repetition makes the process relaxing and intuitive.
One tip for improving your Crochet Basic Granny Square Pattern is to block your finished square. Blocking helps reshape your work and make corners crisp. Simply dampen the square, pin it into shape, and let it dry. This method makes your project look polished and even.
Another helpful tip is weaving ends neatly as you go. If you change colors frequently, you will have multiple yarn tails. Securing them properly prevents unraveling and improves the overall appearance of your granny square. Many crocheters weave ends using a yarn needle for added protection.
Choosing high-quality yarn can make a big difference as well. While beginners often start with inexpensive acrylic yarn, using a soft wool blend or cotton can enhance stitch definition and comfort while crocheting. Experiment with different textures to find your preference.
Keeping spare stitch markers can make your process easier. Marking the beginning of each round helps prevent confusion, especially for beginners still mastering counting and spacing. Having visual markers reduces mistakes and ensures consistency.
Practice also plays an essential role in improving the appearance of your granny squares. The more squares you make, the faster your hands will learn the rhythm of the stitches. Many crocheters notice significant improvement after just a few attempts.
Lastly, don’t be afraid to experiment with variations. The Crochet Basic Granny Square Pattern can be customized with different stitches, colors, or sizes to create unique designs. Once you understand the structure, you can adapt it to your creative taste.
You can use your finished granny squares to make a cozy blanket. This is one of the most popular ways to showcase the Crochet Basic Granny Square Pattern. Making multiple squares in different colors gives your blanket a vibrant and charming patchwork effect.
Granny squares also make wonderful cushions and pillow covers. You can join a few squares together or create a single oversized square. The texture adds warmth and personality to any living space, making it a great handmade décor element.
Fashion lovers enjoy using granny squares to make wearable items. From vests and tops to scarves and handbags, the possibilities are endless. Using the Crochet Basic Granny Square Pattern allows you to blend classic crochet style with modern fashion trends.
Home décor items such as table runners, placemats, and coasters can also be created using granny squares. These smaller projects are perfect for beginners and make great handmade gifts. The versatility of the square opens up numerous creative opportunities.
Another idea is creating toys and accessories. You can assemble squares into stuffed animals, bags, or decorative wall art. Mixing colors and textures allows you to craft one-of-a-kind pieces full of personality and charm.
Finally, granny squares are perfect for using leftover yarn. If you have scraps from previous projects, you can incorporate them into new squares. This sustainable approach reduces waste and leads to colorful, unique designs.
1. Is the Crochet Basic Granny Square Pattern good for beginners?
Yes, it is one of the best beginner-friendly patterns because it uses simple stitches and repetitive steps.
2. How long does it take to make one granny square?
Most people can finish a basic square in 20 to 40 minutes, depending on skill level and size.
3. What yarn is best for granny squares?
Medium-weight yarn is ideal, but you can use any yarn you prefer as long as the hook size matches.
4. Can I change colors in each round?
Yes, color changes are common and add beauty to the final design. Simply join the new color at the beginning of a round.
5. Why does my granny square curl or twist?
This usually happens due to inconsistent tension or missing stitches. Practice and careful counting help improve shape.
6. Can granny squares be joined together easily?
Yes, there are many joining methods, such as whip stitch, slip stitch, or join-as-you-go techniques.
7. How big should a basic granny square be?
There is no fixed size. You can stop at any round to get the dimensions you want.
8. Do I need to block my granny squares?
Blocking is optional, but it helps your squares look even and professional, especially before joining them.
9. Can I use cotton yarn for this pattern?
Definitely. Cotton yarn provides great stitch definition and is perfect for home décor items.
10. What hook size should I use?
Follow the recommendation on your yarn label, but most granny squares use medium-sized hooks.
Creating a Crochet Basic Granny Square Pattern is a wonderful way to practice essential crochet skills, explore color combinations, and build beautiful handmade items. In this article, you learned how to create a classic granny square, perfect it with helpful tips, and apply it to creative projects. I hope this guide has inspired you to start or continue your crochet journey. Please leave your sincere opinion and suggestions—I would love to know what you think and how I can help in future tutorials.


