
Ballerina pencil case with zipper Pattern


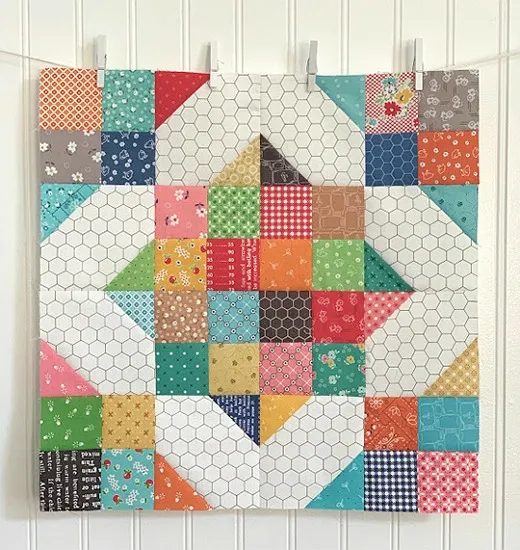
Quilting is a craft that beautifully blends creativity, tradition, and personal expression, and the My Scrappy Cross Roads Block – Tutorial is a perfect example of this. This block brings together the joy of using leftover fabric pieces with a timeless design that looks stunning in any quilt.
By following this tutorial, you’ll not only learn how to construct a visually appealing block but also discover the satisfaction of turning scraps into something meaningful and unique.
The My Scrappy Cross Roads Block – Tutorial is especially appealing because it teaches quilters how to create order from what may seem like random scraps. Instead of letting unused fabric sit in storage, this block offers a fun and structured way to give them new life.
The end result is colorful, vibrant, and filled with character. Each block is slightly different, making your final quilt a patchwork story that reflects your personality and fabric history.
Another reason the My Scrappy Cross Roads Block – Tutorial is so popular is its versatility. Whether you are a beginner learning essential piecing skills or an experienced quilter looking for a playful project, this block has something for everyone. It can be made in bright, bold colors for a modern look or in soft, muted tones for a more traditional feel. The flexibility makes it a must-learn pattern that will inspire countless quilting projects.
To start the My Scrappy Cross Roads Block – Tutorial, gather a collection of fabric scraps. This is the heart of the block, as the variety of colors and prints adds charm and character to the design. Using fabric leftovers ensures that every block is unique and sustainable.
Alongside your scraps, you’ll need background fabric. Choosing a neutral tone, such as white, cream, or light gray, helps the scrappy pieces stand out. This contrast allows the cross roads pattern to emerge clearly, giving structure to the colorful design.
Accurate cutting tools are essential for this block. A rotary cutter, self-healing cutting mat, and quilting ruler will help you cut your pieces to the correct size with precision. Consistency is key in piecing, and sharp tools make the process smoother.
You will also need thread in a neutral shade for piecing. While the thread is less visible in quilting, using high-quality thread prevents tangles and ensures your seams hold securely. Pair this with sharp sewing needles for smooth stitching.
A sewing machine with a quarter-inch foot is highly recommended for this tutorial. The quarter-inch seam is a standard in quilting, and maintaining it throughout your project helps your block come together neatly.
Lastly, an iron and pressing board will be necessary to press seams flat as you sew. Pressing is just as important as stitching, since it helps your block remain even and polished while giving the final project a professional finish.
The first step in the My Scrappy Cross Roads Block – Tutorial is cutting your fabric into the required shapes. Most versions of this block use small squares and rectangles, making it easy to work with even the tiniest of scraps.
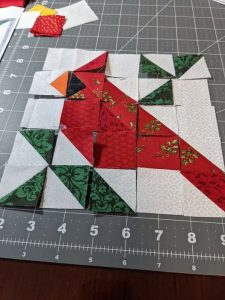
After cutting, start arranging your scraps into the cross roads pattern. This design is created by positioning colorful pieces around a central cross shape. Experiment with different fabric placements until you’re happy with the look.
Once arranged, begin piecing together the smaller sections. Sew the scraps into rows, then join the rows into larger units. Taking your time during this stage ensures accuracy and keeps the design aligned.
After sewing, press your seams carefully. Some quilters prefer pressing seams open, while others press them to one side. Either method works, but consistency will help your block stay flat and easier to assemble with others.
Next, assemble the block by joining the larger sections together. Double-check your alignment as you sew to ensure the cross shape is clear and balanced. A little extra attention here makes a big difference in the finished block.
Finally, give your completed block a final press. At this stage, you should have a neat and vibrant My Scrappy Cross Roads Block – Tutorial ready to be used in quilts, table runners, or other creative projects.
One of the most enjoyable aspects of the My Scrappy Cross Roads Block – Tutorial is experimenting with creative variations. You don’t have to follow traditional fabric choices—you can adapt the design to your personal taste.
For a bold look, use bright scraps with strong contrasts. This makes the block eye-catching and modern, perfect for contemporary quilts. On the other hand, soft pastels or coordinated color schemes create a calmer, more unified appearance.
You can also play with the size of your block. Enlarging the pieces makes the block faster to sew and ideal for larger projects, while reducing the size creates delicate mini-blocks that can be used in smaller crafts.
Adding decorative stitching is another way to personalize your block. Consider using embroidery or quilting stitches to highlight the cross design or add extra texture to your piece. This enhances both the appearance and the tactile quality of the block.
Another variation involves mixing fabrics with different textures. Combining cotton with linen, flannel, or even denim can give the block a unique, tactile feel while still keeping the scrappy aesthetic.
If you’re making a quilt with multiple blocks, consider arranging them in different layouts. Rotating or alternating block directions creates dynamic patterns, transforming a simple block into a visually complex quilt.
The My Scrappy Cross Roads Block – Tutorial is more than just a quilting exercise—it’s a celebration of resourcefulness and creativity. Using scraps makes the process sustainable and economical, giving you a reason to use every piece of fabric in your collection.
This block also teaches valuable quilting skills, such as precise cutting, accurate piecing, and effective pressing. These skills build a foundation that you can apply to countless other quilting projects.
Another reason to try this block is the satisfaction it brings. Watching random scraps come together into a cohesive, structured design is deeply rewarding. It’s a reminder that beauty can be created from even the smallest pieces.
The block is also versatile. Whether you want to make a quilt, pillow, or table runner, the My Scrappy Cross Roads Block – Tutorial adapts easily. It works well in both traditional and modern settings, making it timeless.
Additionally, quilting has therapeutic benefits. Sitting down to piece scraps together can be a calming, meditative process, helping you relax while creating something meaningful.
Most importantly, the finished block becomes part of your quilting story. Each scrap carries a memory, and combining them creates a patchwork that reflects your journey as a quilter.
Q1: Is the My Scrappy Cross Roads Block – Tutorial beginner-friendly?
Yes, it’s perfect for beginners, since it uses basic shapes and simple piecing techniques.
Q2: What size should my scraps be?
Scraps can vary, but you’ll cut them into uniform sizes based on the block instructions. Even small pieces can be used effectively.
Q3: Can I use a sewing machine or hand sew this block?
Both methods work, though a sewing machine will make the process faster and more consistent.
Q4: How do I ensure my blocks are the same size?
Accurate cutting, consistent seam allowances, and careful pressing will help your blocks stay uniform.
Q5: What projects can I use this block for?
It’s ideal for quilts, table runners, pillows, and even tote bags, offering great flexibility.
Q6: Can I mix different fabric types in one block?
Yes, but it’s best to choose fabrics with similar weights to ensure even seams and durability.
The My Scrappy Cross Roads Block – Tutorial is a joyful and practical quilting project that combines creativity with tradition. From gathering scraps to experimenting with variations, every step is a chance to learn, relax, and create something beautiful. This block is beginner-friendly yet versatile enough for advanced quilters to enjoy, making it a timeless pattern worth mastering.
If you try this tutorial, I’d love to hear your thoughts. Share your experiences, ideas, and suggestions—your feedback can inspire others to embark on their quilting journey. Let’s continue celebrating the art of quilting together, one scrappy block at a time.


