Crochet Pig In A Granny Square Blanket Pattern


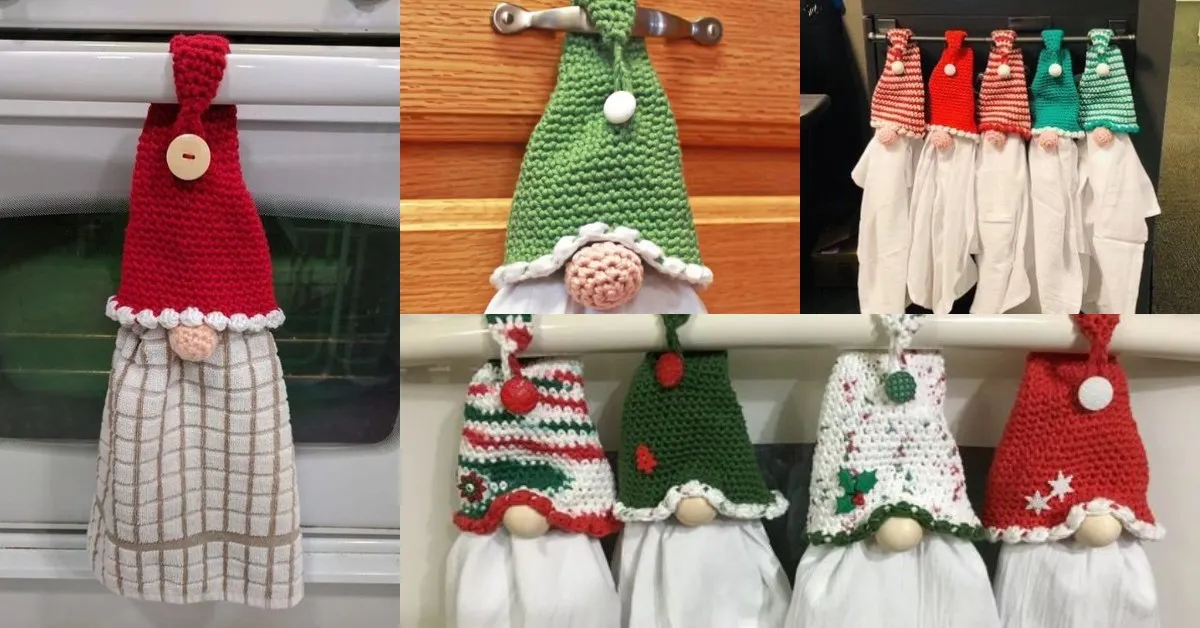
Creating a Gnome Towel Topper Crochet – Tutorial is a delightful way to add a touch of charm to your home décor. Whether you are an experienced crocheter or a beginner, this project provides a fun and rewarding experience.
Crocheting a Gnome Towel Topper Crochet – Tutorial involves patience, attention to detail, and creativity. Each part of the gnome, from the hat to the beard, requires precise stitching to achieve the desired shape.
In addition to being a charming home accessory, a Gnome Towel Topper Crochet – Tutorial can be an excellent conversation starter.
Selecting the right materials is crucial when starting a Gnome Towel Topper Crochet – Tutorial. The type of yarn you choose will affect both the texture and durability of your towel topper. Soft cotton yarn is ideal for the beard, while colorful acrylic yarn works well for the gnome’s hat and body. Choosing the right hook size is also important to ensure your stitches are tight enough to hold the gnome together but loose enough to allow flexibility in shaping.
When preparing for a Gnome Towel Topper Crochet – Tutorial, consider the color palette. Traditional gnome designs often use red, gray, and white, but feel free to experiment with pastels or festive colors depending on the season. Using contrasting colors can help each part of the gnome stand out and make your towel topper more visually appealing.
The choice of yarn weight also matters. For a Gnome Towel Topper Crochet – Tutorial, medium-weight yarn is generally recommended because it balances ease of handling with a firm texture. Light-weight yarn may make the gnome floppy, while bulky yarn could make stitching difficult. Keeping a consistent tension throughout your work ensures that your towel topper maintains its shape.
Additionally, investing in a high-quality crochet hook can make the process smoother and reduce hand fatigue. Ergonomic hooks are ideal for projects like the Gnome Towel Topper Crochet – Tutorial, where you may spend several hours stitching small details. Having all your materials ready before starting ensures a seamless and enjoyable crochet experience.
Finally, having basic crochet tools such as stitch markers, scissors, and a yarn needle will be helpful. These tools make assembling your Gnome Towel Topper Crochet – Tutorial easier and improve the final appearance of your gnome. Taking the time to choose the right materials is an investment in a project you will be proud to display.
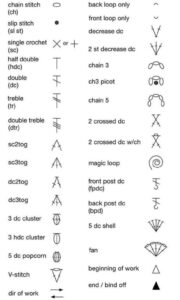
A successful Gnome Towel Topper Crochet – Tutorial relies on mastering fundamental crochet stitches. The primary stitches used in this tutorial include the chain stitch, single crochet, and slip stitch. Learning these basics thoroughly ensures your project progresses smoothly and your gnome has a professional finish.
For beginners, practicing each stitch separately before combining them into your Gnome Towel Topper Crochet – Tutorial is highly recommended. This practice allows you to gain confidence and avoid mistakes in more complex sections like the hat or beard. Understanding stitch placement and tension is key to achieving a consistent appearance.
Once comfortable with basic stitches, you can move on to more advanced techniques used in a Gnome Towel Topper Crochet – Tutorial, such as increasing, decreasing, and working in the round. These techniques are essential for shaping the gnome’s hat and body correctly. Following the tutorial step by step ensures you don’t miss any important instructions.
Another important tip is to count your stitches carefully. In a Gnome Towel Topper Crochet – Tutorial, missing a stitch can alter the proportions and make assembly difficult. Using stitch markers can help you keep track of rounds and maintain symmetry.
It’s also helpful to periodically check your work against the tutorial’s images or diagrams. This visual confirmation allows you to correct any mistakes early and ensures your gnome’s features are accurate. Patience and attention to detail are critical for a successful Gnome Towel Topper Crochet – Tutorial.
Lastly, don’t hesitate to rewind and redo sections if needed. Mastering the stitches for a Gnome Towel Topper Crochet – Tutorial is a learning process, and each attempt improves your skill and confidence.
Assembling your gnome is one of the most satisfying parts of the Gnome Towel Topper Crochet – Tutorial. Once all pieces are completed, you’ll see your hard work come together in a charming, three-dimensional figure. The assembly process includes attaching the beard, hat, body, and any additional embellishments securely.
Begin by attaching the beard to the gnome’s body using a yarn needle. For a neat finish, sew the edges carefully and ensure the beard covers the body symmetrically. This step is crucial in a Gnome Towel Topper Crochet – Tutorial to give your gnome a balanced and polished look.
Next, attach the hat to the top of the gnome. Position it slightly tilted for a whimsical effect, or straight for a classic appearance. In the Gnome Towel Topper Crochet – Tutorial, how you attach the hat can change the character and personality of your gnome, making it uniquely yours.
Adding the arms or hands, if included in your pattern, comes after the hat and beard. Make sure they are securely stitched to withstand handling and movement. A sturdy assembly ensures your Gnome Towel Topper Crochet – Tutorial lasts longer and remains a decorative piece for years.
You may also consider adding embellishments such as buttons, ribbons, or embroidery to personalize your gnome. These small details can enhance the charm of your Gnome Towel Topper Crochet – Tutorial and make it a standout item in your home.
Finally, review all connections and seams. Tighten any loose stitches and ensure that the gnome stands firmly when placed on a towel or hook. A careful assembly process elevates your Gnome Towel Topper Crochet – Tutorial from simple crochet to a professional decorative accessory.
Caring for your Gnome Towel Topper Crochet – Tutorial is essential to maintain its beauty and longevity. Since this piece will often be exposed to moisture in kitchens or bathrooms, proper care ensures it remains clean and intact.
Hand washing your towel topper in cold water with a mild detergent is recommended. Avoid wringing the gnome, as this can distort its shape. Gently press the water out and reshape each part before laying it flat to dry. This care routine preserves the quality of your Gnome Towel Topper Crochet – Tutorial.
Avoid direct sunlight during drying to prevent color fading. Bright colors in your Gnome Towel Topper Crochet – Tutorial can lose vibrancy if exposed to UV light for prolonged periods. Storing the gnome in a cool, dry place between uses helps maintain its structure.
Regularly inspect your towel topper for loose threads or stitches. Repairing any minor damages early prevents larger problems and keeps your Gnome Towel Topper Crochet – Tutorial looking new.
If your gnome accumulates dust, a gentle brush or a quick vacuum with a soft attachment is effective. These maintenance tips ensure your Gnome Towel Topper Crochet – Tutorial continues to delight for years.
Finally, avoid using harsh chemicals or bleach on your towel topper. Gentle handling and proper storage are key to enjoying your Gnome Towel Topper Crochet – Tutorial as a decorative and functional piece.
Q1: Is this tutorial suitable for beginners?
Yes, the Gnome Towel Topper Crochet – Tutorial is designed to be accessible for beginners, with step-by-step instructions and clear images.
Q2: How long does it take to complete one gnome?
Depending on your experience, it may take 3–6 hours to finish a gnome using this Gnome Towel Topper Crochet – Tutorial.
Q3: Can I use different yarn types?
Absolutely. Cotton yarn is ideal for beards, while acrylic works well for hats and bodies. Choose yarns according to your preferences.
Q4: How do I keep the gnome stable on the towel?
Ensure the gnome’s body is stitched tightly and the towel is folded securely. Adding a small rubber band or button can enhance stability.
Q5: Can I make different sizes of gnomes?
Yes, adjusting the yarn thickness and hook size allows you to create larger or smaller versions of your Gnome Towel Topper Crochet – Tutorial.
Q6: How do I clean the gnome without damaging it?
Hand wash in cold water with mild detergent, reshape, and lay flat to dry. Avoid wringing or using bleach.
In this Gnome Towel Topper Crochet – Tutorial, you have learned how to select the right materials, master essential stitches, assemble the gnome, and care for your finished towel topper.
This tutorial provides a fun, creative project that can enhance your home décor and be a meaningful handmade gift. We encourage you to share your results, leave honest feedback, and suggest any improvements.


