Crochet Pig In A Granny Square Blanket Pattern


The Snowman Christmas Crochet Stocking – Free Tutorial is the perfect project for anyone who wants to combine creativity, festive spirit, and a love for handmade crafts.
One of the best things about making a Snowman Christmas Crochet Stocking is the opportunity to practice and showcase different crochet techniques.
Another reason why this Snowman Christmas Crochet Stocking – Free Tutorial is so special is that it represents more than just decoration.
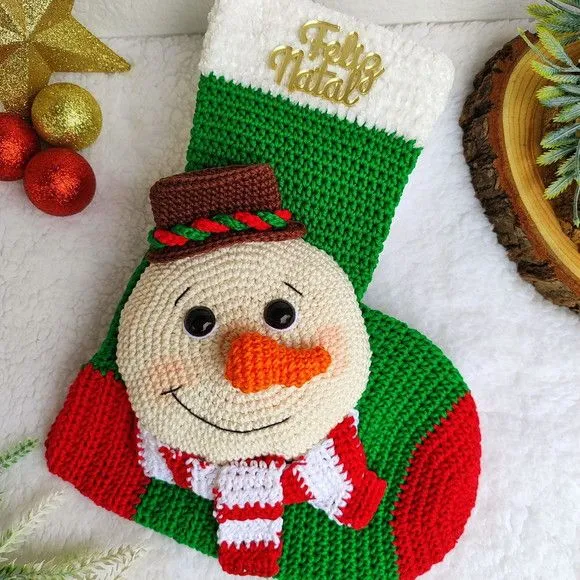
When preparing to start your Snowman Christmas Crochet Stocking – Free Tutorial, it is essential to gather all the necessary materials. The right supplies will make your project easier and ensure that the finished piece is sturdy and visually appealing. Soft acrylic yarn is a popular choice because it is durable, washable, and available in a wide variety of festive colors. White yarn is typically used for the snowman, while red, green, and black yarn can add traditional Christmas details.
A good crochet hook is equally important for this project. The recommended size usually depends on the yarn weight, but most tutorials suggest a hook size between 4.0 mm and 5.5 mm for this type of stocking. Choosing the right hook size helps keep stitches even and consistent, which is crucial for achieving a neat snowman design. Additionally, having extra hooks on hand can be useful in case you prefer experimenting with tension.
You will also need scissors, a tapestry needle, and stitch markers. Scissors ensure clean yarn cuts, while a tapestry needle allows you to weave in loose ends and securely attach details like buttons, eyes, or scarves for the snowman. Stitch markers are optional but highly recommended to keep track of rounds and maintain symmetry.
For the snowman’s facial features, small buttons or safety eyes can be added. Felt fabric or embroidery thread may also be used to create expressive details, giving each snowman a unique personality. Personal touches like glitter yarn or sparkly embellishments can add a magical effect to the stocking.
Another important detail is the stocking hanger. A small crochet loop at the top will make it easy to hang your stocking on a mantel or near the Christmas tree. Using strong yarn for this loop is essential to prevent stretching or breaking, especially once the stocking is filled with gifts.
Finally, it is a good idea to prepare a comfortable workspace with good lighting. Crocheting intricate designs like a snowman requires attention to detail, and a well-organized setup will make the process enjoyable and stress-free.
To begin your Snowman Christmas Crochet Stocking – Free Tutorial, you’ll first crochet the stocking base. This usually starts at the toe and works upward, although some patterns begin at the top cuff. Working in continuous rounds helps create a seamless look. The stocking body should be made using double crochet or half-double crochet stitches, as they provide a strong and flexible fabric.
Once the base is complete, the next step is shaping the heel. The heel may look challenging, but it is simply a matter of increasing and decreasing stitches strategically. Following the tutorial instructions carefully ensures that your stocking keeps its traditional shape while remaining comfortable to fill with goodies. Beginners should take their time here, as it is one of the most crucial parts of the stocking’s construction.
After shaping the heel, you will continue crocheting the leg of the stocking. This section provides an opportunity to add festive colors such as red or green stripes. You can personalize the design by alternating colors or adding textured stitches like bobbles or shells. This makes each stocking unique, even when using the same pattern.
Once the stocking body is complete, you will move on to creating the snowman design. This usually involves crocheting separate small pieces such as circles for the snowman’s body, a small scarf, and a carrot-shaped nose. These pieces are then sewn or attached onto the stocking front. The snowman brings life and charm to the stocking, transforming it from simple décor to a holiday centerpiece.
Adding the cuff at the top is another essential step. A ribbed cuff not only enhances the stocking’s appearance but also makes it sturdier. This is also the part where you will add the loop hanger. Taking care with the finishing details ensures your stocking is durable and visually striking.
The final step is assembling and securing all pieces. Attach the snowman, embroider facial details if desired, and check for any loose ends. Once finished, step back and admire your handmade holiday masterpiece.
The Snowman Christmas Crochet Stocking – Free Tutorial is highly customizable, which means you can adjust the design to reflect your personal style. For example, instead of a traditional white snowman, you could use sparkly white yarn to create a shimmering effect. Adding small sequins or beads can also bring extra festive sparkle.
One creative idea is to make the snowman wear different accessories. A colorful scarf, a tiny crochet hat, or even earmuffs can make each stocking snowman unique. Children especially love these small details, and each stocking can be tailored to match a family member’s personality.
You can also experiment with the stocking size. While the standard size is large enough for treats, creating smaller versions can serve as decorative ornaments for the Christmas tree. Mini stockings with snowman designs can also be used as gift tags or holiday party favors.
For those who enjoy embroidery, personalizing the stocking with names is a beautiful touch. Using surface crochet or embroidery thread, you can add initials or full names at the top cuff. This makes each stocking not only decorative but also meaningful.
Another way to personalize is through color variations. While red, green, and white are traditional, you can use pastel colors for a softer winter look or metallic yarn for a more glamorous design. The possibilities are endless, and creativity makes the process more enjoyable.
Lastly, consider pairing your snowman stocking with other handmade holiday items. A matching crochet garland, Christmas pillows, or even a snowman amigurumi can create a cohesive festive theme in your home.
This Snowman Christmas Crochet Stocking – Free Tutorial is suitable for all skill levels, but beginners may find some parts challenging. To make the process easier, it’s important to practice basic stitches beforehand. Mastering single crochet, double crochet, and slip stitches will provide a strong foundation for this project.
Beginners should also focus on keeping tension consistent. Uneven stitches can affect the stocking shape, so practicing with scrap yarn before starting the final project can be very helpful. Using stitch markers is another useful tip to avoid losing track of rounds, especially in the heel and toe sections.
For advanced crocheters, this tutorial is an opportunity to add complexity. Intricate stitch patterns like cables or lace can be integrated into the stocking leg, while 3D details such as puff stitches can bring texture to the snowman’s scarf or hat. Advanced techniques make the project more challenging but also more rewarding.
Time management is another important tip. Although this is a fun holiday project, it can take several hours to complete, especially for larger stockings. Setting aside small amounts of time each day will make the process more relaxing and enjoyable instead of stressful.
Blocking the finished stocking is a recommended step for both beginners and advanced crafters. Blocking helps the stocking keep its shape, smooths out stitches, and ensures the snowman design lays flat and neat. A well-blocked stocking looks polished and professional.
Finally, don’t be afraid to experiment. Crocheting is a creative art, and every small modification adds personality to your project. Whether you are a beginner or experienced, the goal is to enjoy the process and create something meaningful for the holiday season.
1. How long does it take to make a Snowman Christmas Crochet Stocking?
It usually takes between 6 to 12 hours, depending on your crochet speed and the level of detail you include in the snowman design.
2. Is this project suitable for beginners?
Yes, the Snowman Christmas Crochet Stocking – Free Tutorial is beginner-friendly, though it requires patience for shaping the heel and attaching the snowman details.
3. What type of yarn works best for this stocking?
Acrylic yarn is highly recommended because it is durable, washable, and available in festive colors. Cotton yarn can also work, but it may not provide the same stretch.
4. Can I personalize the snowman design?
Absolutely! You can add scarves, hats, or even embroidery to make each snowman unique and match the personality of your family members.
5. How can I make the stocking stronger for holding gifts?
Using tighter stitches, a ribbed cuff, and strong yarn for the hanging loop ensures your stocking will hold gifts without stretching.
6. Do I need special tools to make this stocking?
No special tools are required, only basic crochet supplies such as yarn, hooks, scissors, and a tapestry needle. Optional items like buttons or safety eyes can enhance the snowman design.
The Snowman Christmas Crochet Stocking – Free Tutorial is more than just a craft project—it is a way to create lasting memories and traditions.
By following this guide, you will learn how to crochet a beautiful stocking, personalize it with creative touches, and enjoy the satisfaction of a handmade holiday decoration.
Whether you are making it for yourself, your family, or as a thoughtful gift, this stocking will bring joy for many years. Share your honest opinion and suggestions after trying this tutorial, and let your creativity shine during the holiday season.


