
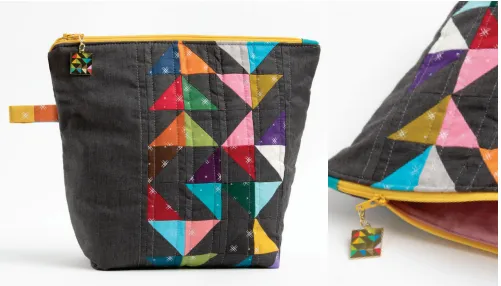
Ballerina pencil case with zipper Pattern


Whether you are looking to make a stylish accessory for yourself, a functional organizer, or a thoughtful gift, this guide will help you understand the process of sewing a zipper bag from scratch.
The versatility of a zipper bag makes it a must-have item in any sewing enthusiast’s collection. You can use it for cosmetics, stationery, travel essentials, or even as a small purse.
Using a ZIPPER BAG – FREE PATTERN is also a fantastic way to practice your sewing skills. Beginners can learn how to insert zippers, handle different types of fabric, and create neat seams.
To begin your ZIPPER BAG – FREE PATTERN project, gathering the right materials is essential. The basic supplies include fabric, lining, interfacing, and a zipper. Choose a durable fabric that suits the bag’s purpose, such as cotton, canvas, or faux leather. Lining fabric ensures your bag’s interior is neat and provides extra strength. Interfacing can be used to give the bag structure and stability. A matching or contrasting zipper adds both function and visual appeal.
Having the proper sewing tools is just as important. You will need a sewing machine, pins, fabric scissors, a measuring tape, and an iron. These tools will make cutting, sewing, and pressing your pieces much easier. Accurate measurements and straight seams ensure your finished zipper bag looks professional and lasts for years. Following a free pattern ensures all materials are accounted for and used efficiently.
Selecting the right zipper is crucial for both aesthetics and functionality. A standard nylon or metal zipper works well for most projects. Consider the zipper length based on your bag’s size. Ensure the zipper slider moves smoothly and that it complements your fabric choice. Proper zipper placement is key to making a functional bag, and a free pattern guides you on exactly where and how to sew it.
Choosing additional embellishments can make your zipper bag unique. You might add a decorative pull, applique, or embroidery to personalize your bag. Small accessories like keychain loops or inner pockets can increase usability. Using the ZIPPER BAG – FREE PATTERN as a base allows you to experiment without starting from scratch. Each choice enhances your bag’s design while maintaining practicality.
Sewing a ZIPPER BAG – FREE PATTERN begins with preparing your fabric and pattern pieces. First, wash and iron your fabric to prevent shrinkage. Then, cut your fabric according to the pattern, ensuring each piece matches precisely. Accurate cutting is essential for the bag to align correctly during assembly. Take your time to check measurements and symmetry before starting to sew.
Start with the zipper installation, which is often the most challenging part for beginners. Place the zipper face down on the right side of the fabric, align it carefully, and pin in place. Using a zipper foot on your sewing machine, sew along the edge of the zipper. Repeat this process for the other side of the bag. Following a free pattern ensures you place the zipper correctly without errors.
After the zipper is installed, attach the lining and main fabric together. Sew around the edges, leaving a small opening to turn the bag right side out. Press the seams with an iron for a neat finish. Once turned, close the opening with a hand stitch or topstitch to complete the bag. Each step is designed to make the process smooth and stress-free.
Adding finishing touches enhances both function and appearance. Topstitching around the zipper gives a professional look and strengthens the seam. Optional pockets or compartments can be sewn inside to organize contents. Decorative stitching, patches, or embroidery can personalize your zipper bag. The ZIPPER BAG – FREE PATTERN allows flexibility for customization.
Check your bag for quality and durability. Test the zipper, inspect seams, and ensure the lining is secure. Small adjustments can prevent issues and extend your bag’s lifespan. By following these detailed instructions and using a free pattern, even beginners can achieve a polished, professional result.
Customizing your ZIPPER BAG – FREE PATTERN allows you to express your creativity. Start by choosing fabric patterns and colors that reflect your personal style. Bold prints, subtle tones, or textured materials can all create unique results. Experimenting with color combinations adds interest while maintaining the bag’s functionality.
Adjusting the bag size is another way to customize. Use the free pattern as a base and scale it up or down depending on your needs. Smaller bags are perfect for coins or cosmetics, while larger versions can carry books or tablets. Always maintain proportional measurements to ensure your bag remains practical and balanced.
Adding pockets or compartments increases usability. Inner pockets help organize items, while external pockets provide quick access to essentials. Using the ZIPPER BAG – FREE PATTERN, you can design a layout that suits your lifestyle. Strategic pocket placement ensures convenience without sacrificing aesthetics.
Decorative elements make your bag visually appealing. Add embroidery, appliques, or badges for personalization. Use contrasting fabrics for the zipper, lining, or handles to create a striking design. The ZIPPER BAG – FREE PATTERN serves as a foundation for creative expression while ensuring structure and durability.
Experimenting with different zipper styles can enhance both form and function. Exposed zippers create a modern look, while hidden zippers offer a sleek finish. Decorative pulls or charms add a touch of personality. Using the free pattern ensures zipper placement is accurate regardless of style choice.
Consider the bag’s intended use when customizing. A travel bag may require sturdier fabric and additional compartments, while a cosmetic bag can be lightweight and colorful. Functionality and design should work together. Following the ZIPPER BAG – FREE PATTERN ensures all customizations maintain the bag’s usability and aesthetic appeal.
One common mistake is inaccurate cutting of fabric. Even small errors can lead to misaligned seams and a poorly fitted zipper. Always double-check measurements and cut precisely. Using a ZIPPER BAG – FREE PATTERN reduces this risk by providing clear cutting guidelines.
Skipping interfacing is another frequent issue. Interfacing adds structure and prevents fabric from sagging or wrinkling. Ensure it is applied correctly to the main fabric pieces. The free pattern includes instructions for when and where to use interfacing for optimal results.
Incorrect zipper placement can ruin the bag’s functionality. Always follow the pattern instructions for aligning the zipper. Pinning carefully and sewing slowly ensures the zipper operates smoothly. A ZIPPER BAG – FREE PATTERN guides you step by step to avoid this problem.
Neglecting seam allowances is a mistake that can affect bag size and durability. Always follow the recommended seam allowance in the free pattern to maintain proper proportions. Pressing seams with an iron after sewing helps achieve a professional finish.
Not testing the bag’s functionality before finishing can lead to disappointment. Open and close the zipper multiple times, check pocket placement, and ensure the lining is secure. Following the ZIPPER BAG – FREE PATTERN carefully prevents these last-minute issues.
Rushing through the sewing process is a major error. Take your time with each step to ensure accuracy and a neat finish. Using a free pattern as a guide allows you to pace yourself without worrying about missing steps. Patience ensures a high-quality, long-lasting bag.
Q: What fabrics work best for a zipper bag?
A: Durable fabrics like cotton, canvas, denim, or faux leather work best. Lightweight fabrics can be used for decorative bags but may need interfacing for stability.
Q: Can beginners use a zipper bag free pattern?
A: Absolutely. Most free patterns include step-by-step instructions, making it suitable for beginners while also allowing advanced crafters to customize.
Q: How do I choose the right zipper size?
A: Measure the length of your bag and select a zipper slightly longer than the opening. Follow the pattern instructions to ensure proper placement.
Q: Can I customize the bag’s size?
A: Yes. Scale the free pattern up or down while keeping proportions in mind. Adjust seam allowances and zipper length accordingly.
Q: Do I need interfacing?
A: Interfacing is recommended for structure, especially with lightweight fabrics. The pattern will indicate which pieces require interfacing.
Q: How can I add pockets or compartments?
A: Follow the pattern’s basic design and add extra pieces for pockets. Sew them onto the main fabric or lining before assembly.
In this article, we explored the complete process of creating a ZIPPER BAG – FREE PATTERN, from selecting materials and cutting fabric to sewing and customizing your bag.
We covered essential tips, step-by-step instructions, and common mistakes to avoid, ensuring your project is both enjoyable and successful.
Now that you have all the tools and knowledge, you can confidently create your own zipper bag, experiment with fabrics, and add unique touches to make it truly yours.
Please leave your honest opinion and suggestions about this guide. Your feedback helps improve future tutorials and inspires even more creative sewing projects.


