Crochet Pig In A Granny Square Blanket Pattern


The LITTE CHICKEN CROCHET PATTERN is a delightful and charming project for crochet enthusiasts of all skill levels. Whether you are a beginner or an experienced crocheter, this pattern brings joy and creativity to your crafting sessions.
Crocheting a little chicken using this pattern is not only fun but also therapeutic. Many people find that working on small crochet projects like this reduces stress and stimulates creativity.
Additionally, the LITTE CHICKEN CROCHET PATTERN is perfect for creating a collection of small crochet animals. You can experiment with different colors, yarn types, and embellishments to give each chicken a unique personality.
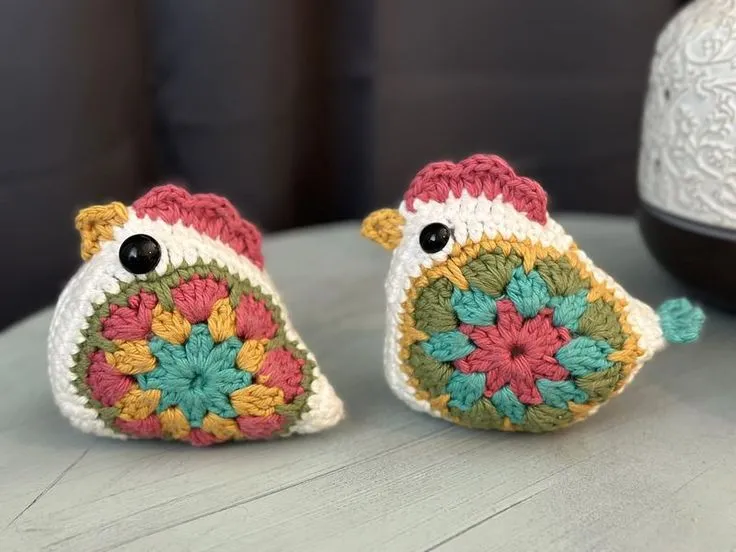
To start your LITTE CHICKEN CROCHET PATTERN, you will need a few essential materials. First, choose a soft, medium-weight yarn in colors suitable for your chicken design. Popular choices include yellow for the body, orange for the beak and feet, and red for the comb. Selecting high-quality yarn ensures a smooth crochet experience and a professional-looking final product.
Next, a crochet hook of the recommended size is crucial. The LITTE CHICKEN CROCHET PATTERN typically uses a 3.5mm or 4mm hook for best results. Using the correct hook size helps maintain proper tension and ensures that your stitches are consistent throughout the project. Maintaining even tension is key to achieving a well-shaped, firm little chicken.
You will also need basic accessories such as stitch markers, a yarn needle, and stuffing material. Stitch markers help keep track of rounds, while a yarn needle is essential for sewing pieces together and weaving in ends. Soft polyester fiberfill or cotton stuffing ensures your little chicken has a plump, huggable appearance once finished.
Safety eyes or small black beads are optional but recommended for giving your chicken a lively expression. If making this project for children, consider using embroidered eyes instead of small parts to avoid choking hazards. Overall, gathering all these materials beforehand makes the crocheting process smooth and enjoyable.
Starting your LITTE CHICKEN CROCHET PATTERN requires patience and attention to detail. Begin by crocheting the body using basic stitches such as single crochet, increases, and decreases. Follow the round-by-round instructions carefully to create a well-proportioned chicken body. Each round builds on the previous one, gradually forming the classic rounded shape.
Once the body is complete, move on to the wings and tail. These small appendages are usually crocheted separately and sewn onto the main body. By using contrasting colors, you can highlight the wings and tail, making your chicken visually appealing. The LITTE CHICKEN CROCHET PATTERN encourages creativity, so you can experiment with patterns and textures in these sections.
The head and comb are next in this pattern. A well-shaped head adds personality to your little chicken. Crochet the comb with red yarn, using small stitches to ensure it sits firmly atop the head. Attach it carefully to avoid uneven placement. This attention to detail helps your finished chicken look professional and adorable.
The beak and feet are small yet important details in the LITTE CHICKEN CROCHET PATTERN. Use bright orange yarn to make these features stand out. The beak can be created with a few simple stitches, while the feet may require shaping techniques such as folding and stitching to achieve a three-dimensional look. Correct placement of these elements ensures your chicken looks balanced and cute.
Finally, assemble all pieces carefully, sewing them securely with a yarn needle. Stuff the body firmly but not too tightly, allowing the little chicken to remain soft and huggable. Check all seams for stability, ensuring your crocheted chicken can withstand gentle handling. This final step completes your LITTE CHICKEN CROCHET PATTERN, leaving you with a charming finished project ready for display or gifting.
The LITTE CHICKEN CROCHET PATTERN can be personalized in countless ways to make each creation unique. One popular method is to change the color palette. Instead of the traditional yellow, consider using pastel or multicolored yarn for a whimsical effect. Customizing colors allows your chickens to match different decor styles or seasonal themes.
Adding accessories is another way to enhance your little chicken. Tiny bows, hats, or scarves can give each piece its own character. For example, you could crochet a small Easter bonnet or a winter scarf to create themed decorations. These little additions make the LITTE CHICKEN CROCHET PATTERN perfect for gifts and seasonal displays.
Experimenting with yarn textures can also transform the appearance of your chicken. Fuzzy or boucle yarn adds a soft, fluffy texture, while smooth cotton yarn gives a more structured look. Trying different yarns can teach you new crochet techniques and expand your skill set, all while maintaining the charm of the original pattern.
Adjusting the size of your little chicken is another customization option. By using thicker or thinner yarn and corresponding hook sizes, you can create miniature or larger chickens. This flexibility allows you to craft a full set of chickens in varying sizes, perfect for storytelling, nursery decor, or gift sets.
Personalizing facial expressions is a subtle yet effective way to bring your little chicken to life. Adjust the placement and size of the eyes, or try embroidered details to create smiles or quirky expressions. The LITTE CHICKEN CROCHET PATTERN is versatile, allowing you to make each piece uniquely expressive and endearing.
Lastly, mixing patterns and combining techniques from other small crochet animals can inspire creativity. You can integrate elements from other amigurumi patterns to develop a hybrid style. This experimentation keeps the LITTE CHICKEN CROCHET PATTERN engaging for experienced crocheters and encourages beginners to develop their skills.
Even experienced crocheters may encounter challenges when following the LITTE CHICKEN CROCHET PATTERN. One common mistake is uneven tension, which can distort the chicken’s shape. Maintaining consistent tension ensures that each stitch is uniform and the finished project looks professional.
Another issue is incorrect stitch count, which can occur when skipping or adding stitches unintentionally. Using stitch markers and carefully counting rounds can prevent this problem. Following the pattern step by step is crucial to achieving the correct proportions in your little chicken.
Misplaced or loosely attached pieces, such as wings, beak, or comb, can also affect the final appearance. Always double-check placement before sewing pieces together, and use secure stitches to attach each part. Proper assembly is essential for the durability and aesthetics of your crocheted chicken.
Choosing inappropriate yarn or hook sizes can result in a chicken that is too floppy or too stiff. Stick to recommended materials in the LITTE CHICKEN CROCHET PATTERN or adjust carefully to maintain balance and shape. Testing a small swatch before starting the project helps ensure compatibility.
Neglecting stuffing is another common error. Too little stuffing can make the chicken look deflated, while too much can stretch the stitches and distort its shape. Add stuffing gradually and evenly to achieve a soft but firm result.
Finally, rushing through finishing touches can reduce the overall quality of your project. Take your time weaving in ends, sewing pieces securely, and adjusting features for symmetry. Patience during the final steps makes a significant difference in the polished look of your LITTE CHICKEN CROCHET PATTERN.
Q: Is the LITTE CHICKEN CROCHET PATTERN suitable for beginners?
A: Yes, this pattern is designed for crocheters of all skill levels, with clear step-by-step instructions and simple stitches. Beginners can follow it successfully with a bit of patience.
Q: What type of yarn is best for this pattern?
A: Medium-weight yarn in soft textures works best. Common choices are acrylic or cotton blends, which provide structure and a smooth finish.
Q: Can I make the chicken in different sizes?
A: Absolutely. Adjusting yarn thickness and hook size allows you to create smaller or larger chickens while maintaining the pattern’s proportions.
Q: Are there any safety considerations for making this for children?
A: Yes. For young children, use embroidered eyes instead of beads or safety eyes to prevent choking hazards.
Q: How can I customize my little chicken?
A: You can change colors, add accessories like hats or scarves, modify facial expressions, or use different yarn textures to give each chicken a unique personality.
Q: How long does it take to complete one chicken?
A: Depending on your skill level and speed, it can take anywhere from 2 to 5 hours to finish one chicken. Beginners may need more time.
Throughout this guide, we’ve covered the materials needed, step-by-step instructions, tips for customization, and common mistakes to avoid.
Crocheting this little chicken also provides opportunities to experiment with colors, textures, and sizes, allowing for endless creativity. Remember, patience and attention to detail are key to achieving the best results.
We encourage you to share your creations, leave your honest opinions, and suggest ideas for new projects. Your feedback helps improve the craft community and inspires others to try the LITTE CHICKEN CROCHET PATTERN.


