
Ballerina pencil case with zipper Pattern


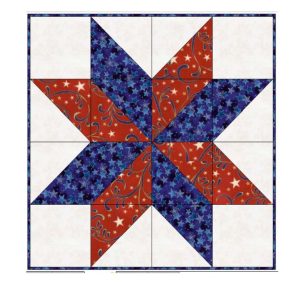
The Twisted Quilt Block – Tutorial is a fun and creative guide for quilters of all levels who want to bring a unique twist to their quilting projects.
The Twisted Quilt Block – Tutorial highlights how a simple twist in the fabric placement can transform an ordinary block into a remarkable centerpiece.
One of the main benefits of following the Twisted Quilt Block – Tutorial is that it encourages experimentation with different color schemes and patterns.
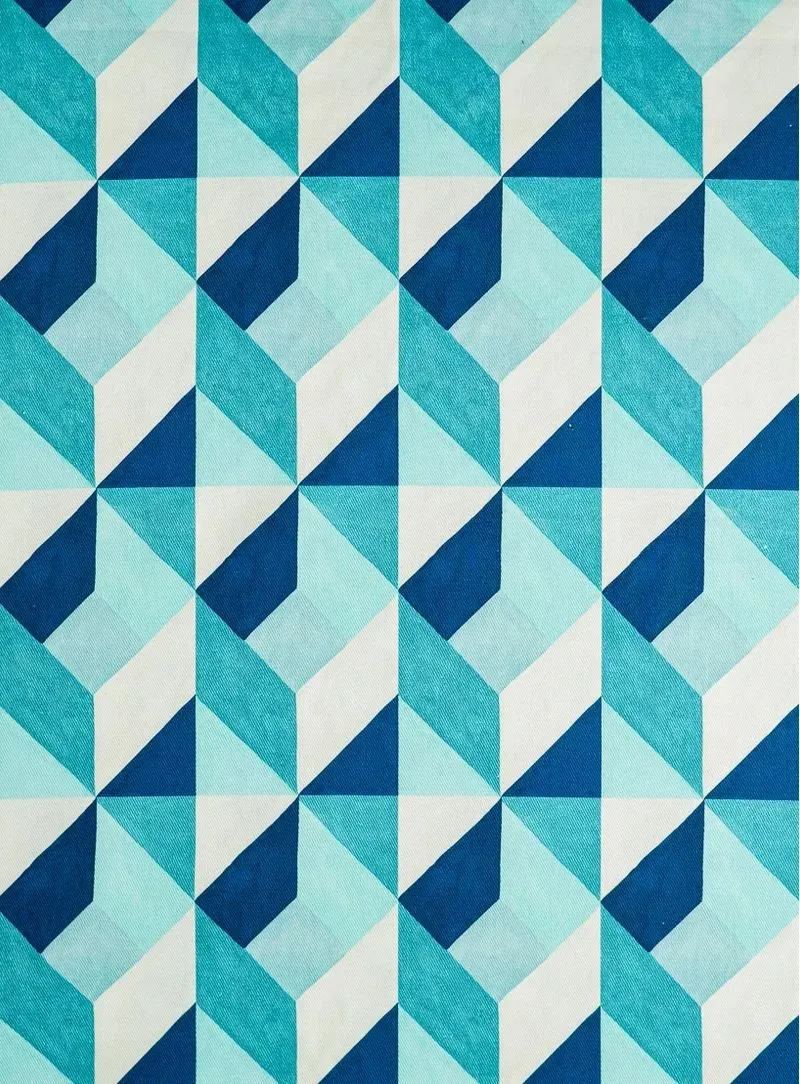
The Twisted Quilt Block – Tutorial begins with understanding the structure of the twisted block. Each block consists of geometric shapes arranged in a way that creates a visually appealing twist. The key to mastering this block is learning how to cut, position, and stitch the fabric pieces accurately. This section will break down the components and techniques used in constructing the twisted block.
The first step in creating a Twisted Quilt Block is selecting fabrics that complement each other. Contrasting colors often highlight the twist pattern, while harmonized tones create subtle sophistication. This tutorial suggests using at least three different fabrics to achieve depth. Ensure that your fabric pieces are cut with precision; even minor inaccuracies can affect the final alignment of your block.
Next, pay attention to the layout of your pieces. The twist effect is achieved by strategically placing triangles and squares in a specific sequence. Laying out the block before sewing allows you to visualize the finished design and make adjustments if necessary. This approach is emphasized throughout the Twisted Quilt Block – Tutorial to minimize mistakes and improve the overall outcome.
Proper seam allowance is essential when constructing the Twisted Quilt Block. Most quilters use a standard ¼-inch seam, which ensures that the pieces fit together neatly. This tutorial includes tips on how to maintain consistent seam allowances, which is crucial for achieving the desired twist effect. Using a consistent seam guide on your sewing machine can make this step easier.
Pressing the seams correctly is another important aspect covered in the Twisted Quilt Block – Tutorial. Pressing each seam as you sew prevents bulkiness and ensures that the block lies flat. Some quilters prefer pressing seams open, while others press to the side. Experimenting with both methods will help you determine which produces the best results for your fabric type and design.
Finally, assembling the pieces is where the magic of the Twisted Quilt Block happens. Follow the tutorial’s step-by-step instructions to stitch each segment together carefully. Checking the alignment frequently ensures that the twist appears as intended. With patience and precision, your Twisted Quilt Block will come together beautifully.
Choosing the right fabrics is a crucial part of the Twisted Quilt Block – Tutorial. The colors, textures, and patterns you select can enhance or diminish the visual impact of your quilt block. This section provides guidance on fabric selection and color coordination to make your quilt block truly stand out.
Consider using fabrics with varying shades to create depth. Light, medium, and dark tones in a single block can emphasize the twist and create a three-dimensional effect. This tutorial highlights how strategic placement of colors enhances the twist pattern and adds visual interest.
Textures also play an important role in the Twisted Quilt Block. Mixing smooth cottons with slightly textured fabrics can provide subtle contrasts. This tutorial explains how to balance textures without making the block look busy or chaotic.
When selecting patterns, it’s important to avoid overly complex prints that may distract from the twist design. Simple geometric prints, stripes, or small florals are ideal for maintaining the block’s integrity. The Twisted Quilt Block – Tutorial emphasizes that harmony between fabric patterns ensures that the twist effect remains the focal point.
Another tip is to test fabric combinations before cutting. Lay out the pieces in the proposed arrangement to visualize how the colors interact. This step is recommended in the Twisted Quilt Block – Tutorial to prevent errors and ensure a balanced appearance.
Finally, pre-washing your fabrics is essential. It prevents shrinkage and color bleeding, which could distort your Twisted Quilt Block. Following this simple preparation step guarantees a polished and professional-looking quilt block.
Accurate cutting and sewing are critical components of the Twisted Quilt Block – Tutorial. This section explains how to achieve precise cuts and consistent stitching to create perfect twisted blocks.
Start by using a rotary cutter, ruler, and cutting mat. The tutorial recommends cutting each piece carefully to the required size to ensure all segments fit together seamlessly. Even small deviations can affect the overall twist effect.
Sewing each segment requires consistent seam allowances. The Twisted Quilt Block – Tutorial suggests using a ¼-inch seam, which is standard in quilting. Maintaining this measurement is key to aligning the pieces correctly.
Pinning or using fabric clips can prevent pieces from shifting while sewing. This technique is emphasized in the tutorial to keep the block neat and organized. Avoid rushing this step, as precision is more important than speed.
Pressing the seams is another essential step. The tutorial offers guidance on pressing seams open or to one side, depending on your preference and the fabric type. Proper pressing ensures that the block lies flat and the twist effect is visible.
Assembling the block involves sewing smaller units together. The Twisted Quilt Block – Tutorial provides step-by-step instructions to align the corners accurately, creating the signature twisted look. Take your time and check each seam carefully before moving to the next step.
Finally, inspecting the finished block is crucial. Correct any minor misalignments and trim excess threads. This attention to detail guarantees that your Twisted Quilt Block is neat, professional, and ready to be incorporated into larger quilt projects.
The Twisted Quilt Block – Tutorial is not just about technique; it also inspires creativity. Once you master the basic block, there are numerous ways to incorporate it into your quilting projects.
Consider creating a quilt using multiple Twisted Quilt Blocks in varying color schemes. Alternating blocks with light and dark fabrics can create an eye-catching quilt with dynamic movement.
You can also experiment with combining twisted blocks with other traditional quilt blocks. This approach adds variety and complexity to your projects, making your quilts unique and memorable.
Miniature twisted blocks are ideal for table runners, placemats, or pillow covers. The tutorial suggests adapting the block size to suit different projects while maintaining the twist effect.
Adding embellishments such as appliqué, embroidery, or quilting motifs can enhance the design further. The Twisted Quilt Block – Tutorial encourages personalization to make each block truly yours.
Using the block as a centerpiece in a larger quilt is another creative idea. Surrounding the twisted block with simpler blocks highlights its intricate design and draws attention to its unique pattern.
Finally, gifting quilts made with Twisted Quilt Blocks is a thoughtful way to share your craft. Friends and family will appreciate the effort and creativity put into these handmade treasures.
Q: Is the Twisted Quilt Block suitable for beginners?
A: Yes, the Twisted Quilt Block – Tutorial is designed for both beginners and experienced quilters. Clear instructions and step-by-step guidance make it accessible to all skill levels.
Q: What fabrics are best for a Twisted Quilt Block?
A: Cotton fabrics with varying shades and simple patterns are ideal. Pre-washing fabrics is recommended to prevent shrinkage and color bleeding.
Q: How do I maintain consistent seam allowances?
A: Using a ¼-inch seam guide on your sewing machine ensures accuracy. Pinning pieces before sewing also helps maintain consistent seams.
Q: Can I combine twisted blocks with other quilt patterns?
A: Absolutely. Mixing twisted blocks with traditional quilt blocks can create visually interesting designs and enhance your quilt’s uniqueness.
Q: What projects can I use the Twisted Quilt Block for?
A: These blocks are versatile. They can be used for quilts, pillow covers, table runners, wall hangings, and more. Adjust block sizes for different applications.
Q: How do I fix misaligned seams?
A: Carefully unpick the stitching and realign the pieces. Press seams flat before resewing to maintain a polished look.
In this Twisted Quilt Block – Tutorial, we explored everything from fabric selection and color coordination to precise cutting, sewing, and creative applications.
You now have the knowledge to create beautiful, professional-looking twisted quilt blocks that can be used in a variety of projects.
Your feedback and suggestions are valuable, so please share your honest opinion and any creative ideas you have after completing your project.


