Crochet Pig In A Granny Square Blanket Pattern


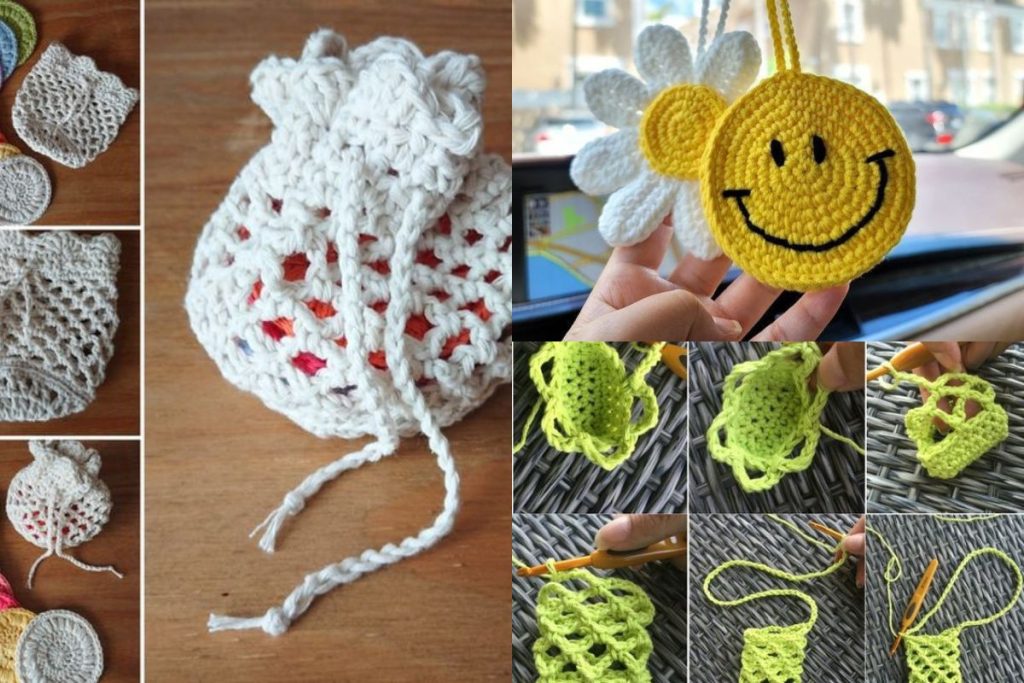
Creating a DIY Crochet Car Freshener – TUTORIAL can completely transform the atmosphere of your vehicle. A crochet car freshener is not only a practical accessory to keep your car smelling delightful, but it also allows you to showcase your creativity and personalize your driving experience.
By following a step-by-step tutorial, anyone, whether a beginner or experienced crocheter, can craft unique designs that match their style and preferences.
With a DIY crochet car freshener, you can choose your favorite scents and incorporate them directly into the crocheted design. This makes the freshener not only visually appealing but also highly functional.
Unlike store-bought options that may have overpowering fragrances, creating your own allows for complete control over scent intensity and material safety. It’s a fun and engaging project that also doubles as a thoughtful handmade gift for friends and family.
This tutorial will guide you through the essential materials, stitches, and techniques required to make a DIY crochet car freshener. By the end of this guide, you will not only have a beautifully crafted freshener but also a better understanding of how crochet can be combined with everyday items to enhance your lifestyle. Whether you are looking for a simple design or a more elaborate pattern, this guide covers it all.
To start your DIY Crochet Car Freshener – TUTORIAL, you first need to gather all necessary materials. The primary tools include crochet hooks of appropriate size, high-quality yarn, and a needle for finishing touches. Using yarn that is both durable and soft ensures that your finished product maintains its shape and appearance over time.
The type of yarn you select directly impacts the overall look and feel of your crochet car freshener. Cotton yarn is often preferred for its breathability and ability to hold scent well. Synthetic fibers, on the other hand, may last longer but might not absorb essential oils as effectively. Choosing the right yarn is crucial for creating a long-lasting, effective freshener.
Additionally, you will need filling material to hold the fragrance. Popular options include dried lavender, cedar chips, or other aromatic herbs. These natural materials are safe for the car environment and provide a soothing aroma. Selecting the right scent is an essential step in personalizing your DIY crochet car freshener.
Other optional tools include stitch markers, scissors, and measuring tape. While these items are not mandatory, they help maintain precision and ease throughout the crocheting process. Using these tools allows even beginners to create professional-looking results without unnecessary frustration.
Remember to have a small container or pouch to store the aromatic filling while working on your DIY crochet car freshener. This keeps your workspace clean and prevents accidental spills that could damage surfaces. Keeping everything organized from the beginning makes the entire tutorial more enjoyable and efficient.
Lastly, patience is key. Crocheting requires focus, and working with delicate materials like yarn and aromatic fillings means that rushing can result in mistakes. Taking your time ensures that the final crochet car freshener is both functional and visually appealing.
Once you have all materials, the next step in this DIY Crochet Car Freshener – TUTORIAL is learning the essential stitches and techniques. Basic crochet stitches such as chain stitch, single crochet, and slip stitch form the foundation for almost any project. Mastering these will help you complete your freshener smoothly.
Starting with a chain foundation, you can create circular or square bases depending on the desired shape of your crochet car freshener. A circular design often works best for even distribution of scent, while square or decorative shapes offer more aesthetic variation. Choosing the shape is a matter of personal preference and the space available in your vehicle.
Single crochet stitches are ideal for building a tight and sturdy fabric. This ensures that the aromatic filling remains secure inside the DIY crochet car freshener. Loose stitches may allow the filling to escape, reducing the effectiveness of the freshener over time. Practicing consistent tension is essential for creating a professional-looking piece.
For decorative touches, consider incorporating different textures such as bobble stitches or shells. These techniques not only add visual interest but can also subtly enhance scent diffusion by increasing surface area. This makes your crochet car freshener both functional and visually appealing.
Finishing techniques are just as important as the crochet stitches themselves. Securely stitching the final edges and leaving a small opening for inserting the aromatic filling ensures the freshener remains intact. Using a needle to close this opening neatly prevents spillage and maintains the overall aesthetic.
Finally, adding embellishments like beads or buttons can elevate the design of your DIY crochet car freshener. These small details personalize your project and make it stand out as a unique handmade item. Even simple additions can create a professional and polished appearance.
Selecting the perfect fragrance is crucial for your DIY Crochet Car Freshener – TUTORIAL. Popular choices include lavender, rosemary, eucalyptus, and citrus blends. Each scent has unique properties: lavender promotes relaxation, rosemary enhances focus, eucalyptus supports breathing, and citrus provides an energizing atmosphere.
When choosing scents, consider the size of your car and your personal preferences. Strong aromas might be overwhelming in a smaller vehicle, while subtle fragrances can dissipate quickly in larger spaces. Testing different combinations helps find the ideal balance for your crochet car freshener.
Essential oils are another popular option. You can soak small cotton pads or felt inserts with your favorite essential oils and place them inside the DIY crochet car freshener. This method allows you to change scents easily and maintain freshness over time.
Natural dried materials are safe and environmentally friendly alternatives. Ingredients such as cedar chips or potpourri are ideal for long-lasting fragrances without artificial chemicals. Using these ensures a fresh, pleasant environment in your car without harmful effects.
Consider layering scents for a customized aroma. Combining two or three complementary fragrances can create a unique signature smell. For example, lavender and citrus together offer a balance of calming and refreshing effects for a pleasant driving experience.
Lastly, maintaining your freshener is simple. Periodically replacing or refreshing the aromatic filling ensures that your DIY crochet car freshener continues to provide a consistent and enjoyable scent for months. This small maintenance step prolongs the life of your handmade creation.
Once your DIY Crochet Car Freshener – TUTORIAL is complete, finding the right spot in your vehicle is important. Hanging it from the rearview mirror is a popular option, but you can also place it on the dashboard or inside cup holders. The key is ensuring airflow passes through the freshener to distribute the scent evenly.
Consider using a small loop or string to hang your crochet car freshener securely. This allows easy removal for cleaning or refreshing the aromatic filling. A detachable loop also prevents accidental damage while driving.
Placing your freshener near air vents maximizes scent diffusion. When the car air conditioning or heating is on, the aroma spreads efficiently throughout the interior, creating a consistently pleasant environment. This is particularly effective for DIY crochet car fresheners with lighter scents.
Avoid placing the freshener in areas where it may obstruct your view or interfere with controls. Safety is paramount, and positioning should never compromise driving visibility. Finding the perfect location balances practicality and aesthetics.
Your crochet car freshener can also double as a decorative element. Choosing colors that complement your car’s interior adds a personal touch and enhances the overall ambiance. Customizing designs with initials, shapes, or patterns makes it uniquely yours.
Regularly checking and refreshing the aromatic filling keeps your DIY crochet car freshener effective. This simple step ensures your vehicle always smells pleasant while showcasing your creative effort. It also prolongs the life of your handmade accessory.
Q: Can beginners make a DIY crochet car freshener?
A: Absolutely. This tutorial uses basic stitches that beginners can easily follow, and tips are provided for simple designs.
Q: How long does the scent last in a crochet car freshener?
A: Depending on the filling used, scents can last from a few weeks to several months. Essential oils or dried herbs can be refreshed as needed.
Q: What type of yarn is best for a car freshener?
A: Cotton yarn is preferred for breathability and fragrance absorption, but acrylic or blended yarns can also work for durability.
Q: Can I change the scent once the freshener is made?
A: Yes, you can refresh the filling or add new essential oils without altering the crochet structure.
Q: Are crochet car fresheners safe for cars with pets or children?
A: Yes, as long as you use non-toxic, natural ingredients and keep the freshener out of reach from pets or young children.
Q: How can I make my crochet car freshener last longer?
A: Use high-quality yarn, secure stitches properly, and periodically replace or refresh the aromatic filling.
This DIY Crochet Car Freshener – TUTORIAL has shown you how to create a beautiful, personalized, and functional accessory for your vehicle.
From selecting materials and learning crochet techniques to choosing scents and displaying your finished product, every step contributes to a unique, handcrafted freshener. By following this guide, you not only gain a practical item but also the satisfaction of crafting something by hand.
We hope this tutorial inspires your creativity and encourages you to experiment with different designs and fragrances. Please leave your honest opinions and suggestions in the comments so we can continue to provide helpful and engaging content. Your feedback is invaluable in improving future DIY crochet car freshener tutorials.


