
Ballerina pencil case with zipper Pattern


Tumbling Charms Quilt – TUTORIAL is the ultimate guide for quilters of all levels who want to create a visually stunning quilt with charm and elegance.
If you have ever wondered how to piece together beautiful fabrics into a cohesive design, this guide will walk you through every step.
From understanding the key materials to mastering the techniques, the Tumbling Charms Quilt – TUTORIAL ensures that you gain confidence and skill while producing a quilt you will be proud of.
The charm of a quilt lies not only in the colors and patterns but also in the way each piece is meticulously joined together. With the Tumbling Charms Quilt – TUTORIAL, you will learn how to align squares, manage seams, and bring your fabrics to life.
This tutorial emphasizes precision, creativity, and patience, helping beginners and experienced quilters alike achieve a professional-looking quilt. The step-by-step instructions ensure that even the most intricate patterns are easy to follow.
Quilting is more than just a craft; it’s a therapeutic activity that allows you to express your creativity and personal style. The Tumbling Charms Quilt – TUTORIAL introduces practical tips for fabric selection, color coordination, and pattern layout, making it easy to design a quilt that suits your taste. By the end of this tutorial, you will have not only a beautiful quilt but also a deeper appreciation for the art of quilting and the joy it brings to handmade creations.
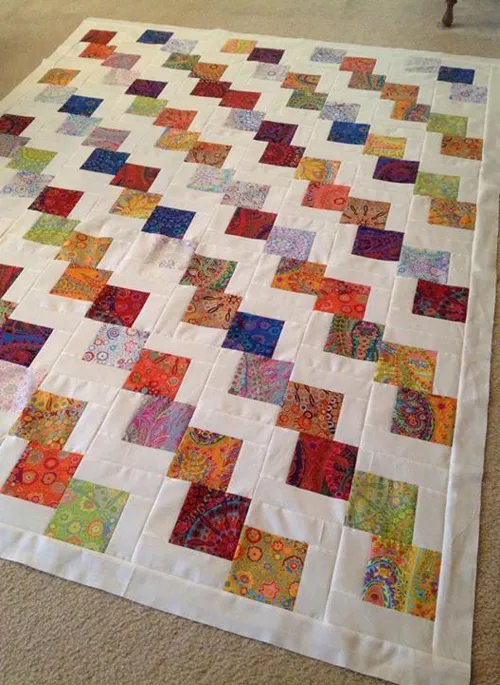
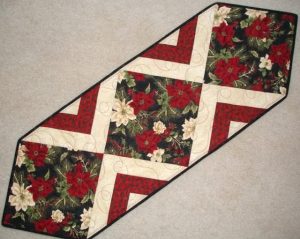
Before diving into the Tumbling Charms Quilt – TUTORIAL, it is important to understand the foundational elements. A tumbling charms quilt typically involves small fabric squares, often referred to as “charm squares,” which are arranged in a diagonal or tumbling pattern. Each square contributes to the overall design, creating a dynamic and eye-catching effect. Precision in cutting and stitching is essential for the perfect alignment of squares.
One of the first steps in creating a tumbling charms quilt is selecting the right fabric. Fabrics should complement each other while providing enough contrast to highlight the tumbling effect. The Tumbling Charms Quilt – TUTORIAL suggests using high-quality cotton fabrics, as they are easy to handle and maintain. Mixing patterns, solids, and textures can add depth and dimension to your quilt.
Cutting your charm squares accurately is critical. In the Tumbling Charms Quilt – TUTORIAL, it is recommended to use a rotary cutter, cutting mat, and ruler for precise measurements. Each square should be uniform in size to ensure that your quilt pieces align correctly. Accuracy at this stage will save time and frustration during the piecing process.
Understanding seam allowance is also crucial. Most tumbling charms quilts require a standard ¼ inch seam, which helps maintain consistent size and shape. The tutorial emphasizes careful pinning and pressing of seams, as this prevents puckering and keeps the quilt top flat. Mastering these basics sets the stage for a smooth quilting experience.
Color placement plays a significant role in the visual impact of the quilt. The Tumbling Charms Quilt – TUTORIAL encourages arranging squares in a way that balances light and dark tones, creating a sense of movement. Planning your layout before stitching helps avoid clashes and ensures that the tumbling pattern flows seamlessly across the quilt.
Finally, the tutorial addresses the importance of patience. Quilting is a meticulous craft, and rushing through steps can compromise the final product. Following the Tumbling Charms Quilt – TUTORIAL carefully ensures that your quilt is not only beautiful but also durable and professionally finished.
The piecing process is the heart of the Tumbling Charms Quilt – TUTORIAL. Begin by arranging your charm squares in a tumbling pattern, either on a design wall or flat surface. This helps you visualize the quilt before sewing. Taking the time to plan placement ensures a balanced and appealing design.
Start sewing rows of charm squares together, maintaining a consistent ¼ inch seam allowance. Press seams in one direction to reduce bulk and make joining rows easier. The Tumbling Charms Quilt – TUTORIAL emphasizes careful handling to prevent stretching or distortion of the fabric squares.
Once the rows are complete, join them to form the quilt top. Align seams carefully to maintain the tumbling effect. Pinning the intersections before sewing helps achieve precise corners and a professional finish.
Trimming edges after piecing is recommended. This ensures that your quilt top is square and ready for layering with batting and backing. Accuracy in trimming prevents mismatched edges and improves the overall appearance.
Layering the quilt involves placing the backing fabric, batting, and quilt top together. Basting the layers with pins or temporary adhesive ensures they stay aligned during quilting. The tutorial highlights techniques for smooth and even layering, which is crucial for a polished final product.
Finally, quilt the layers together using either hand stitching or a sewing machine. The Tumbling Charms Quilt – TUTORIAL encourages exploring different quilting patterns, from simple straight lines to intricate designs, to complement the tumbling squares. Finishing the quilt with binding completes the project and adds a professional touch.
For quilters looking to elevate their Tumbling Charms Quilt – TUTORIAL, advanced techniques can add texture and dimension. Try incorporating half-square triangles or strip sets to create more dynamic patterns within the tumbling design.
Experimenting with color gradients can make your quilt appear more three-dimensional. Arranging charm squares from light to dark or warm to cool tones enhances the visual flow and creates depth.
Mixing fabric textures is another way to enrich your quilt. Combining solids, prints, and textured fabrics adds interest and uniqueness. The tutorial advises pre-washing fabrics to prevent color bleeding and shrinkage.
Consider custom quilting patterns that follow the tumbling squares. Echo quilting or free-motion designs can highlight the tumbling effect, making the quilt even more visually striking.
Labeling your quilt adds a personal touch. Include your name, date, and a short message to commemorate the creation. The Tumbling Charms Quilt – TUTORIAL suggests sewing the label on the back corner of the quilt for a professional presentation.
Finally, maintaining your quilting tools and workspace ensures consistent quality. Keeping rotary cutters sharp, using high-quality thread, and organizing fabrics can streamline the quilting process and make it more enjoyable.
Even experienced quilters encounter challenges. One common mistake is misaligned seams. The Tumbling Charms Quilt – TUTORIAL stresses accuracy in cutting and pinning to avoid this issue.
Using inconsistent seam allowances can distort the quilt. Always measure and maintain the ¼ inch seam to ensure uniformity.
Neglecting fabric selection can impact the final look. Choosing fabrics with similar tones or patterns may cause the tumbling design to appear flat. The tutorial emphasizes thoughtful color coordination.
Skipping the pressing step can result in bulky seams that disrupt the smooth tumbling effect. Press carefully after every seam for best results.
Rushing through the layering process may lead to puckered or uneven quilting. Take your time to align and baste layers properly.
Ignoring the finishing touches, such as binding and labeling, can make a quilt appear incomplete. The Tumbling Charms Quilt – TUTORIAL highlights the importance of these final steps for a polished project.
Q: What fabrics are best for a tumbling charms quilt?
A: High-quality cotton fabrics are ideal. They are easy to handle, durable, and maintain their shape well. Mixing solids and prints adds depth.
Q: How large should charm squares be?
A: Typically, charm squares are 5 inches by 5 inches. However, you can adjust the size depending on your quilt dimensions and design preferences.
Q: Can beginners make a tumbling charms quilt?
A: Yes! The Tumbling Charms Quilt – TUTORIAL is designed for all skill levels, providing step-by-step guidance to ensure a successful project.
Q: How do I prevent misaligned seams?
A: Use precise cutting tools, maintain a consistent ¼ inch seam, and pin intersections before sewing to ensure perfect alignment.
Q: Is pre-washing fabrics necessary?
A: Yes, pre-washing prevents color bleeding and shrinkage, ensuring your quilt maintains its appearance after washing.
Q: Can I machine quilt a tumbling charms quilt?
A: Absolutely. You can use straight-line quilting, echo quilting, or free-motion quilting to enhance your design.
The Tumbling Charms Quilt – TUTORIAL provides a comprehensive guide for creating a stunning, dynamic quilt that showcases both skill and creativity.
From selecting fabrics and cutting charm squares to piecing, quilting, and finishing, this tutorial covers every essential step. By following this guide, you will gain confidence in your quilting abilities and produce a quilt that is both beautiful and durable.
Share your thoughts, experiences, and suggestions below, as your feedback can inspire future quilting projects and help others in the quilting community.


