
Ballerina pencil case with zipper Pattern


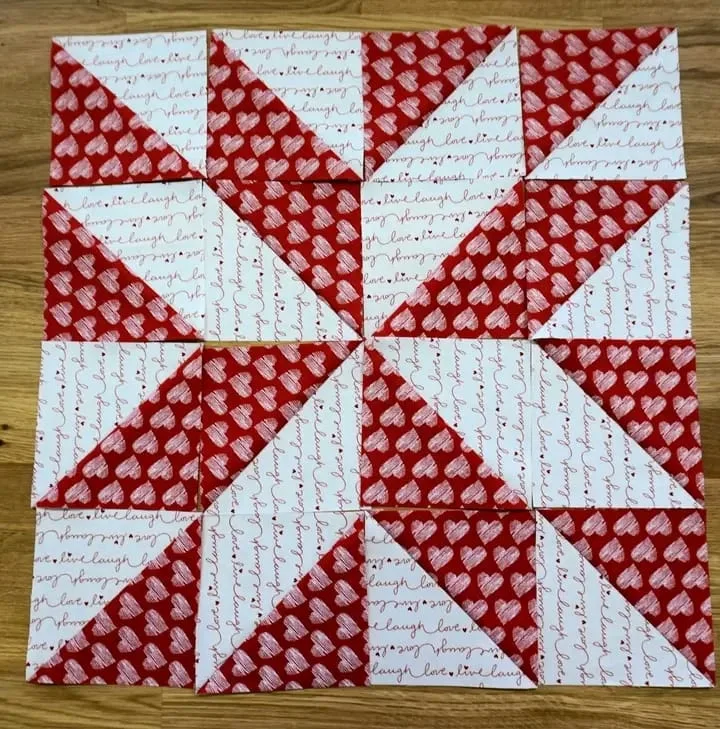
The Lemoyne Star Quilt – Tutorial is one of the most beloved guides in the quilting world, offering a perfect balance between tradition and creativity. The Lemoyne Star pattern, with its elegant eight-point star design, has fascinated quilters for generations.
Its crisp lines and geometric beauty make it a timeless choice for beginners and experienced crafters alike. Starting with this classic quilt block not only teaches important skills but also provides endless possibilities for personalization.
When you follow a Lemoyne Star Quilt – Tutorial, you quickly discover why this pattern has remained popular for centuries. The star itself is versatile, fitting beautifully into both vintage-inspired quilts and modern interpretations.
Each block can be made with contrasting colors, seasonal fabrics, or even scraps, making it an excellent project for those who enjoy experimenting with fabric choices. More than just a quilt design, it symbolizes craftsmanship, patience, and artistic expression.
Making a Lemoyne Star Quilt – Tutorial is also a journey of precision. Unlike simpler square-based quilts, the star requires careful cutting and sewing of diamonds to form perfect points. This teaches quilters the importance of accuracy, pressing, and alignment—skills that elevate all future projects.
While it may seem challenging at first glance, with the right instructions and patience, anyone can achieve stunning results that look both professional and personal.
One of the biggest reasons to choose a Lemoyne Star Quilt – Tutorial is its heritage. This quilt block has been cherished for generations, often passed down as heirlooms that represent both artistry and love. By making your own, you are joining a long tradition of quilters who valued beauty, precision, and storytelling through fabric.
Another reason is its adaptability. The Lemoyne Star works beautifully in quilts of all sizes, from small wall hangings to king-sized bedspreads. You can easily adjust the block size to suit your project, making it practical whether you are creating a decorative piece or a functional quilt.
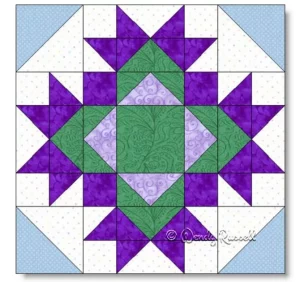
The design also offers endless creative freedom. You can play with contrasting colors to make the star pop or use soft tones for a more subtle effect. This flexibility ensures no two quilts ever look the same, giving each project its own identity.
The tutorial is also ideal for skill building. Because of the angled cuts and piecing, you’ll gain valuable experience with precise sewing. Once mastered, these techniques will improve your ability to tackle more advanced quilting projects.
Additionally, the Lemoyne Star Quilt – Tutorial allows for personalization. Many quilters enjoy dedicating their projects to loved ones by selecting fabrics that hold personal meaning, transforming the quilt into a treasured gift.
Finally, this pattern never goes out of style. While some designs feel trendy and fleeting, the Lemoyne Star remains a classic, making it a wise choice for anyone who wants to invest time in a quilt that will remain beautiful for decades.
Before beginning a Lemoyne Star Quilt – Tutorial, gathering the right materials is essential. The most important element is fabric. Choose high-quality cotton fabrics that are easy to work with and provide a clean finish. The star looks especially striking when made with contrasting fabrics, such as light and dark tones.
A rotary cutter and self-healing cutting mat are crucial for achieving precise diamond shapes. Since the pattern requires angled cuts, accuracy is vital for the star to align correctly. A good ruler, preferably one designed for quilting with marked angles, makes cutting faster and more precise.
You’ll also need a reliable sewing machine with a quarter-inch foot attachment. This foot ensures consistent seam allowances, which are essential for the points of the star to match perfectly. Even a slight deviation can distort the design, so this tool is worth using.
Thread selection matters as well. Neutral-colored, high-quality thread blends well with most fabrics and provides strong seams. Since quilting often involves pressing seams open or to one side, durable thread helps maintain the quilt’s longevity.
An iron and ironing board are also necessary. Pressing after each step is one of the secrets to achieving crisp, professional-looking quilt blocks. Pressing ensures that each diamond lays flat and connects neatly with the others.
Lastly, don’t forget basic quilting supplies like pins, fabric scissors, and a seam ripper. Even experienced quilters sometimes need to redo a seam, so having these tools close at hand makes the process smoother.
The first step in the Lemoyne Star Quilt – Tutorial is cutting your fabric. Using your rotary cutter and ruler, carefully cut diamonds for the star. It’s important to cut accurately since even small mistakes can affect the symmetry of the final block.
Next, arrange your diamonds in the star shape before sewing. This preview step helps ensure your color placement is correct and that you’re happy with the overall design. Once satisfied, you can start piecing the diamonds together.
Sewing the diamonds requires precision. Pair them into units and then sew those units into larger sections until the star shape is complete. Using a quarter-inch seam allowance and pressing carefully between each step will help maintain accuracy.
After finishing the star, add background fabric around it. This helps the star stand out and creates the block’s final square shape. The background can be a solid color or a subtle print, depending on the effect you want to achieve.
Once the block is assembled, trim it to the desired size. Trimming ensures that all blocks in your quilt are uniform, making assembly easier and the finished quilt neater.
Finally, piece together multiple blocks to form your quilt top, add batting and backing, and quilt the layers together. Whether you choose hand quilting, machine quilting, or longarm quilting, the final stitches will bring your Lemoyne Star Quilt – Tutorial project to life.
One creative approach with the Lemoyne Star Quilt – Tutorial is to use seasonal fabrics. For example, red and green fabrics create a festive holiday quilt, while pastel shades bring a springtime feel. This adaptability makes the design useful for year-round projects.
You can also experiment with scrappy stars. Instead of sticking to two colors, use fabric scraps from previous projects. This gives each star a unique look and reduces waste, making the project both creative and eco-friendly.
The Lemoyne Star is also excellent for storytelling. Many quilters choose fabrics that reflect their personal history or family traditions. When stitched together, these blocks form a quilt that becomes a narrative in fabric form.
Another benefit is the sense of accomplishment. Because the pattern requires precision, completing even a single block feels rewarding. Finishing an entire quilt filled with these stars is an achievement worth celebrating.
The quilt is also practical. Beyond its beauty, it provides warmth and comfort for your home. A handmade quilt always carries emotional value, making it both useful and deeply meaningful.
Lastly, the Lemoyne Star Quilt – Tutorial encourages connection. Sharing your finished quilt with friends, family, or quilting communities allows you to inspire others while celebrating the artistry of quilting together.
Q1: Is the Lemoyne Star Quilt pattern beginner-friendly?
Yes, while it looks complex, beginners can complete it by following clear steps and practicing precision.
Q2: What is the most important tool for this quilt?
A rotary cutter and quilting ruler are essential for cutting accurate diamonds.
Q3: Can I make the Lemoyne Star Quilt by hand?
Yes, but it is more time-consuming. A sewing machine speeds up the process and ensures more consistent results.
Q4: What size should I make the blocks?
Block sizes vary depending on your project, but 12-inch blocks are common and easy to assemble into larger quilts.
Q5: Do I need to use special rulers for cutting diamonds?
Not necessarily, but angled quilting rulers make cutting faster and more accurate.
Q6: How do I keep my star points sharp?
Consistent seam allowances, pressing carefully, and trimming blocks at the end all help maintain sharp points.
The Lemoyne Star Quilt – Tutorial is a timeless guide to creating one of the most elegant and beloved quilt patterns in history. With its geometric beauty, versatility, and ability to be customized, it remains a favorite for quilters of all levels. From selecting fabrics and mastering precision sewing to experimenting with creative layouts, this tutorial empowers you to produce a quilt that is as personal as it is beautiful.
We hope this detailed tutorial inspires you to try making your own Lemoyne Star Quilt. If you’ve already worked with this pattern or plan to begin soon, we’d love to hear your honest opinions and suggestions. Your insights can encourage and guide fellow quilters who are just starting their own journey.


