Crochet Pig In A Granny Square Blanket Pattern


Creating a Wonderful Crochet Square is one of the most satisfying and versatile projects any crocheter can enjoy. Whether you’re a beginner learning basic stitches or an experienced crafter seeking new designs, mastering the crochet square opens the door to countless creative possibilities.
From cozy blankets and elegant bags to stylish cushions and decorative throws, this simple motif forms the foundation of many beautiful crochet pieces.
In this guide, we’ll explore how to make your own wonderful crochet square step by step, while also offering helpful tips, creative variations, and essential techniques to perfect your craft.
The Wonderful Crochet Square is not just a project—it’s an opportunity to experiment with colors, yarn textures, and stitch combinations.
This pattern allows you to express your creativity while maintaining a structured form that’s easy to connect and expand into larger items. Even if you’re new to crochet, following this detailed guide will help you create squares that are both neat and visually stunning. By learning how to control tension and align stitches, you’ll gain the confidence to take on more complex crochet projects later on.
Before diving into the steps, it’s important to gather all the necessary materials. You’ll need your favorite yarn (cotton or acrylic works best for structure), a matching crochet hook, a pair of scissors, and a yarn needle for finishing. Once you have everything ready, it’s time to begin your Wonderful Crochet Square journey and learn the techniques that make this pattern such a timeless and essential part of the crochet world.
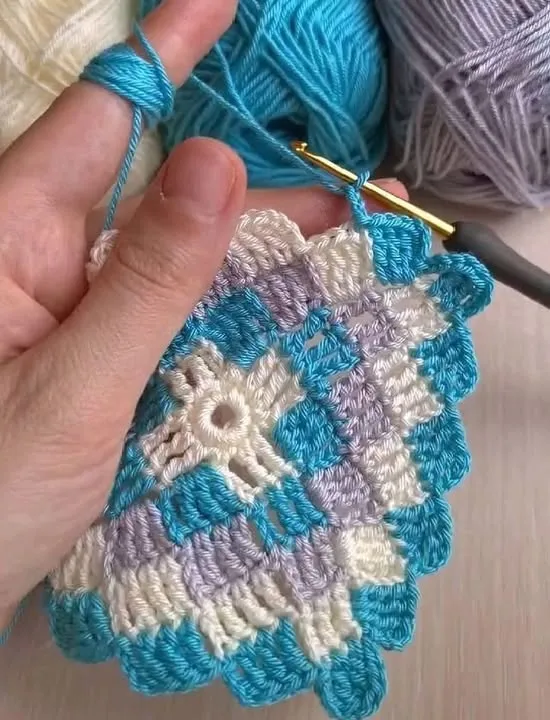
To start your wonderful crochet square, create a slip knot and chain four stitches. Then, join the first and last chains with a slip stitch to form a ring. This small circle will serve as the base for your entire square. Working in the round gives your square symmetry and strength, ensuring all corners stay perfectly shaped.
Next, begin your first round with three chain stitches, which count as your first double crochet. Then, make two more double crochets into the ring, followed by a chain of two stitches to form the first corner. Repeat this process three more times—three double crochets, chain two—until you have four corners. Close the round with a slip stitch. This classic structure gives your square its foundational frame.
As you work, make sure your tension remains consistent. Loose stitches can make your square floppy, while tight stitches might cause it to curl. The key to a beautiful crochet square lies in even tension and clean edges. You can use a stitch marker to identify your first stitch in each round, helping you keep track and maintain balance.
After finishing the first round, you’ll notice a small square forming in the center. From here, each new round will build upon this shape, increasing the square’s size symmetrically. This process makes it easy to customize the size of your wonderful crochet square depending on your project needs.
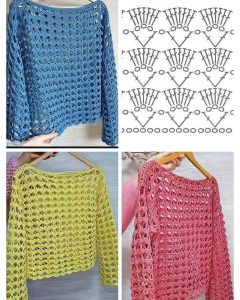
Try experimenting with color changes after each round. Using contrasting or gradient shades can add depth and beauty to your square. Many crocheters love combining pastel hues or vibrant tones to make their squares truly stand out. Whether you prefer a classic monochrome look or a rainbow of colors, this pattern gives you full creative control.
Lastly, remember to count your stitches carefully in every round. Missing or adding stitches will distort the shape. Taking a few extra seconds to double-check ensures your crochet square stays uniform and professional-looking from start to finish.
Each round you add to your wonderful crochet square will make it larger and more defined. To start the second round, slip stitch your way to the first corner space. Chain three (this counts as your first double crochet), then work two more double crochets, chain two, and three more double crochets in the same space. This forms your new corner.
Continue to the next corner space, skipping over the side stitches, and repeat the same pattern—three double crochets, chain two, and three more double crochets. As you proceed, you’ll see your square expand evenly. The chain spaces at the corners create clean turns, keeping your edges sharp and defined.
Pay special attention to your corners. They’re the key to maintaining symmetry throughout your crochet square. If the corners are too tight, your work might start curving inward; if too loose, it may ripple. Adjust your chain count at the corners if necessary to achieve a perfect flat shape.
When changing colors between rounds, always fasten off your yarn neatly and weave in ends securely. This prevents unraveling and gives your finished piece a polished look. You can also use a seamless join method for a more professional finish.
For texture and depth, try alternating stitch types in different rounds—such as combining half double crochets or treble crochets with your standard double crochets. This adds character and complexity to your wonderful crochet square without compromising its structure.
Once you’ve mastered these rounds, you’ll have the foundation to create larger projects like afghans or patchwork blankets. Connecting multiple squares is simple: use a slip stitch or whipstitch method to join them together neatly.
One of the most exciting aspects of the wonderful crochet square is experimenting with colors and patterns. Using color strategically can transform a simple square into a stunning work of art. Whether you choose complementary shades or a bold contrast, your color choices can completely change the mood of the piece.
To create a gradient effect, select yarn colors that gradually shift from light to dark. For a more striking design, alternate between two or three contrasting colors every round. Remember to switch colors at the end of a round to keep transitions clean.
Texture also plays a big role in making your crochet square unique. Consider using bobble stitches, popcorn stitches, or front post double crochets to add raised patterns and intricate details. Mixing textures gives your square a handcrafted, luxurious appearance that stands out in larger projects.
Another creative idea is to use variegated yarn, which automatically changes color as you crochet. This creates a naturally blended look without having to change yarns manually. It’s a great option for beginners who want a colorful result with minimal effort.
When planning multiple squares for a blanket or throw, arrange your colors before joining them to ensure balance. Lay them out on a flat surface to see how the tones interact under natural light. A well-arranged color scheme makes your finished piece harmonious and visually pleasing.
Lastly, don’t forget about blocking. After finishing your wonderful crochet square, gently dampen it and pin it to shape on a blocking board. Once dry, your square will have sharp corners and an even finish, making it ready for assembly or display.
After completing your wonderful crochet square, there are endless ways to use it creatively. One of the most common applications is assembling multiple squares to create a blanket or afghan. By joining several squares with complementary colors, you can design cozy home décor pieces that reflect your personal style.
If you prefer smaller projects, try turning your squares into cushion covers, tote bags, or even garments like vests and cardigans. The modular nature of crochet squares allows you to build projects piece by piece, making it easy to adjust size and layout as you go.
You can also use individual squares as coasters, wall art, or even as part of a larger crochet collage. Adding decorative edges such as picot borders or scalloped trims enhances the overall look and makes your project truly special.
Don’t hesitate to mix yarn types for unique results. For example, combining cotton with a touch of metallic or textured yarn adds dimension and shine. Just ensure that all yarns used have similar thickness to maintain even tension.
Finishing details matter too. Weave in all yarn ends securely using a yarn needle, trimming excess thread carefully. Proper finishing not only improves the durability of your wonderful crochet square but also gives it a neat and professional appearance.
Finally, showcase your creation proudly! Whether you gift it to a loved one or share it online, every wonderful crochet square you make tells a story of patience, creativity, and craftsmanship.
1. What is the best yarn to use for a crochet square?
Cotton and acrylic yarns are ideal because they hold shape well and are easy to care for. Choose a medium-weight yarn for a balanced texture.
2. How do I keep my crochet square from curling?
Make sure your tension is even and that you add the correct number of chains in each corner. Blocking also helps flatten the piece.
3. Can beginners make a wonderful crochet square?
Absolutely! This project is beginner-friendly. It helps develop basic skills like chaining, double crochet, and working in the round.
4. How many squares do I need for a blanket?
It depends on the blanket’s desired size. Measure one square, then calculate how many fit across and down your target dimensions.
5. How can I join crochet squares together?
You can join them with a slip stitch, whipstitch, or join-as-you-go method for a seamless appearance.
6. What is the easiest way to change colors?
Switch yarns at the end of a round and secure the ends before continuing. This ensures smooth color transitions.
The Wonderful Crochet Square is more than just a pattern—it’s a gateway to endless creative opportunities. From simple coasters to intricate patchwork blankets, this design offers versatility, beauty, and satisfaction for crafters of all levels. By following this step-by-step guide, you’ve learned how to build a solid foundation, experiment with color, and finish your project like a pro. We hope you feel inspired to create your own variations and explore new ideas.
If you enjoyed this guide, please share your thoughts and experiences in the comments. We’d love to hear your honest opinion and any suggestions you have for future crochet tutorials. Your feedback helps us keep improving and creating more wonderful crochet projects for everyone to enjoy!


