
Ballerina pencil case with zipper Pattern


The Sisterhood Sampler Block 4 is part of a creative quilting journey that celebrates unity, friendship, and craftsmanship among quilters worldwide.
From beginners taking their first stitches to advanced crafters refining their techniques, this block represents a deeper meaning — a connection through shared creativity.
When working on the Sisterhood Sampler Block 4, quilters often discover not only a beautiful fabric pattern but also the joy of collaboration and self-expression through design.
This particular block stands out for its intricate yet approachable design, making it a perfect balance between challenge and simplicity.
Whether you’re creating it as part of the full Sisterhood Sampler quilt or as an independent project, it provides an excellent opportunity to explore color theory, contrast, and precision piecing. The Sisterhood Sampler Block 4 helps refine your quilting skills while contributing to a project that symbolizes connection and empowerment.
Quilters love this block because of how flexible and adaptable it is. You can use scraps from previous projects, play with bold or pastel tones, or even incorporate meaningful fabrics that hold personal memories. Each finished block tells its own story while blending beautifully into the overall Sisterhood Sampler design. As you begin your Sisterhood Sampler Block 4, prepare your tools, select your favorite fabrics, and embrace the mindful, creative process that quilting inspires.
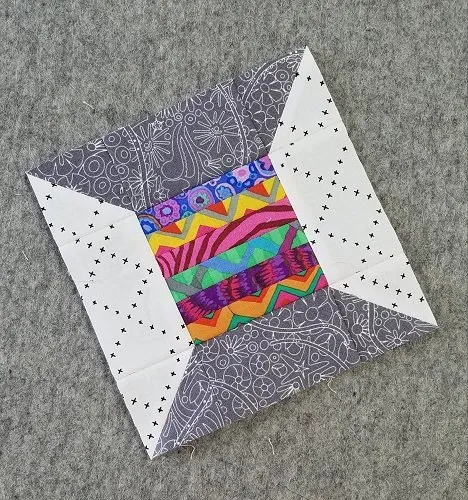
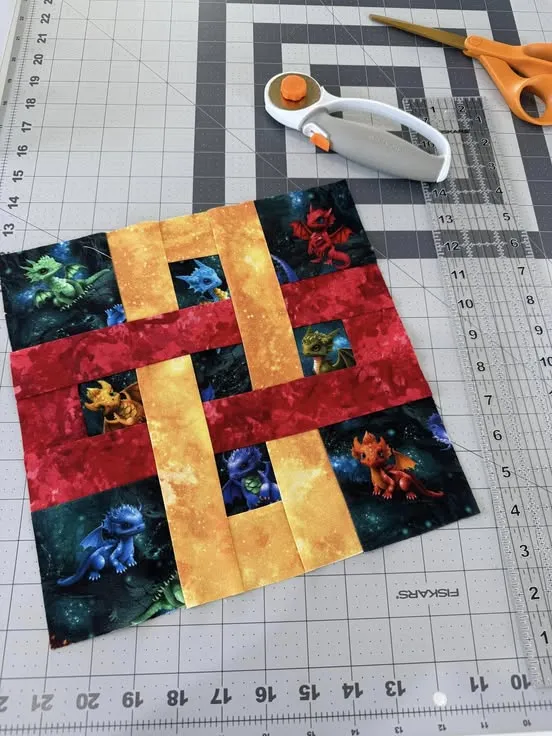
The design of the Sisterhood Sampler Block 4 is a beautiful mix of symmetry and style. It often features geometric lines that create a sense of harmony and rhythm throughout the block. The pattern usually combines traditional quilting shapes such as half-square triangles, rectangles, and corner units. These elements come together to form a unified design that stands as a metaphor for the bond shared among the “sisters” who quilt together.
One of the best aspects of this block is how it allows for experimentation with color placement. You can choose a light and dark color combination to emphasize contrast or go for a monochromatic palette for a more subtle look. The versatility of the Sisterhood Sampler Block 4 design means you can make each block unique, even if following the same basic pattern.
When preparing to cut your fabric pieces, accuracy is key. A small misalignment can affect the symmetry of the block. Using a rotary cutter and a transparent quilting ruler helps ensure precision. Always press your seams flat after each sewing step to maintain a neat and professional finish.
It’s also recommended to use high-quality quilting cotton for this project. The durability of the fabric ensures that your block will last over time, and the clean texture of cotton enhances the visual impact of the Sisterhood Sampler Block 4 design. If you want a slightly textured appearance, try using batiks or linen blends — just remember to adjust your sewing needle accordingly.
Once your pieces are prepared, lay them out before sewing to visualize the final design. This “mock assembly” step helps you avoid errors in fabric placement and gives you a chance to tweak color balance. Even experienced quilters find this step valuable in achieving consistent results.
The key to mastering this block is patience. Take your time with each seam and focus on the rhythm of stitching. The process is as rewarding as the finished result.
To start your Sisterhood Sampler Block 4, gather all essential tools: rotary cutter, self-healing cutting mat, sewing machine, iron, and quilting ruler. Make sure your machine is threaded with quality cotton thread that complements your fabric colors. Having the right setup makes a significant difference in both precision and enjoyment.
Begin by cutting your fabric pieces according to the pattern instructions. Usually, this involves several squares and triangles of varying sizes. Always double-check your measurements before cutting, as accuracy is the foundation of a perfect quilt block.
Next, start assembling smaller units such as half-square triangles or four-patch sections. Sew with a ¼-inch seam allowance to ensure uniformity across all blocks. After each seam, press with your iron toward the darker fabric to prevent shadowing and improve alignment.
Once your smaller units are ready, assemble them into larger sections following the layout of the Sisterhood Sampler Block 4. Pin the edges carefully before stitching to keep points aligned and corners sharp. Taking your time during this step will ensure a crisp, professional finish.
As you sew, maintain a steady rhythm and consistent seam width. Avoid rushing, as precision is what makes the block come together perfectly. When finished, press the entire block gently, checking that all seams lie flat. This helps prepare the block for future assembly into the full quilt.
Finally, admire your work! Completing the Sisterhood Sampler Block 4 is an accomplishment worth celebrating. Each block represents not just sewing skill but also creativity and patience — two essential elements of quilting.
Selecting fabrics for the Sisterhood Sampler Block 4 is an exciting part of the process. The fabrics you choose can completely change the visual effect of the finished piece. If you’re working within a theme for your overall sampler quilt, select colors that coordinate with your previous blocks. This ensures cohesion while still allowing for individuality.
Bold, contrasting colors can highlight the geometric design, while soft pastels can create a calming, delicate look. For a modern twist, consider pairing neutral backgrounds with vibrant accent colors. The Sisterhood Sampler Block 4 offers endless creative opportunities, and experimenting with fabric combinations can make your quilt uniquely yours.
Prints also play a role in defining the style of your block. Small-scale prints tend to work best for intricate designs, as they don’t overpower the pattern. However, mixing solids with prints can add dimension and visual interest. When choosing multiple fabrics, try to include a balance of light, medium, and dark tones for depth.
Before cutting, always pre-wash and press your fabrics to avoid shrinkage and bleeding. This simple step ensures that your finished Sisterhood Sampler Block 4 maintains its shape and color integrity over time.
You might also explore themed color palettes, such as seasonal tones or vintage-inspired hues. For instance, warm autumn shades can give your block a cozy, rustic feel, while blues and whites can evoke a cool, wintery mood. Whatever you choose, let your personal style guide you.
Color theory can also enhance your design choices. Complementary colors (opposites on the color wheel) create high contrast, while analogous colors (next to each other) produce a harmonious blend. Understanding how colors interact helps you achieve the exact mood and aesthetic you want for your Sisterhood Sampler Block 4.
The Sisterhood Sampler Block 4 may look simple once finished, but getting there requires attention to detail. To ensure perfection, consistency in cutting, sewing, and pressing is essential. Each of these small steps contributes to the overall quality of your quilt.
First, measure twice and cut once. Even a minor deviation can cause misalignment when piecing the block together. Use sharp rotary blades and a clean cutting surface for best results.
Second, maintain an accurate seam allowance. A ¼-inch seam is standard in quilting, and sticking to it will ensure your blocks fit together perfectly later. Many quilters use a special presser foot to help maintain consistent seams.
Third, press, don’t iron. Pressing means lifting and lowering the iron rather than sliding it back and forth, which can distort fabric. Using a bit of steam can help flatten seams neatly.
Fourth, check your block dimensions after sewing. If the size is slightly off, it’s better to adjust early than to struggle with fitting it into the quilt later. Precision now saves frustration later on.
Fifth, take photos or notes as you work through each block. Documenting your process helps track progress and makes it easier to replicate techniques for future blocks.
Lastly, enjoy the process. The Sisterhood Sampler Block 4 isn’t just about creating a quilt — it’s about connecting with a community of quilters, learning new skills, and expressing creativity through fabric and thread.
What is the size of Sisterhood Sampler Block 4?
Most versions of the Sisterhood Sampler Block 4 are designed to finish at 12 inches square, though this can vary depending on the pattern version or adjustments made by the quilter.
Do I need specific fabrics for this block?
No, you can use any high-quality quilting cotton. However, it’s best to use pre-washed fabrics in coordinating colors for consistency and ease of sewing.
Can beginners make Sisterhood Sampler Block 4?
Yes, absolutely. While it includes some intermediate techniques, following careful measurements and taking your time will ensure success for beginners.
How can I make my points align perfectly?
Pin precisely where seams meet and use a ¼-inch seam allowance. Press each step carefully to keep pieces aligned.
Can I hand-sew this block instead of using a machine?
Yes, it’s possible to hand-piece the Sisterhood Sampler Block 4. It will take more time, but many quilters enjoy the meditative pace of hand stitching.
What color combinations work best?
That depends on your style. High contrast pairs (like navy and cream) highlight shapes, while soft palettes (like pink and gray) give a gentle, cohesive look.
The Sisterhood Sampler Block 4 represents more than just fabric and thread — it’s a celebration of creativity, connection, and patience.
From choosing your fabrics to pressing the final seam, every step is an act of artistry and care. This block allows quilters to practice precision while embracing self-expression through design and color.
By following this guide, you’ve learned the basics of constructing, coloring, and perfecting your block with confidence. Now it’s your turn to put your personal touch on the Sisterhood Sampler Block 4 and make it truly your own.


