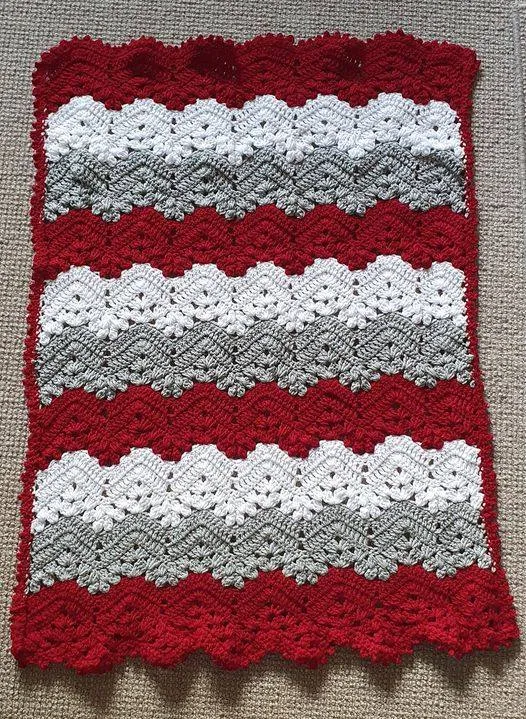
Crochet Pig In A Granny Square Blanket Pattern


If you’re looking for a fun and creative project to make for your little one, this Crochet Pattern: Baby’s Dino Hat with Cape is a perfect choice.
This adorable design transforms your baby into a cute and cozy dinosaur, making it ideal for photo shoots, costume parties, or simply for keeping them warm during chilly days. The pattern combines both practicality and creativity, giving you a unique handmade set that parents and babies will love.
With the Crochet Pattern: Baby’s Dino Hat with Cape, you can explore the magic of crochet while crafting something memorable and personal.
The combination of a soft hat with a matching cape creates an outfit that feels playful yet functional. Whether you are a beginner or an experienced crocheter, this project is fun, rewarding, and a great way to improve your skills while making something precious.
This charming project is more than just a crochet pattern—it’s a keepsake. Creating the Baby’s Dino Hat with Cape allows you to blend imagination with craftsmanship. Every stitch becomes a memory, and the end result is a warm, adorable accessory that will make your little one the star of the day. In this article, we will guide you through everything you need to know about this project—from choosing the right materials to tips for perfecting the finishing touches.
The success of your Crochet Pattern: Baby’s Dino Hat with Cape depends largely on the materials you select. Quality yarn and suitable tools can make the difference between a comfortable, durable piece and one that loses shape or softness. When working on baby projects, safety and comfort should always be your top priorities.
Start by choosing baby-friendly yarn that is soft, hypoallergenic, and machine washable. Cotton and acrylic blends are great options because they are gentle on the skin and easy to maintain. Avoid yarns with rough textures or fibers that might irritate your baby’s skin. Smooth, lightweight yarn will help your stitches look neat and uniform while keeping your baby comfortable.
The right hook size is also crucial. Check the yarn label for recommendations, but most baby crochet projects use hooks between 3.5mm and 5mm. A slightly smaller hook can create tighter stitches that help the hat and cape keep their shape better. Always make a small swatch before starting the main project to test your gauge.
Color choice is another way to make this project truly special. Traditional dinosaur shades like green, turquoise, or mustard work beautifully, but don’t be afraid to personalize. A pink or lavender dino hat can look just as charming. You can also add contrasting spikes or borders in vibrant colors for a playful finish.
Besides yarn and hooks, gather accessories like stitch markers, scissors, and a tapestry needle for weaving in ends. These small tools will make the process smoother and help you maintain consistency in your work. Keeping your workspace organized ensures your project stays clean and neat—important when making items for babies.
Finally, always prewash your yarn before using it for baby garments. This ensures that any residues or dyes are removed, and the final product will be safe for sensitive skin. With your materials ready, you’re set to begin your delightful dinosaur adventure.
Now that your materials are ready, it’s time to begin crafting the Baby’s Dino Hat. The hat is usually crocheted in the round, starting from the crown and working downward. This allows for a smooth shape that comfortably fits your baby’s head.
Begin by making a magic ring and working several double crochet stitches into it. Close the round and continue increasing in each round until you reach the desired circumference. Measuring your baby’s head is key here; babies’ sizes can vary, so adjust the pattern to ensure a snug yet comfortable fit.
Once the crown is the right size, continue crocheting in rounds without increases to create the body of the hat. This section determines the length, so check periodically by gently placing it over your baby’s head (or a size reference). Keep your tension even for a professional look.
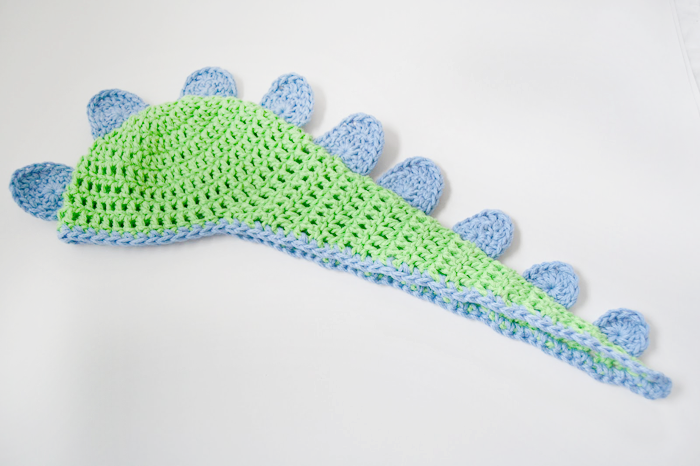
The highlight of this hat is the dino spikes. You can crochet them separately using triangle shapes and then sew them along the top center of the hat. The spikes add that adorable dinosaur charm that makes this pattern stand out. Use a contrasting color like orange, yellow, or blue to make them pop.
After attaching the spikes, you can add earflaps for extra warmth and a secure fit. Crochet two flaps on each side, finishing them with braided ties or button fasteners. Earflaps not only enhance comfort but also complete the dino look perfectly.
Finally, weave in all loose ends carefully. Babies love to explore textures with their hands and mouths, so make sure there are no loose threads or sharp yarn ends. When you finish, your hat will be soft, safe, and ready to charm everyone who sees it.
The Crochet Pattern: Baby’s Dino Hat with Cape wouldn’t be complete without its cozy companion piece—the cape. The cape adds a touch of fantasy, transforming the outfit into a full dinosaur ensemble. It’s an easy-to-make piece that complements the hat beautifully.
Start the cape by making a chain long enough to wrap comfortably around your baby’s shoulders. The cape should drape gently without being too heavy or restrictive. Work rows of half-double crochet stitches, which give a nice texture and flexibility to the garment.
To give your cape that dinosaur flair, add spikes along the back, just like you did with the hat. Make small triangle shapes and sew them evenly down the center of the cape. The matching spikes create a cohesive look that’s simply irresistible.
You can also add a button or tie closure at the neckline for easy wear. Make sure the closure is baby-safe—avoid small buttons that could pose choking hazards. Crochet ties or large flat buttons are both safe and stylish options.
Another way to enhance the cape is by using two-tone colors. For example, a green base with darker green or yellow edging can create a stunning visual effect. Experiment with color combinations that complement your hat and bring your dino theme to life.
Lastly, block your finished cape lightly by pinning it into shape and spraying it with water. This helps the stitches settle evenly, giving your work a smooth and professional finish. Once it’s dry, your dino cape will be ready to pair with the hat for the cutest handmade outfit imaginable.
A big part of the fun of crocheting is personalizing your projects. The Crochet Pattern: Baby’s Dino Hat with Cape offers endless opportunities for creativity and customization. You can adjust the size, color, and even the type of spikes to suit your vision.
If you’re making this as a gift, consider the recipient’s favorite colors or theme. Some parents love pastel versions for newborns, while older babies might look adorable in bright, bold hues. Adding a small embroidered name tag or applique can make the piece even more special.
For those who want a more textured look, try experimenting with different stitch patterns. Shell stitches or bobble stitches can add playful dimension to the cape or hat. You can also make the spikes softer by lightly stuffing them before sewing them on.
When it comes to care, always hand wash or machine wash on a gentle cycle using mild detergent. Avoid bleach or strong chemicals, as they can damage the yarn and fade colors. Lay the items flat to dry to prevent stretching or warping.
If you plan to sell your finished products, good presentation is key. Wrap your Baby’s Dino Hat with Cape in tissue paper and label it with washing instructions. Handmade baby accessories make thoughtful gifts and popular market items.
Finally, enjoy the process. Crochet is not just about creating something; it’s about the calm, satisfaction, and joy it brings. Each piece you make carries your creativity and care—something truly priceless.
1. Is this pattern suitable for beginners?
Yes! The Crochet Pattern: Baby’s Dino Hat with Cape is beginner-friendly. The stitches used are simple, and the pattern can be easily adjusted as you gain confidence.
2. What type of yarn is best for baby crochet projects?
Use soft, hypoallergenic yarn such as cotton or acrylic blends. These materials are gentle on sensitive baby skin and easy to clean.
3. Can I resize the pattern for older children?
Absolutely. You can increase the starting chain or the number of rounds to fit larger head sizes and longer cape lengths.
4. How long does it take to complete this project?
Most crocheters can finish both the hat and cape within two to three days, depending on skill level and time spent per day.
5. Are there ways to personalize the design?
Yes! You can play with colors, add buttons, or even incorporate small crocheted horns or tails for extra fun.
The Crochet Pattern: Baby’s Dino Hat with Cape is more than a crafting project—it’s a delightful way to create something warm, playful, and full of love. By following this guide, you’ll have everything you need to make a comfortable and adorable dino-themed set for your baby. Whether it’s a gift or a keepsake, this handmade piece will surely bring smiles.
We hope this article has inspired you to start your own Baby’s Dino Hat with Cape project. If you found this guide helpful, please leave your honest opinion and share any suggestions or ideas you have. Your feedback helps make future crochet tutorials even better!
Crocheting this set allows for customization in colors, sizes, and embellishments, making it a perfect handmade gift for newborns and toddlers alike.


