
Ballerina pencil case with zipper Pattern


The Jack in the Box Quilt Block Tutorial is a timeless design guide for anyone who loves the art of quilting. This beautiful and symmetrical block captures the playfulness of its name while maintaining the classic balance that makes quilting such a satisfying craft.
If you’ve been searching for a way to create a quilt block that is visually dynamic yet beginner-friendly, then this Jack in the Box Quilt Block Tutorial will be your ideal starting point.
With precise measurements, thoughtful fabric selection, and a few practical tips, this design can bring both joy and texture to any quilting project.
When learning how to sew the Jack in the Box Quilt Block, you’ll find that its charm lies in its geometric appeal. The block typically combines squares and triangles in a way that creates movement and symmetry, reminiscent of a playful surprise popping out of a box.
Whether you are an experienced quilter or a newcomer, this project allows you to explore pattern repetition and contrast, two key concepts that elevate any quilt from simple to stunning. Using this tutorial, you’ll not only learn how to assemble the block but also how to personalize it to fit your own creative vision.
This Jack in the Box Quilt Block Tutorial also teaches you the importance of color balance and fabric coordination. The interplay of dark, light, and medium tones is what gives this pattern its distinct identity. You can use solid colors for a modern twist or traditional prints for a vintage look. No matter your choice, this block adapts beautifully, offering endless design possibilities for quilts, table runners, pillows, or even wall art. Now, let’s go step by step and explore how to make your own Jack in the Box quilt block.
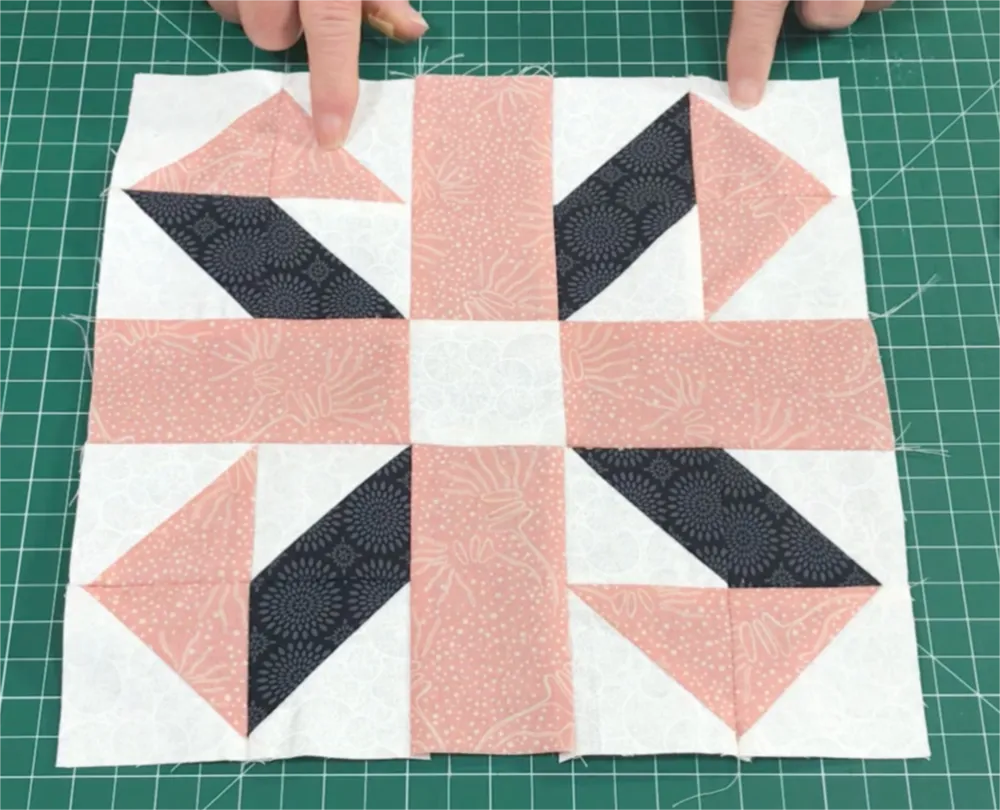
Before you start cutting fabric, it’s important to understand the structure of the Jack in the Box Quilt Block. The block is built from a central square surrounded by a series of triangles and rectangles that form an interlocking pattern. This creates the illusion of depth and motion — the “box” opening outward.
The foundation of this pattern is precision. Each square and triangle must align perfectly to create sharp corners and clean seams. Using a rotary cutter, a self-healing mat, and a clear acrylic ruler will ensure accurate measurements and professional results.
You’ll typically need four fabric tones: a dark shade, a light shade, a medium shade, and a contrasting color to add visual excitement. This contrast is what makes the block pop, echoing the playful energy of its name.
The block can be made in various sizes, but an 8-inch or 12-inch square is ideal for beginners. Smaller blocks allow you to practice alignment and sewing accuracy before moving on to larger quilt projects.
When laying out your pieces, consider using a design board or a flat surface where you can arrange fabrics before stitching. Visualizing the final design helps you make small adjustments to color balance or orientation.
Finally, remember that quilting is as much about creativity as it is about technique. The Jack in the Box Quilt Block Tutorial encourages experimentation — mix fabrics, rotate elements, and discover your own unique version of this delightful design.
To start your Jack in the Box Quilt Block, gather the following materials: quilting cotton fabric in four coordinating colors, a rotary cutter, ruler, mat, sewing machine, iron, and thread. High-quality quilting cotton ensures crisp seams and smooth ironing results.
For a 12-inch finished block, cut the following pieces:
Accuracy in cutting is key. Even a small deviation can cause uneven seams or misaligned corners later. Take your time and double-check each measurement before cutting.
Next, mark your half-square triangles carefully. Draw a diagonal line on the lighter fabric square, sew a ¼-inch seam on both sides of that line, and cut along it. Press the seams toward the darker fabric for a cleaner look.
As you prepare the pieces, stack them neatly by color and type. This organization helps during assembly and prevents mixing up pieces, especially when you are making multiple blocks at once.
Once all your pieces are ready, press them flat with an iron. Proper pressing — not ironing back and forth — helps keep the fabric from stretching or distorting. A flat, well-pressed unit will always yield sharper points and smoother joins in your finished Jack in the Box Quilt Block.
Now that your pieces are cut and prepared, it’s time to sew your Jack in the Box Quilt Block together. Begin by laying out all your fabric pieces in the correct arrangement so you can visualize the final design before stitching.
Start with the center square. Sew the adjacent rectangles on the top and bottom of this square using a ¼-inch seam allowance. Press the seams outward. This creates the central strip of your block.
Next, add the side rectangles and corner squares to complete the first layer around your center. As you stitch, always check alignment. Nesting seams — where one seam allowance is pressed in the opposite direction of the next — will help your corners meet perfectly.
Add the half-square triangles to the corners to create the “box” illusion. The triangles should point outward, forming a diamond-like frame around the center square. Carefully align the diagonal edges to ensure sharp points once sewn.
After assembling the full block, press it flat and square it up to the correct size. Trimming is a vital step; it ensures that all your quilt blocks will join neatly when pieced together later.
Finally, admire your completed block. The Jack in the Box Quilt Block Tutorial shows that attention to detail, patience, and a touch of creativity can produce a beautiful geometric pattern ready to be used in any quilt layout.
The beauty of the Jack in the Box Quilt Block lies in its flexibility. Once you master the basic layout, you can experiment with endless variations that suit your personal aesthetic or project goals.
Try using bold, high-contrast fabrics for a modern, eye-catching design. Alternatively, choose soft pastels or muted tones for a classic, vintage feel. The choice of fabric can completely transform the mood of your quilt.
You can also adjust the scale. Creating smaller blocks can add intricacy to your quilt, while larger blocks provide a bolder, more graphic effect. Mixing sizes within a quilt adds movement and visual depth.
Consider playing with pattern direction. By rotating each block 90 degrees before joining them, you can create a continuous, swirling design that enhances the illusion of movement.
Embellishment offers another way to personalize your Jack in the Box Quilt Block. Add hand embroidery along the seams, or stitch in contrasting thread for decorative topstitching. These small details elevate the block into a true work of art.
Lastly, think beyond quilts — this pattern works beautifully in cushion covers, tote bags, or framed fabric art. The possibilities are endless when you allow your imagination to guide you.
1. What is the ideal size for a Jack in the Box Quilt Block?
The most common finished sizes are 8-inch or 12-inch blocks. Beginners often start with 12 inches because larger pieces are easier to handle and align.
2. Do I need special tools to make this quilt block?
Not necessarily. A rotary cutter, ruler, and self-healing mat are helpful but optional. Accurate cutting and consistent seam allowances are the most important factors.
3. Can I make this block using scraps?
Yes! The Jack in the Box Quilt Block is perfect for using leftover fabric scraps. Mixing different prints and colors gives it a charming, patchwork appeal.
4. How do I avoid fabric distortion?
Always press (not iron) your seams and use a ¼-inch seam allowance. Pressing stabilizes the fabric, keeping your block square and accurate.
5. Can this block be made by hand instead of machine?
Absolutely. Hand-stitching gives a traditional, artisanal touch to your project. Just ensure your stitches are even and your fabric pieces are securely pinned.
6. How can I combine Jack in the Box blocks into a quilt design?
Arrange them in alternating directions for a playful pattern, or line them up symmetrically for a more formal look. Use sashing or borders to frame each block beautifully.
The Jack in the Box Quilt Block Tutorial offers both structure and creativity, making it an excellent project for quilters of all levels. You’ve learned how to cut, sew, and assemble each piece with precision while understanding how fabric choices and layout can dramatically affect the final design. Whether you create a single block or an entire quilt, this pattern showcases your skill and artistic flair.
Take your time, enjoy the process, and remember — quilting is as much about joy and expression as it is about the finished product. We hope this guide inspires you to make your own version of the Jack in the Box Quilt Block.
We’d love to hear your thoughts! Share your honest opinions, experiences, and suggestions in the comments so others can learn from your journey too.


