
Ballerina pencil case with zipper Pattern


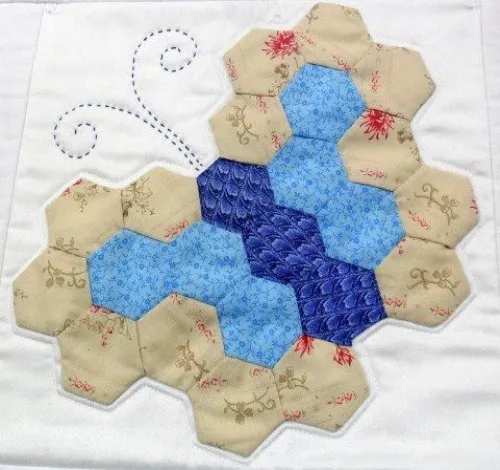
he Hexie Butterfly Quilt is a delightful addition to any quilting project. This pattern combines the timeless appeal of hexagons with the whimsical charm of butterfly designs, creating a quilt that is both eye-catching and elegant.
Whether you are an experienced quilter or just starting, this tutorial will guide you through the steps to craft your very own Hexie Butterfly Quilt, making it a treasured handmade piece for your home or a thoughtful gift.
One of the highlights of the Hexie Butterfly Quilt is its combination of simplicity and sophistication. Hexagon quilts are known for their geometric beauty and ease of assembly, while butterfly motifs add a playful, lively touch.
The pattern is ideal for showcasing a variety of fabrics, from floral prints to solid colors, letting your creativity shine. By following this step-by-step tutorial, you will learn how to cut, piece, and assemble hexagons into beautiful butterfly shapes, resulting in a quilt that is both cozy and visually striking.
Before starting, gather your quilting supplies. You will need fabric in multiple colors, a rotary cutter or scissors, cutting mat, quilting ruler, pins, sewing machine (or needle for hand stitching), and thread that complements your chosen fabrics. The Hexie Butterfly Quilt also benefits from careful planning of color placement, as this can enhance the butterfly effect and give depth to your quilt.
To create a Hexie Butterfly Quilt, start by selecting fabrics that harmonize well together. For a sweet, whimsical look, choose pastel colors like soft pinks, blues, yellows, and purples. For a bolder, modern quilt, mix bright colors with contrasting patterns. The variety of fabrics is key to highlighting the butterfly motif.
Hexagons are the foundation of this quilt. Use a hexagon template to cut your fabric pieces accurately. Standard sizes range from 1.5 to 2 inches across each side, but you can adjust according to the quilt size you want. Accurate cutting ensures the pieces fit together perfectly during assembly.
Once your hexagons are cut, lay them out in the butterfly pattern. Planning your layout beforehand helps maintain symmetry and balance, making the butterflies clearly recognizable within the quilt design. This step is crucial for a visually appealing result.
Prepare your sewing area with all tools at hand. Pins or fabric clips are essential for holding hexagons in place while sewing, especially for hand piecing. A well-organized workspace allows smoother workflow and prevents mistakes.
For beginners, consider practicing with a small section before starting the full quilt. This helps you get comfortable with joining hexagons and creating butterfly shapes without committing the entire fabric at once.
Finally, decide on the quilt size and number of butterflies you want to feature. A baby quilt might include one or two butterflies, while a larger throw could showcase several in a repeating pattern. Proper planning ensures that the Hexie Butterfly Quilt turns out exactly as you envisioned.
Start by assembling the hexagons for the butterfly wings. Arrange six hexagons around a central hexagon to form each wing segment. Secure them using pins before stitching. If hand piecing, use small whip stitches along the edges; if machine sewing, sew slowly to maintain accuracy.
Once the wings are complete, join them to the central body hexagon. The butterfly’s body can be a single solid-colored hexagon or a small rectangular piece for contrast. Position it carefully to maintain symmetry.
Continue adding hexagons for the surrounding quilt background. This frames your butterfly and gives it definition within the larger quilt. Alternate fabric colors for visual interest and depth.
Repeat the process for additional butterflies if creating a multi-butterfly quilt. Ensure that spacing between butterflies is consistent to maintain a balanced look. Adjust hexagon placement as needed for alignment.
After all hexagons are joined, press the seams flat using an iron. Proper pressing enhances the quilt’s overall appearance and makes quilting easier later. Be gentle to avoid stretching the fabric.
Finally, assemble the quilt layers: the Hexie Butterfly Quilt top, batting, and backing fabric. Pin or baste the layers together in preparation for quilting. You can quilt by hand or machine, using straight lines, stitches along the hexagon seams, or free-motion quilting for added texture.
The beauty of the Hexie Butterfly Quilt lies in its adaptability. You can mix prints and solids to create butterflies that “pop” against the background. Pastels create a soft, dreamy effect, while bold colors give a modern and energetic feel.
Try using gradient fabrics for the wings. This creates an ombré effect, giving the butterflies a lifelike appearance and adding dimension to your quilt. Small accent hexagons in metallic or shimmer fabrics can also highlight certain areas, making the butterflies sparkle subtly.
Experiment with different sizes of hexagons. Smaller hexagons allow for detailed designs, while larger ones speed up the quilt-making process. A combination of sizes can also create a visually dynamic pattern.
Borders and sashing can further enhance the quilt. A simple solid border frames the butterflies, while a patterned border adds contrast and visual interest. Consider matching the border color to the background hexagons for harmony.
Add personalization by incorporating initials or small embroidered motifs within the background hexagons. This is a lovely touch for baby quilts or special gifts.
Finally, consider quilting patterns that follow the hexagon shapes or outline the butterfly wings. This adds texture and helps the design stand out beautifully.
To maintain the beauty of your Hexie Butterfly Quilt, machine wash gently on a cold cycle or hand wash. Use mild detergent and avoid bleach to preserve fabric colors and softness.
Dry the quilt flat or tumble dry on low heat. Avoid high heat, which can shrink or distort the fabric. Proper drying keeps your quilt looking vibrant and crisp.
Regularly check seams for wear, especially if the quilt is frequently used. Reinforce any loose threads to prolong its lifespan.
Store your quilt in a cool, dry place away from direct sunlight to prevent fading. Folding along natural seams helps avoid creases and preserves the quilt’s shape.
Rotate use if the quilt is on display or used regularly. This prevents uneven wear and keeps the fabric looking fresh.
Q: Is this quilt suitable for beginners?
A: Yes! With patience and attention to hexagon placement, even beginners can create a beautiful Hexie Butterfly Quilt.
Q: What fabrics are best?
A: Cotton quilting fabrics are ideal, providing durability and easy handling. Mix prints and solids for contrast.
Q: How do I make the butterflies stand out?
A: Use contrasting colors for wings versus background, and consider gradient or metallic fabrics for added dimension.
Q: Can I customize the quilt size?
A: Absolutely! Adjust the number of hexagons and butterflies to fit baby quilts, throws, or full-size quilts.
Q: How should I quilt it?
A: Straight-line quilting, outlining hexagons, or free-motion quilting works well. Follow the shapes for the best effect.
Q: Can I wash the quilt safely?
A: Yes, wash gently on cold, air-dry or tumble dry low, and avoid bleach to maintain color and shape.
The Hexie Butterfly Quilt combines creativity, precision, and charm, resulting in a quilt that is both functional and visually captivating. From cutting hexagons to assembling wings and quilting, each step allows crafters to express their artistry while creating a practical item. Whether for gifting or personal use, this quilt showcases the beauty of handmade craftsmanship.
With this tutorial, you can confidently embark on your Hexie Butterfly Quilt journey. Experiment with colors, fabrics, and layouts to make it uniquely yours.
Share your finished creations and provide feedback to inspire other quilters. Your opinions and suggestions help the quilting community grow and flourish.


