
Ballerina pencil case with zipper Pattern


If you’re passionate about quilting, then you’ve likely come across the Bear Paw Quilt Block – FREE PATTERN, a timeless and classic design that has been loved by quilters for generations.
This block perfectly blends tradition, creativity, and structure, resulting in a piece that is both visually striking and deeply symbolic. The bear paw design represents strength, guidance, and courage, making it an inspiring choice for many quilters looking to express both artistry and heritage in their craft.
Whether you’re a beginner or an experienced quilter, this pattern provides a fun and rewarding way to enhance your quilting skills while creating something truly meaningful.
The Bear Paw Quilt Block – FREE PATTERN is versatile and suitable for various quilting projects, from cozy lap quilts to large bedspreads. It features a geometric composition that allows you to experiment with different fabrics and color combinations.
The key to mastering this pattern lies in accuracy and attention to detail when cutting and assembling the pieces. Once you learn the basic structure, you’ll find endless ways to adapt and personalize it to suit your taste or decor style.
Before diving into the steps, it’s important to gather your materials and prepare your workspace. Having your tools organized will make the process much smoother. The Bear Paw Quilt Block – FREE PATTERN typically requires just a few essential supplies: quality quilting cotton, a rotary cutter, a ruler, and a sewing machine with a precise ¼-inch seam allowance. Once everything is ready, you can begin your quilting journey with confidence and excitement, knowing that every stitch brings you closer to creating a beautiful and lasting piece of art.
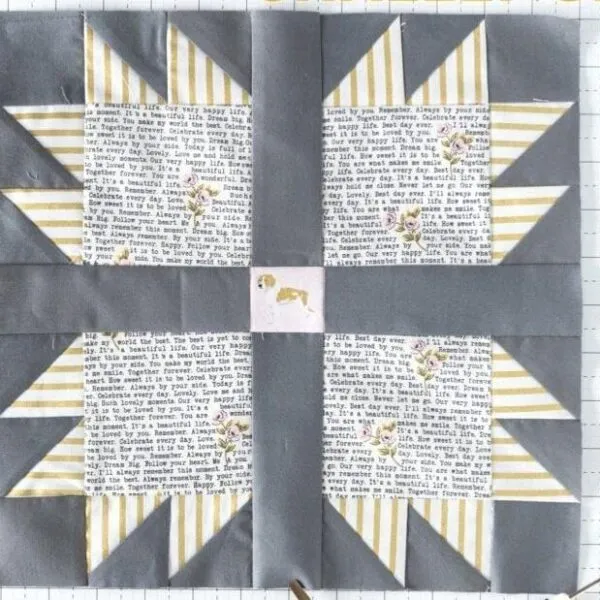
The Bear Paw Quilt Block – FREE PATTERN is built around a simple but powerful layout. Each block consists of a large square surrounded by smaller squares and triangles, forming the “paw” shape. Usually, four bear paw units come together to make one complete block, but you can adjust this according to the size and look you want to achieve.
To start, familiarize yourself with how the pieces fit together. The main components include half-square triangles (HSTs), small squares, and a center square. Accurate cutting is essential because even a small measurement error can misalign the final design. Use a cutting mat and a quilting ruler to ensure clean, straight cuts every time.
When planning your layout, think about your fabric selection. Contrasting colors or patterns help highlight the distinctive paw shape. For example, you can use darker tones for the paw sections and lighter backgrounds to make them stand out. Alternatively, a monochromatic palette can create a subtle, elegant effect.
Another key element in this pattern is the seam allowance. Keeping a consistent ¼-inch seam ensures that all parts align perfectly when assembling the final block. Press your seams carefully—either open or to one side—to maintain a smooth and professional finish.
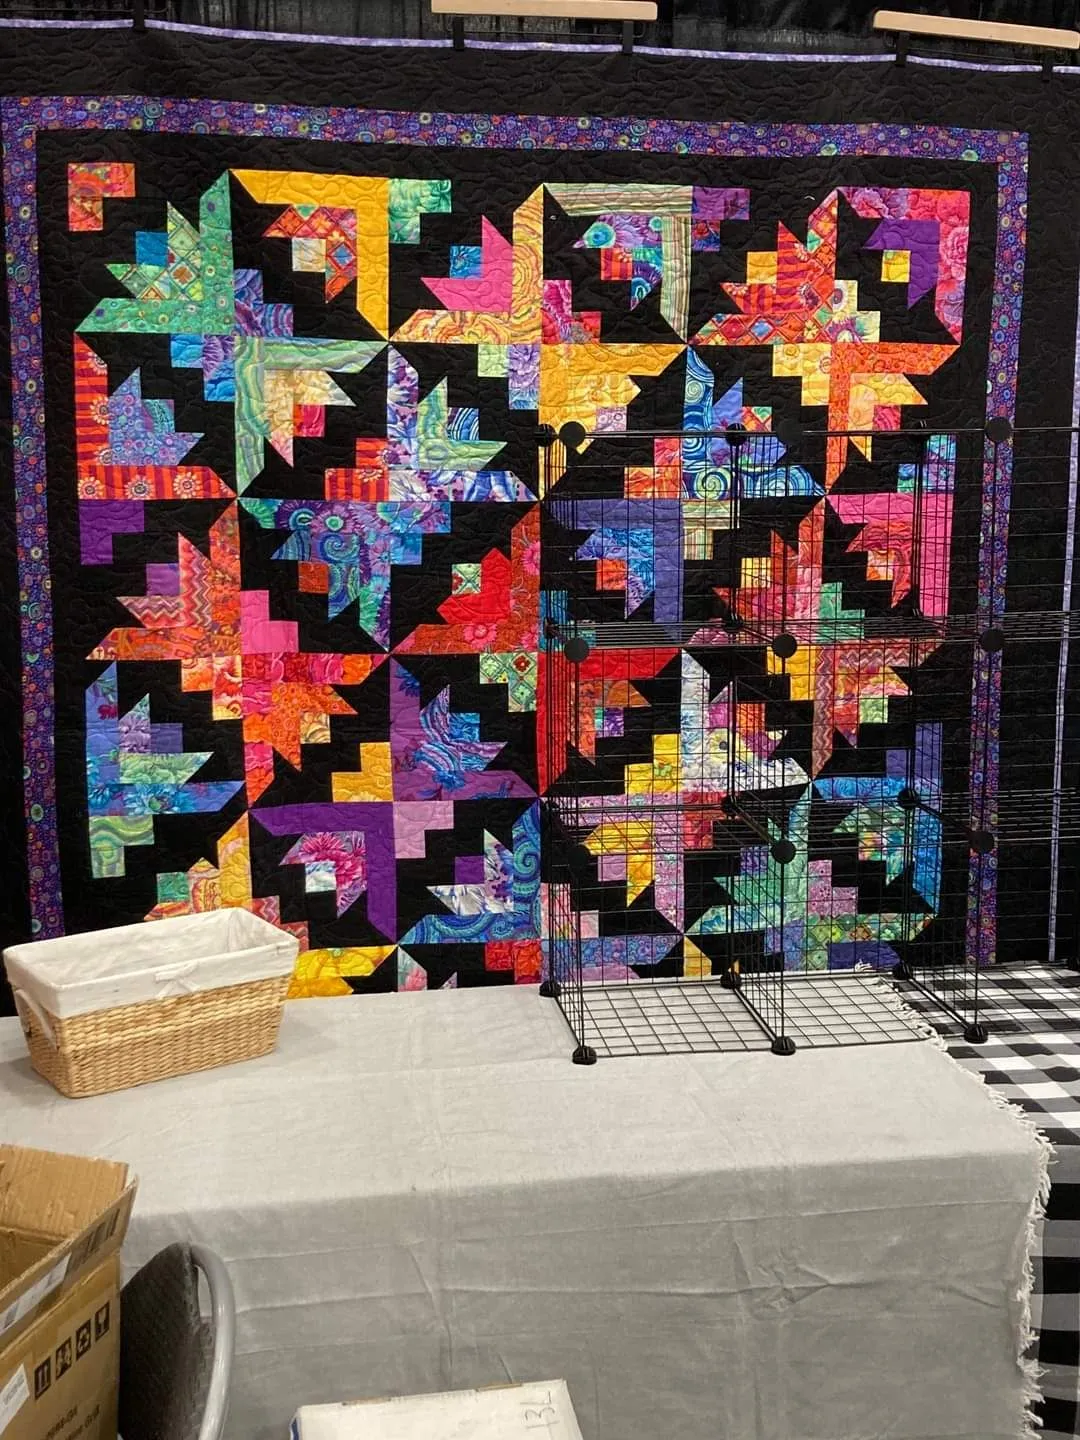
Once you’ve mastered one Bear Paw Quilt Block, you can easily create multiples to form a larger quilt. Repetition of this block creates a stunning and cohesive quilt top that showcases your precision and color sense beautifully.
Finally, take your time with this step. The foundation of a beautiful quilt lies in patience and accuracy. Don’t rush through measuring or piecing—every detail contributes to the final result.
When creating the Bear Paw Quilt Block – FREE PATTERN, fabric preparation plays a major role in achieving clean lines and sharp corners. Begin by selecting two contrasting fabrics: one for the bear paw and one for the background. This will help emphasize the design’s intricate details.
Start by cutting one large square for the paw center, four smaller squares for the paw pads, and eight half-square triangles for the claws. Use your rotary cutter and ruler to ensure precise measurements. Accuracy is the secret to a balanced, professional-looking quilt block.
To create half-square triangles, place two fabric squares right sides together, draw a diagonal line, and stitch ¼ inch on both sides of that line. Then, cut along the drawn line and press open. You’ll get two perfect HSTs. Repeat this until you have all your pieces ready.
Once all the components are cut, organize them neatly in sets for easier assembly. Laying out the pieces before sewing helps visualize the final look and ensures that no element is misplaced. It’s a simple step but makes a huge difference in the accuracy of the design.
Ironing is another essential part of fabric preparation. Press all pieces before sewing to remove wrinkles, ensuring smooth seams and better alignment during assembly.
Finally, check your fabric grain. Keeping all cuts aligned with the fabric grain prevents distortion and makes sewing easier. This small attention to detail gives your Bear Paw Quilt Block – FREE PATTERN a crisp, professional finish.
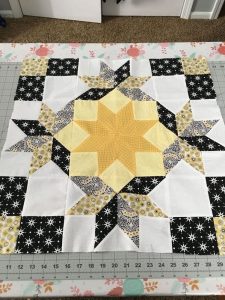
Now comes the fun part—assembling the Bear Paw Quilt Block – FREE PATTERN! Begin by arranging your cut pieces into the traditional bear paw layout. Make sure all triangles and squares are oriented correctly before stitching.
Start sewing smaller units first. Join the half-square triangles to the small squares to form the paw corners. Then, sew these smaller sections to the center square, keeping your seams straight and consistent. It’s best to sew slowly and double-check your alignment at each step.
After the smaller paw units are completed, assemble them into a larger block. Align the edges carefully, pinning if necessary to prevent shifting. A well-aligned seam will make the overall design look cleaner and more professional.
As you piece the block together, press each seam as you go. This step keeps the block flat and prevents fabric bunching. You can press seams open or toward one side—whichever method you prefer.
Once all units are connected, square up the finished block using a rotary cutter and ruler. This ensures all sides are even and will fit perfectly with other blocks in your quilt.
At this point, you’ll have a beautifully structured Bear Paw Quilt Block ready to be joined into a quilt top. Take a moment to appreciate your work—you’ve built a traditional design that’s both bold and timeless.
One of the best things about the Bear Paw Quilt Block – FREE PATTERN is its versatility. Once you’ve mastered the classic layout, you can experiment with endless variations. Try using scrappy fabrics for a colorful, eclectic look, or go modern with solid colors and minimalistic designs.
Changing the scale is another fun way to personalize your quilt. You can make mini bear paw blocks for smaller projects like pillows or table runners, or go large-scale for a bold statement quilt. The pattern adapts beautifully to any size.
Borders and sashing can also enhance your quilt’s final appearance. Adding a narrow border in a contrasting color can frame each bear paw beautifully, creating a strong visual separation between blocks.
If you want to add texture, consider quilting along the seams or using free-motion stitching to highlight the paw shape. These quilting techniques add dimension and depth to your project.
Color placement can dramatically alter the look of your quilt. For a rustic feel, use earth tones like browns, greens, and golds. For a modern twist, go with bright solids or ombré gradients.
Finally, label your quilt! Add your name, date, and perhaps the inspiration behind your project. This gives your Bear Paw Quilt Block – FREE PATTERN a personal touch and transforms it into a lasting memory.
1. What is the best size for a Bear Paw Quilt Block?
The most common size is 12 inches finished, but you can easily adjust the measurements to make smaller or larger blocks depending on your project.
2. Can beginners make the Bear Paw Quilt Block?
Absolutely! The Bear Paw Quilt Block – FREE PATTERN is beginner-friendly as long as you pay attention to cutting accuracy and seam allowance.
3. What fabrics work best for this pattern?
High-quality quilting cotton is recommended because it presses well and maintains shape. Using contrasting colors will help the paw design stand out.
4. How many blocks do I need for a full quilt?
This depends on your desired quilt size. For a queen-size quilt, you’ll typically need around 30–40 blocks.
5. Can I make this block using scraps?
Yes! The Bear Paw Quilt Block – FREE PATTERN is perfect for using up fabric scraps, especially for the smaller paw pieces and triangles.
6. How should I quilt the finished piece?
You can quilt in the ditch for a traditional look or use free-motion quilting to add creativity and depth to the design.
The Bear Paw Quilt Block – FREE PATTERN combines tradition, artistry, and precision in one elegant design. From learning to cut accurate pieces to experimenting with colors and layouts, this pattern offers a fun and fulfilling quilting experience. Whether you’re creating a cozy throw or a large bed quilt, each bear paw you sew tells a story of craftsmanship and creativity.
Now that you’ve learned how to make this beautiful block step by step, take your time experimenting with your favorite fabrics and layouts. Share your experience, leave your honest opinion, and suggest new ideas—you might inspire another quilter to start their own Bear Paw Quilt Block journey!


