Crochet Pig In A Granny Square Blanket Pattern


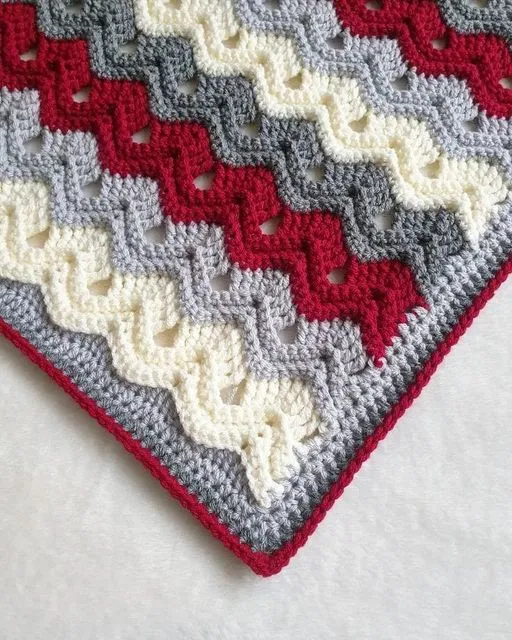
The Vintage Fan Ripple Stitch is a timeless crochet technique that blends elegance with rhythmic texture, creating waves of beauty in every piece you make.
This classic pattern stands out for its scalloped fan shapes and smooth rippling motion that brings visual movement and sophistication to your crochet projects.
Whether you are creating blankets, shawls, scarves, or decorative throws, mastering the Vintage Fan Ripple Stitch will add a stunning vintage charm to your handmade items.
This stitch pattern has stood the test of time because of its versatility and ability to adapt to different types of yarn and color combinations.
From soft pastel shades for a vintage-inspired baby blanket to bold contrasting hues for a modern twist, the Vintage Fan Ripple Stitch offers endless possibilities. The design combines structure and flow, producing a textured fabric that feels both cozy and visually captivating.
Learning the Vintage Fan Ripple Stitch may look complex at first, but once you understand the rhythm of its repeats, it becomes soothing and enjoyable. Each row builds gracefully upon the last, forming peaks and valleys that mimic gentle waves. This combination of repetition and creativity is what makes crocheting this pattern both relaxing and deeply satisfying. In the next sections, you’ll discover how to crochet it, where to use it, and the best tips for achieving perfect results.
To truly appreciate the Vintage Fan Ripple Stitch, it helps to understand its construction and how it differs from a standard ripple or chevron pattern. Unlike the sharp points of a classic chevron, this stitch creates soft, rounded fans that look like open shells. These fans are formed through a combination of increases and decreases, strategically placed to shape the ripple effect while maintaining balance across the fabric.
Each fan typically begins with a base of double or treble crochet stitches, depending on the variation. The stitch count increases in the center of each fan, creating a raised arch, and decreases between fans form the dips that define the ripple motion. The rhythm of this structure gives the pattern its mesmerizing appearance. Even beginners who practice the stitch a few times will quickly grasp the flow of increases and decreases.
Another reason the Vintage Fan Ripple Stitch remains so beloved is its adaptability. You can modify the number of stitches in each fan to adjust the height and width of your ripples. This means you can create narrow, delicate waves for smaller projects like table runners, or large, sweeping curves for blankets and afghans. The flexibility of the design allows for experimentation without losing the signature fan texture.
Color also plays a major role in enhancing this stitch. Many crocheters enjoy changing yarn colors every few rows to highlight the curves of the ripple. When done in gradient or ombré yarns, the Vintage Fan Ripple Stitch creates a soft transition of hues that looks naturally blended. The interplay of color and texture makes this pattern both dynamic and elegant.
If you’re just starting out, it’s best to practice on a small swatch first. This helps you get comfortable with counting stitches and recognizing the pattern’s rhythm. Once you’ve established your tension and flow, you’ll be ready to take on larger projects confidently. The stitch’s beauty truly reveals itself as it grows, row by row, into a flowing fabric full of movement and charm.
Creating the Vintage Fan Ripple Stitch involves mastering a repeat sequence of stitches that form fans and ripples. You can use your preferred yarn and hook, but a medium-weight yarn and a suitable hook size are ideal for beginners to clearly see the stitch structure. The key to success is consistency — ensuring each row aligns properly with the one before it.
Start by chaining a multiple of stitches that fits your chosen pattern repeat. Many crocheters use multiples of 18 plus 1 for balance. The first row establishes your base, usually worked in double crochet stitches. From there, you begin forming the fans by increasing several stitches in one chain space and then decreasing over the next set of stitches to create the dips.
As you continue, the fans start taking shape. The beauty of the Vintage Fan Ripple Stitch lies in its rhythm: once you’ve done a few rows, the pattern almost works itself. You’ll find the repetition meditative and calming. Count your stitches carefully to maintain symmetry; missing or adding even one stitch can disrupt the wave’s smooth flow.
One excellent tip is to mark the top of each fan with a stitch marker during your first few rows. This helps keep track of where to increase and where to decrease. As you gain confidence, you’ll be able to see and feel where the pattern changes naturally, and the markers won’t be necessary.
Blocking your finished work enhances the results significantly. Because the stitch has natural curves, gentle blocking helps smooth and stretch the ripples evenly, highlighting the graceful arcs of each fan. Use steam or wet blocking depending on your yarn type, and allow it to dry flat for best results.
The Vintage Fan Ripple Stitch can be used in countless crochet projects. Whether you’re crafting a lightweight summer wrap, a cozy winter afghan, or even a textured cushion cover, this stitch brings a refined handmade look that never goes out of style. It’s a technique that combines art, rhythm, and timeless beauty.
The versatility of the Vintage Fan Ripple Stitch makes it suitable for a wide variety of crochet projects. Its elegant wave design adapts beautifully to both small and large-scale creations. Many crocheters love using this stitch to make statement pieces that highlight its intricate texture and graceful form.
One of the most popular uses is in blankets and afghans. The rippling fans create a sense of motion, perfect for cozy throws draped across a couch or bed. Using different yarn colors on each row enhances the pattern, turning a simple blanket into a work of art. The stitch also adds a comforting thickness and softness ideal for keeping warm.
Shawls and wraps are another excellent way to showcase the Vintage Fan Ripple Stitch. When crocheted with fine yarn, the resulting fabric has an airy, delicate quality reminiscent of lace, yet it maintains a structured drape. These projects are perfect for adding a touch of vintage elegance to your wardrobe.
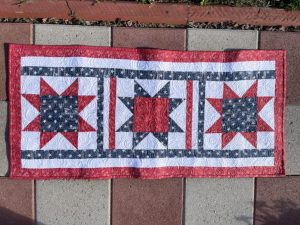
If you prefer smaller projects, consider creating scarves or table runners. A Vintage Fan Ripple Stitch scarf can be both decorative and functional, making it a wonderful handmade gift. Table runners worked in this stitch bring a nostalgic touch to any home décor, especially when made in soft cream or pastel tones.
Cushions and pillow covers are also popular choices. The ripple texture adds dimension to living spaces, and the stitch’s strength ensures durability. You can even combine the Vintage Fan Ripple Stitch with other crochet patterns for a mixed-texture aesthetic that feels modern yet classic.
For baby projects, such as blankets or crib covers, this stitch works beautifully in soft yarns and gentle shades. The rounded fans look charming and cozy, creating a precious heirloom-quality piece that families can treasure for years. The soothing rhythm of the pattern also makes it ideal for relaxing crochet sessions.
Even though the Vintage Fan Ripple Stitch is beginner-friendly, mastering its symmetry and tension requires attention and practice. A few professional tips can help you perfect your technique and produce stunning, consistent results in every project you make.
First, choose yarn that shows off texture. Smooth, high-quality yarns such as cotton or acrylic blends work best because they highlight the ridges and valleys of the fans. Avoid overly fluffy or novelty yarns that can obscure stitch definition, especially while learning the pattern.
Next, always maintain even tension throughout your work. The ripple structure depends on consistent stitch height to achieve balanced waves. If your tension varies, the peaks and dips may look uneven. Take time to find your natural rhythm, and don’t rush your stitches.
Counting is critical in ripple patterns. Use stitch markers or row counters to help you stay on track. A simple counting mistake can throw off the entire ripple, making it difficult to correct later. It’s better to double-check your stitch count at the end of each row than to discover an error several rows up.
Experimenting with color placement can transform your project. You can use a single color for a subtle vintage look or alternate hues to emphasize the wave pattern. Many crocheters enjoy working with gradient or variegated yarns, which add depth without the need for frequent color changes.
Blocking is the final step that brings out the full beauty of your Vintage Fan Ripple Stitch project. Gently stretch and shape your piece after finishing, letting it dry flat. This enhances stitch definition and evens out the ripples, giving your work a polished, professional appearance.
Lastly, patience is key. Like all intricate crochet patterns, the Vintage Fan Ripple Stitch rewards persistence. The more you practice, the more natural the rhythm becomes, turning each session into a relaxing creative experience.
1. Is the Vintage Fan Ripple Stitch suitable for beginners?
Yes, beginners can learn it with patience. The pattern looks complex, but once you understand the repeat sequence, it becomes easy to follow and very rewarding.
2. What type of yarn works best for this stitch?
Smooth yarns that highlight stitch definition—like cotton, acrylic, or blended yarns—are ideal. Avoid fuzzy or bulky textures when starting out.
3. Can I use the Vintage Fan Ripple Stitch for garments?
Absolutely! It looks beautiful on shawls, cardigans, and skirts. Just choose a lightweight yarn to maintain comfort and drape.
4. How do I fix a mistake in the ripple pattern?
It’s best to unravel (frog) back to the last correct row and rework from there. Because the pattern is repetitive, you’ll quickly find your place again.
5. How many chains do I need to start?
This depends on your project size, but most patterns use multiples of 18 plus 1. Always test with a small swatch first.
6. Does blocking affect the final look?
Yes, blocking is highly recommended. It helps even out the waves, enhances stitch definition, and gives your project a professional finish.
The Vintage Fan Ripple Stitch is more than just a crochet technique — it’s an artistic expression of movement, texture, and timeless charm.
Whether you’re a beginner discovering new stitches or an experienced crocheter looking to elevate your designs, this pattern offers endless creative opportunities. Its soft ripples and elegant fans bring warmth, beauty, and sophistication to every handmade piece.
If you’ve enjoyed learning about this beautiful stitch, take your yarn and hook and start practicing today. With patience and creativity, you’ll soon master the gentle waves that define the Vintage Fan Ripple Stitch.
Don’t forget to leave your honest opinion and suggestions below — your feedback helps inspire new ideas and keeps the crochet community thriving with creativity.


