Crochet Pig In A Granny Square Blanket Pattern


The Crochet Shell Pattern Tutorial is a detailed guide for creating one of the most classic and versatile crochet designs. Shell stitches are widely loved for their scalloped, fan-like appearance, which adds texture and elegance to any project.
Whether you are making blankets, scarves, shawls, or decorative items, mastering the shell stitch opens up endless creative possibilities.
Learning the crochet shell pattern is perfect for both beginners and experienced crocheters. This tutorial explains step by step how to achieve consistent shells, combine them into rows, and create visually striking patterns.
Using the crochet shell pattern allows you to experiment with different yarns, hook sizes, and color combinations. From delicate lace-like shells to bold, chunky fan motifs, this pattern can be adapted to suit any style. It’s a relaxing and rewarding technique, ideal for both practical projects and decorative pieces.
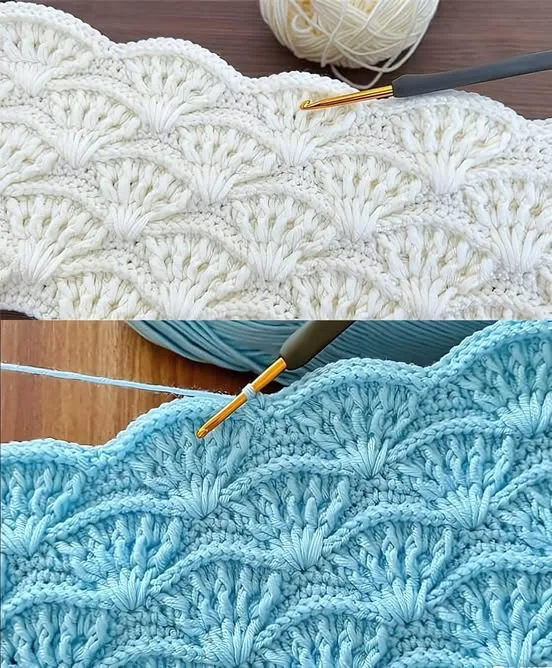
The shell stitch is a basic crochet pattern in which multiple stitches are worked into a single stitch or space to form a fan shape. Typically, double crochet stitches are used, but variations can include half-double or treble crochets. The result is a scalloped texture that adds dimension and visual interest.
In this Crochet Shell Pattern Tutorial, we focus on creating even, uniform shells that can be combined into rows and motifs. A standard shell often consists of five double crochets worked into one stitch or chain space, but this number can be adjusted to create larger or smaller shells.
Choosing the right yarn and hook is essential when working the crochet shell pattern. Smooth yarns highlight the scalloped texture, while soft, medium-weight yarns are ideal for blankets or wearable items. Using the correct hook size ensures that the shells maintain their shape and spacing.
The shell stitch is highly adaptable. It can be worked flat for blankets and shawls or in the round for doilies, coasters, or hats. By learning the basics in this tutorial, you can apply the shell stitch to almost any crochet project.
To maintain consistency, always count stitches carefully and use stitch markers when necessary. Consistent tension ensures that each shell is uniform and that your project lays flat without curling.
Additionally, the shell stitch can be paired with other crochet techniques, such as single crochet borders or lace patterns, to create complex, textured designs while maintaining structure and stability.
Step 1: Foundation Chain
Begin with a foundation chain that is a multiple of the stitch pattern repeat. For example, a simple shell stitch may require a multiple of six chains plus additional chains for turning.
Step 2: First Row of Shells
Work the first row according to the pattern, creating shells by crocheting multiple stitches into single chain spaces. This forms the base for all subsequent rows.
Step 3: Chain Spaces
Between shells, chain the required number of stitches to create spacing. These chains help separate the shells and maintain their fan-like shape.
Step 4: Next Rows
Turn your work and continue creating shells in each row, usually placing them between shells from the previous row. This offset placement enhances the texture and prevents bulk.
Step 5: Adjusting Size
To make shells larger, increase the number of stitches per shell. For smaller, delicate shells, decrease the number of stitches. Experimenting with different sizes creates unique visual effects.
Step 6: Finishing the Project
Once your project reaches the desired size, finish with a border if desired. Simple single crochet or decorative scalloped borders complement the shell pattern beautifully.
By following these steps in the crochet shell pattern tutorial, you can create uniform, elegant shells that enhance any project.
Maintaining consistent tension is critical when creating the crochet shell pattern. Uneven tension can distort the shells and affect the overall appearance of the project.
Counting stitches carefully ensures that each shell is formed correctly and that your rows remain even. Miscounts can cause shells to shift and create irregularities in the fabric.
Using stitch markers helps track the beginning and end of each shell, especially in longer rows or larger projects.
Press lightly with an iron or block your finished work to open up the shells and enhance their definition.
Experiment with color changes between rows to add depth and dimension to your project. Contrasting colors can make each shell stand out beautifully.
Practice on a small swatch before starting a larger project. This allows you to perfect your technique and ensure uniform shells throughout your work.
The shell stitch is incredibly versatile. It can be used for blankets, throws, scarves, shawls, hats, and decorative items like doilies or table runners.
For baby blankets, the shell stitch creates a soft, textured surface that is both visually appealing and comfortable.
Scarves and shawls benefit from the shell pattern’s flow and drape, producing elegant, wearable designs.
Cushion covers or pillowcases gain texture and charm with rows of shells, transforming plain fabrics into eye-catching accents.
The shell stitch can also be adapted for seasonal projects, such as festive decorations or themed gifts, making it a creative go-to stitch for any occasion.
You can combine the shell stitch with other crochet motifs like clusters, fans, or lace patterns to create intricate and unique designs.
Finally, crocheting shell patterns provides a rhythmic, relaxing experience. Repeating the fan shapes can be meditative, offering both creative satisfaction and stress relief.
Q: Is the shell stitch beginner-friendly?
A: Yes, the basic shell stitch is easy to learn, and this tutorial guides you step by step.
Q: What type of yarn is best?
A: Medium-weight, smooth yarns work best to define the shells. Cotton, acrylic, and blends are ideal.
Q: Can I adjust the size of the shells?
A: Yes, by increasing or decreasing the number of stitches per shell, you can create larger or smaller shells.
Q: Can I use the shell stitch in scarves and blankets?
A: Absolutely. The stitch works beautifully in blankets, throws, shawls, and scarves.
Q: How do I keep shells even?
A: Consistent tension, counting stitches, and using stitch markers ensure uniform shells.
Q: Can I use multiple colors?
A: Yes, alternating colors in rows or shells adds visual interest and depth.
Q: How should I finish the edges?
A: A simple single crochet, scalloped, or shell border complements the design while keeping edges tidy.
The Crochet Shell Pattern Tutorial is a comprehensive guide to creating one of the most classic crochet stitches. From blankets to scarves, shawls, and home décor, this pattern adds texture, elegance, and versatility to any project. By following this tutorial, you can master the shell stitch and incorporate it into a wide range of creative designs.
Exploring different variations of the shell stitch can also enhance your projects. For example, you can combine single, double, and treble crochet shells to create intricate patterns, or stagger the shells in alternating rows for a dynamic, textured effect.
Experimenting with these variations allows you to crochet the shell pattern in unique ways, giving each project a personalized touch and ensuring no two pieces ever look exactly the same.
We encourage you to try this pattern and share your results! Leave your honest opinions, tips, or suggestions — your feedback can inspire fellow crocheters and help everyone improve their shell stitch projects.


