Crochet Pig In A Granny Square Blanket Pattern


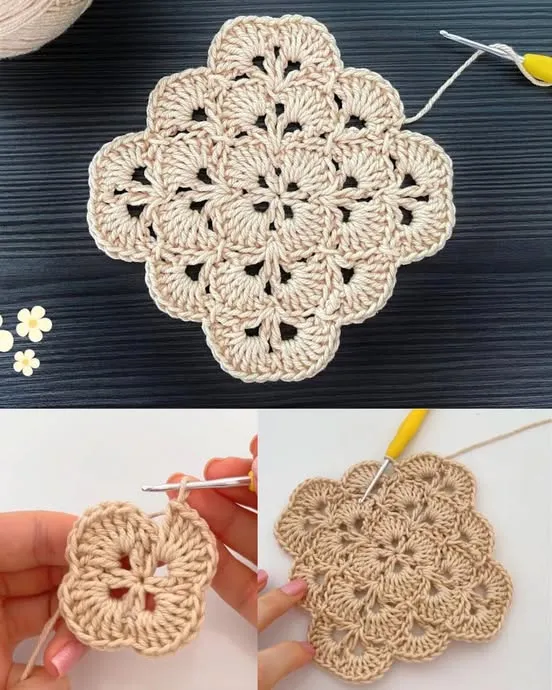
The Crochet Overlay Coaster – FREE PATTERN is an elegant and practical addition to any home décor. These coasters combine beauty and functionality, providing a protective barrier for your tabletops while showcasing intricate crochet designs.
Crocheting a Crochet Overlay Coaster allows you to explore the overlay crochet technique, which involves layering stitches to produce raised, decorative motifs.
The process is fun, relaxing, and results in coasters that make wonderful gifts or additions to your own home. Following this free pattern ensures a smooth experience, guiding you step by step to craft detailed, professional-looking pieces.
The Crochet Overlay Coaster – FREE PATTERN is ideal for crafters who enjoy experimenting with texture and design. Unlike traditional flat coasters, overlay crochet creates depth and visual interest.
This pattern allows you to practice your stitch work, color changes, and finishing techniques while producing functional items that enhance your living space.
In this guide, we will walk you through the entire process of making Crochet Overlay Coasters, from choosing materials to finishing touches. Follow along and create stunning, textured coasters that are both functional and decorative.
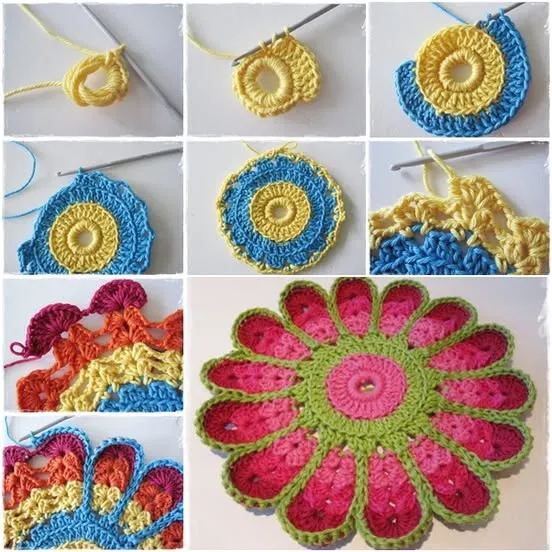
Overlay crochet is a technique that builds layers of stitches on top of one another, creating intricate patterns that appear almost embossed. The Crochet Overlay Coaster – FREE PATTERN uses this technique to form decorative motifs that stand out beautifully against a flat background.
To start, a foundation chain is created and followed by a series of base stitches. On top of these, overlay stitches are worked to form patterns such as flowers, geometric shapes, or abstract designs. The layered effect adds texture, making the coasters unique and visually appealing.
The pattern allows for customization. You can select different yarn colors to highlight the overlay design or keep a monochrome palette for a classic look. Using cotton or cotton-blend yarn ensures durability and easy cleaning, essential for functional coasters.
Overlay crochet requires attention to stitch placement. The free pattern provides clear diagrams and step-by-step instructions to guide you through each round. Understanding the relationship between base and overlay stitches is key to achieving a polished final result.
One of the most rewarding aspects of overlay crochet is watching your design come to life. Each coaster becomes a miniature work of art, perfect for gifting or enhancing your home décor collection.
With practice, you can expand the technique beyond coasters, creating placemats, table runners, or even wall hangings using the same overlay stitch principles.
Creating your Crochet Overlay Coaster is a straightforward process when following this free pattern.
Step 1: Choose Your Yarn and Hook
Select a durable, washable cotton or cotton-blend yarn. A medium-weight yarn (category 3 or 4) is ideal, and a hook size matching the yarn ensures clear stitch definition.
Step 2: Create the Foundation Circle
Begin with a magic ring or adjustable loop, then work a base round of single or double crochet stitches. This forms the center of your coaster.
Step 3: Work the Base Rounds
Continue working in rounds, following the base stitch instructions. Maintain even tension to ensure the coaster remains flat and circular.
Step 4: Begin the Overlay Stitches
Using a contrasting color if desired, start overlay stitches according to the pattern. These stitches are typically placed over previous rounds to form raised motifs.
Step 5: Shape and Expand the Coaster
Follow the diagram carefully, increasing where necessary to maintain a flat shape. Each round adds texture and detail to the coaster.
Step 6: Finish and Secure Ends
Once your overlay design is complete, fasten off and weave in all yarn ends neatly. A clean finish ensures your coaster is ready for use or gifting.
Step 7: Block the Coaster (Optional)
Lightly block your coaster to enhance the shape and definition of the overlay stitches. Pin it to a flat surface and steam or wet block according to the yarn type.
Step 8: Repeat for a Set
Create multiple coasters to form a matching set. Consistent tension and stitch placement ensure that each coaster is uniform in size and design.
To achieve professional results with your Crochet Overlay Coaster, follow these expert tips.
Use stitch markers to maintain correct placement of overlay stitches, especially in complex patterns.
Ensure your tension is consistent to prevent curling edges or uneven surfaces.
Experiment with color contrasts to make the overlay design pop. Bright or complementary colors can enhance the visual impact.
Practice the overlay technique on a small swatch before starting the full coaster to familiarize yourself with stitch placement and pattern flow.
Choose yarn that is machine-washable if your coasters will see frequent use.
Blocking is optional but recommended for achieving crisp, defined shapes and ensuring that the coaster lays flat.
Maintain a clean workspace and organize your yarn and hooks to prevent tangling, especially when working with multiple colors.
The Crochet Overlay Coaster – FREE PATTERN can be adapted to suit your style and home décor.
Try using variegated yarn for a dynamic color effect that changes with each round.
Create seasonal or themed coasters by choosing colors or motifs that reflect holidays or personal interests.
Use metallic or glittery yarn for a festive touch, perfect for entertaining guests.
Combine different overlay motifs in a single set to produce a diverse, eye-catching collection.
Make larger versions to serve as decorative placemats, maintaining the same overlay technique for consistency.
Add decorative edging such as scallops, picots, or small fringe to enhance the design and add a unique finish.
Mix textures by using a combination of cotton and bamboo yarn for a soft yet durable feel.
Q: Is the Crochet Overlay Coaster suitable for beginners?
A: Yes. While the overlay technique requires attention, the free pattern provides clear instructions, making it approachable for beginners.
Q: What type of yarn works best?
A: Cotton or cotton-blend yarn is ideal due to durability and ease of washing. Medium-weight yarn works best for texture and stitch definition.
Q: Can I use multiple colors?
A: Absolutely. Overlay crochet looks stunning with contrasting colors or subtle gradients.
Q: How long does it take to make one coaster?
A: Depending on skill level, a single coaster may take 1–2 hours.
Q: How do I prevent curling edges?
A: Maintain consistent tension, increase as instructed, and block the coaster if necessary.
Q: Can this pattern be scaled?
A: Yes. You can make larger or smaller coasters, placemats, or decorative pieces using the same overlay technique.
Q: How do I care for the finished coaster?
A: Machine wash on gentle or hand wash, and lay flat to dry to maintain shape and texture.
The Crochet Overlay Coaster – FREE PATTERN is an accessible and beautiful project for crocheters of all levels. By mastering overlay stitches, you can create coasters that are both functional and decorative, adding a touch of artistry to your home.
With this free pattern, even beginners can craft professional-looking pieces that make perfect gifts or stylish additions to any tabletop.
Now that you’ve learned the step-by-step process, gather your yarn and hooks and start creating your own Crochet Overlay Coasters. Share your results, ideas, and variations — your creativity may inspire others to try this elegant crochet technique.


