
Ballerina pencil case with zipper Pattern


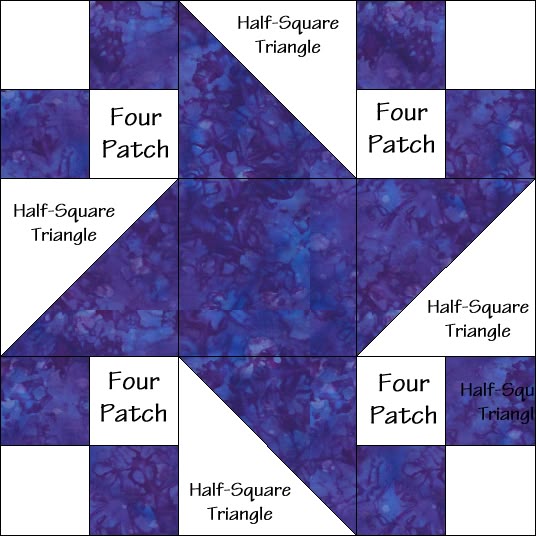
The Milky Way Quilt Block Diagram is a stunning design that captures the beauty of the night sky in quilt form. Inspired by the galaxy’s swirling patterns and radiant stars, this block design combines precision with creativity.
Using the diagram as a guide, quilters can recreate the visual complexity of the Milky Way while maintaining balance and symmetry in their quilt blocks.
Creating a Milky Way Quilt Block is both artistic and rewarding. The design incorporates geometric shapes arranged in circular or spiral patterns, giving the illusion of motion and depth.
The beauty of using a Milky Way Quilt Block Diagram lies in its clarity. The diagram allows quilters to visualize color placement, stitch direction, and block assembly before cutting fabric. This reduces errors and ensures a polished, professional finish, making it suitable for beginners and advanced quilters alike.
The Milky Way Quilt Block draws inspiration from astronomy, translating stars, clusters, and cosmic movement into geometric shapes. Typically, the block features a central starburst or spiral surrounded by radiating segments, representing the galaxy’s core and arms.
The first step in creating the Milky Way Quilt Block Diagram is cutting your fabric into the right shapes. To begin, you’ll need to cut the fabric into small squares or triangles for the various elements of the block. The exact measurements will depend on the design you choose, but the key is to ensure that your pieces are cut precisely to maintain symmetry and alignment throughout the block.
Start by cutting the background fabric in larger pieces, as this will form the outer parts of the block. Then, cut smaller pieces for the swirling shapes and stars. These will need to be carefully arranged to create the movement and pattern that defines the Milky Way. Don’t forget to cut a few additional pieces just in case you need them later.
Choosing the right fabrics is crucial. Light and dark fabrics create contrast that mimics stars against the night sky. Metallic or shimmery fabrics can add sparkle, emphasizing the celestial theme.
Precision is essential when working with the Milky Way Quilt Block Diagram. Each piece must be cut accurately to ensure the shapes fit together correctly. Using a rotary cutter, ruler, and templates can make the process smoother and more precise.
The block can be scaled for different quilt sizes. A single Milky Way Quilt Block can serve as a focal point in a quilt, or multiple blocks can be combined to create a galaxy-themed quilt top. Each block contributes to the overall cosmic effect.
Color placement is critical for achieving depth. Darker shades in the background help the central starburst or spiral pop, creating a three-dimensional look. Gradients or ombré fabrics are particularly effective for adding movement and realism.
Finally, understanding seam allowances and proper pressing techniques is essential. Pressing seams open or to one side helps maintain accuracy and prevents bulk, which is crucial for blocks with multiple intersecting points.
To begin your Milky Way Quilt Block, first review the diagram carefully. Identify the central motif, surrounding shapes, and color distribution. The diagram acts as a roadmap, guiding your cutting and piecing.
Step 1: Select your fabrics according to the diagram. Typically, you’ll need a mix of dark, medium, and light fabrics for contrast. Prewash fabrics to prevent color bleeding.
Step 2: Cut pieces precisely using the diagram as a template. Diamonds, triangles, or trapezoids may be required depending on the pattern. Accurate cutting ensures seamless assembly.
Step 3: Start piecing the central motif. Sew small segments together carefully, following the diagram’s sequence. Pinning pieces before stitching helps maintain alignment.
Step 4: Assemble surrounding shapes, gradually building outward. The diagram shows exact placement for each segment, helping you maintain symmetry and balance.
Step 5: Press each seam as you go. Proper pressing keeps the block flat and ensures that points meet precisely, which is especially important for blocks with intricate geometric designs.
Step 6: Once all pieces are joined, compare your block to the diagram. Make adjustments if necessary to ensure alignment and color placement match the intended design.
By following the Milky Way Quilt Block Diagram, you’ll create a precise, visually stunning quilt block that captures the essence of the galaxy.
Use high-quality fabrics with minimal stretch to maintain shape and alignment. Cotton quilting fabrics are ideal for precision and durability.
Mark your sewing lines carefully using chalk or water-soluble pens to ensure accurate stitching, especially when working with intricate segments.
Consistent seam allowances are critical. Even slight variations can throw off the geometric precision of the Milky Way Quilt Block.
Chain piecing can speed up assembly while maintaining accuracy. Sew multiple segments in sequence before trimming threads for efficiency.
Experiment with gradient color placement to mimic the Milky Way’s natural variations in light and color. This adds depth and dimension to the block.
Lastly, take your time. Precision, patience, and attention to detail make the difference between a good block and a truly stellar Milky Way Quilt Block.
The Milky Way Quilt Block Diagram can inspire many variations. Try different color schemes: dark purples, blues, and blacks for a cosmic look, or vibrant shades for a more whimsical effect.
Consider using metallic or glitter fabrics to create stars that sparkle, adding a realistic celestial touch.
Combine multiple blocks to create a galaxy quilt top, alternating the central star or spiral positions to give a sense of motion across the quilt.
Smaller versions of the block can be used as accents in larger quilts, or incorporated into pillows, table runners, or wall hangings for a cosmic theme.
Add applique or embroidery elements to emphasize stars, planets, or other celestial details. These creative additions personalize your Milky Way Quilt Block further.
Experiment with asymmetrical color placement while following the diagram to create a more abstract or artistic galaxy effect.
Q: Is the Milky Way Quilt Block Diagram suitable for beginners?
A: Yes. While some blocks require precise piecing, following the diagram step by step makes it accessible to dedicated beginners.
Q: What fabrics are best for this block?
A: 100% cotton quilting fabrics work best for accuracy, durability, and ease of piecing.
Q: Can I use metallic fabrics?
A: Absolutely. Metallic or shimmery fabrics highlight the stars and central motifs for a realistic galaxy effect.
Q: How do I prevent points from misaligning?
A: Pin carefully, maintain consistent seam allowances, and press seams as you go to ensure points meet accurately.
Q: Can this block be scaled for different quilt sizes?
A: Yes. Adjust the number of blocks or the size of each block to fit your quilt dimensions.
Q: How can I add more depth?
A: Use gradient fabrics or mix light and dark shades strategically according to the diagram for a three-dimensional appearance.
Q: Is it possible to combine multiple diagrams?
A: Yes. Combining multiple Milky Way Quilt Block Diagrams can create a larger galaxy-themed quilt with dynamic visual flow.
The Milky Way Quilt Block Diagram provides quilters with a clear, structured way to create a visually striking quilt block that evokes the beauty of the galaxy.
By carefully following the diagram, selecting complementary fabrics, and paying attention to precision, you can craft a block that is both artistic and functional. Whether used as a single focal point or combined into a larger quilt, this block adds cosmic elegance to any project.
We hope this guide inspires you to bring the night sky into your quilting projects. Share your creations, tips, and ideas — we’d love to hear your honest feedback and suggestions for future quilting designs.


