
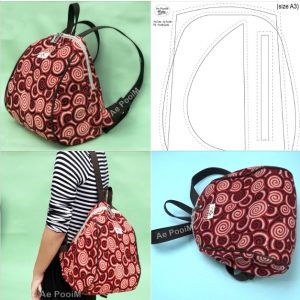
Ballerina pencil case with zipper Pattern


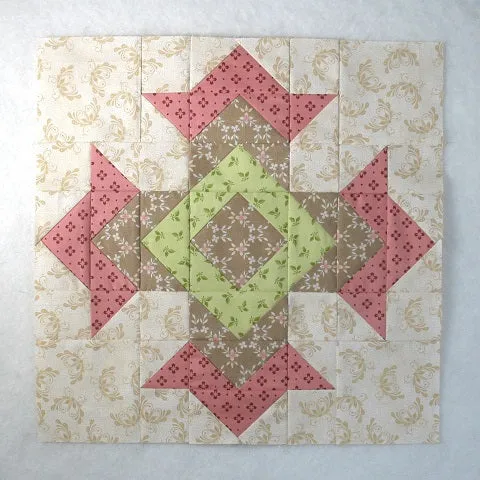
The God’s Eye Quilt Block – Free Tutorial is a wonderful way to combine creativity, color, and precision in quilting. This classic quilt block pattern, inspired by the traditional “Ojo de Dios” craft, features vibrant diamond shapes radiating from a central point.
Quilting the God’s Eye Quilt Block is not only about producing a visually striking piece; it’s also about exploring geometry, color combinations, and textile design.
The block’s symmetry allows for endless experimentation with fabrics, making it perfect for personalizing your quilt. Whether you are a beginner or an experienced quilter, this free tutorial guides you step by step to ensure your blocks turn out precise and elegant.
The God’s Eye Quilt Block – Free Tutorial is highly versatile. You can make a single block for a pillow, combine multiple blocks into a large quilt, or use them as wall hangings.
The God’s Eye Quilt Block is recognized by its distinctive diamond and star shapes that radiate outward from the center. The design is inspired by the spiritual craft of “Ojo de Dios,” where yarn is woven around crossed sticks. In quilting, these shapes are created using precise cutting and piecing techniques.
Each block starts with a central square and is surrounded by strips of fabric that extend outward, forming a diamond pattern. The placement of colors and fabrics is essential to highlight the radial symmetry and create a dynamic visual effect.
Choosing the right fabrics is crucial for the God’s Eye Quilt Block. Contrasting colors enhance the pattern, while subtle shades can give a more muted, elegant look. Cotton fabrics are ideal because they are easy to cut, sew, and press.
This block can be scaled to any size. Small blocks work well for table runners or pillow covers, while larger blocks make stunning quilt centers. By repeating and rotating the blocks, you can create complex patterns that look professionally designed.
Attention to seam allowance is important. Using a consistent ¼-inch seam ensures that all points align perfectly, maintaining the integrity of the diamond and star shapes.
Finally, the God’s Eye Quilt Block offers endless customization. You can experiment with prints, solids, gradients, or even combine multiple textures to create a quilt that is entirely unique to your taste.
To create your God’s Eye Quilt Block, begin by gathering your materials: fabric in at least three contrasting colors, a rotary cutter, cutting mat, ruler, pins, and a sewing machine. Cotton quilting fabrics are recommended for ease of handling and durability.
Step 1: Cut your fabrics into strips according to the size of your block. For a standard 12-inch block, 2½-inch strips work well. Each color will be used in the diamond arms extending from the center square.
Step 2: Sew the first strip to the central square, aligning edges carefully. Press seams open with an iron to reduce bulk and maintain crisp lines. Repeat with the second strip on the opposite side.
Step 3: Continue adding strips in alternating colors, pressing seams after each addition. Ensure that the points of the diamonds align at the center. Precision at this stage is crucial for a professional-looking block.
Step 4: Once all strips are sewn, trim excess fabric and square up the block using a ruler. Accuracy ensures that blocks will fit together perfectly when assembling the quilt.
Step 5: Repeat the process to create multiple blocks. You can rotate blocks in different directions to create secondary patterns, adding depth and interest to your quilt.
Step 6: Join blocks together with careful alignment, maintaining consistent seam allowance. Add borders if desired to frame the quilt and enhance the design.
Accuracy is key for the God’s Eye Quilt Block. Use a rotary cutter and ruler to achieve straight, precise cuts. This helps all diamond points and edges align perfectly.
Press seams open after each addition. Pressing reduces bulk and ensures the block lays flat, which is especially important when joining multiple blocks.
Choosing contrasting fabrics enhances the visual impact. Bright or patterned fabrics make the diamond shapes pop, while subtle colors give a refined, soft appearance.
Use pins or clips to hold strips in place before sewing. This prevents shifting and ensures that your points meet exactly at the center.
Maintain a consistent ¼-inch seam allowance. Inconsistent seams can distort the shape and alignment of the block, affecting the overall quilt layout.
Experiment with rotation and arrangement. Rotating the blocks 90 or 180 degrees creates secondary designs and adds interest to your quilt without adding complexity to the sewing process.
The God’s Eye Quilt Block can be used in various projects beyond traditional quilts. Consider making pillow covers, table runners, or wall hangings to showcase the pattern in different ways.
Color plays a significant role. A gradient from dark to light across the diamonds can mimic the look of a radiant sunburst, while random color placement creates a playful, eclectic effect.
This block is ideal for scrap quilting. Small pieces of leftover fabric can be incorporated into the diamond strips, giving new life to fabric remnants.
You can also combine the God’s Eye Quilt Block with other quilt block patterns. Adding plain squares or different geometric blocks between the God’s Eye blocks creates a modern, mixed-pattern quilt.
Border options enhance the block’s design. A simple solid border frames the diamonds elegantly, while a pieced or patterned border can complement the block and add visual interest.
Additionally, these blocks make excellent gifts. Handmade quilts with a few colorful God’s Eye blocks become treasured keepsakes that showcase your skill and creativity.
Q: Is this pattern suitable for beginners?
A: Yes, beginners can follow this free tutorial. Start with one block to practice alignment and seam allowance before creating a full quilt.
Q: What fabrics are best for this block?
A: Cotton quilting fabrics are recommended because they are easy to cut, sew, and press. Avoid slippery fabrics that may shift during sewing.
Q: How can I make the diamonds more precise?
A: Use a rotary cutter, ruler, and consistent ¼-inch seam allowance. Press seams open and pin strips carefully before sewing.
Q: Can I use multiple colors?
A: Absolutely. Alternating colors or using a gradient enhances the visual impact of the God’s Eye Quilt Block.
Q: How large can I make the block?
A: The block can be scaled to any size. Small blocks are suitable for pillows, while larger blocks create striking quilts.
Q: Can I combine these blocks with other quilt patterns?
A: Yes. Mixing blocks can add creativity and complexity to your quilt layout.
Q: How do I finish the quilt?
A: Once blocks are joined, add borders if desired and quilt through all layers. Finish with binding to secure edges.
The God’s Eye Quilt Block – Free Tutorial provides quilters with a versatile and visually striking design. By following this tutorial, you can create blocks that are precise, colorful, and elegant, whether for quilts, pillows, or decorative items. Practicing cutting, piecing, and pressing ensures your blocks align perfectly and your quilt looks professional.
Start with one block, experiment with colors, and gradually create a full quilt to showcase the beauty of the God’s Eye Quilt Block. Share your experiences, tips, and color combinations — your feedback can inspire fellow quilters to create their own stunning quilts.


