Crochet Pig In A Granny Square Blanket Pattern


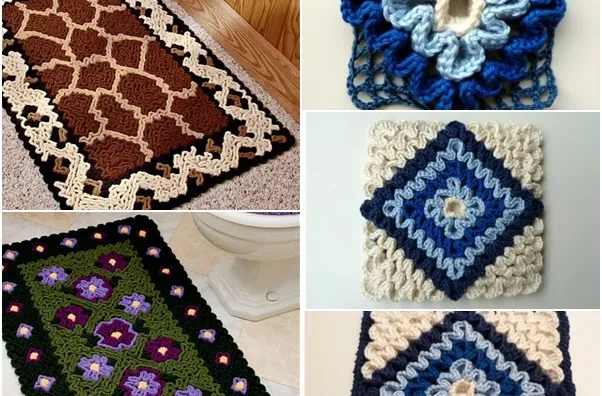
The Wiggly Crochet Rug is an exciting and unique way to bring life, color, and texture into any room. Unlike traditional rugs, this pattern features flowing, curvy designs that create a sense of movement and playfulness.
Whether you are a beginner or an experienced crocheter, the Wiggly Crochet Rug offers a fun project that combines practicality with artistic expression.
You can create a rug that complements your home décor, brightens a child’s bedroom, or becomes a statement piece in your living room.
One of the joys of making a Wiggly Crochet Rug is the satisfaction of transforming simple yarn into a functional and eye-catching piece.
With this tutorial, you will learn how to achieve consistent curves and flowing patterns that define the “wiggly” aesthetic. The combination of stitches and strategic increases and decreases ensures a dynamic design that is both fun to crochet and visually appealing.
The Wiggly Crochet Rug is created by alternating rows of increases and decreases, which generate the signature undulating wave pattern. This method requires a solid grasp of basic crochet stitches such as single crochet, half double crochet, and double crochet. Mastering these stitches will make the process smooth and enjoyable.
Choosing the right yarn is essential for this project. Medium-weight yarns (category 4) are ideal because they provide structure without being too heavy. You can combine multiple colors to emphasize the wavy design or use gradient yarns for a smooth, flowing effect.
The rug’s shape is determined by careful placement of increases and decreases. By counting stitches consistently, you ensure that the waves remain even and the rug maintains its intended shape. Stitch markers are highly recommended for keeping track of rows and pattern repeats.
Hook selection also plays a critical role. A slightly larger hook than usual will give the rug a looser, drapier feel, while a smaller hook creates a tighter, more structured fabric. Both options are suitable depending on your desired look and purpose.
Blocking is optional but can enhance the rug’s appearance. Gently wet the finished piece and pin the edges to smooth out uneven curves. This step is especially helpful if you want a professional-looking finish for home décor.
Finally, you can experiment with different textures by using novelty or boucle yarns to create a more tactile and playful surface. Combining smooth and textured yarns adds depth to your Wiggly Crochet Rug, making it even more visually interesting.
To make your Wiggly Crochet Rug, start with a foundation chain in multiples that match your desired width. A lap-sized rug might begin with around 100 chains, while a larger living room rug will require more.
Step 1: Work the first row using your preferred stitch, maintaining consistent tension. This row forms the base for the undulating waves.
Step 2: Begin shaping the wavy pattern by increasing at strategic points. Typically, an increase involves working two stitches into a single stitch to expand the fabric.
Step 3: Create decreases in the middle of each wave section to pull the fabric inward. A decrease is usually achieved by working two stitches together. The careful placement of increases and decreases forms the “wiggly” curves.
Step 4: Continue alternating increases and decreases for subsequent rows, counting stitches to maintain symmetry. Adjust the number of rows to control the rug’s length.
Step 5: Experiment with color changes every few rows to emphasize the wave patterns. Bright contrasts or gradients enhance the wiggly effect and add visual interest.
Step 6: Once the rug reaches your desired size, finish with a simple border. Single crochet or scalloped edges provide a polished finish, while still maintaining the playful movement of the wavy design.
By following these steps, your Wiggly Crochet Rug will take shape quickly while remaining dynamic and visually appealing.
The Wiggly Crochet Rug is more than just a decorative piece; it is versatile and functional in many settings. It can be used to brighten a child’s bedroom or playroom with fun, flowing patterns.
Place it in a living room or hallway to add a splash of color and texture. The wavy design draws attention and complements both modern and boho décor.
Small wiggly rugs work well as bedside mats or bathroom accents, adding softness underfoot while enhancing the space aesthetically.
You can also make a set of miniature Wiggly Crochet Rugs as placemats or table runners, bringing the unique pattern to your dining area.
These rugs make thoughtful handmade gifts for friends and family. Personalized color choices and sizes make each rug one-of-a-kind and highly appreciated.
Finally, for a playful home décor twist, consider using different yarn textures and thicknesses to create a tactile experience. Soft yarns for comfort combined with durable yarns for high-traffic areas give your rug both functionality and charm.
Achieving the ideal curves in a Wiggly Crochet Rug requires attention to detail. First, keep your stitch count consistent across rows to prevent uneven waves.
Second, use stitch markers to mark the peaks and valleys of each wave. This helps maintain symmetry and reduces mistakes.
Third, select yarn that is easy to work with and has good drape. Smooth cotton or acrylic blends are ideal, while textured yarns can create interesting surfaces.
Fourth, don’t rush the increases and decreases. Precision in shaping the waves ensures the rug maintains its wiggly appeal.
Fifth, consider blocking your rug after finishing. Pinning and wetting the piece helps to define curves and creates a neat, professional finish.
Lastly, experiment with color patterns to emphasize the movement of the waves. Alternating colors every few rows or using ombre yarns can enhance the dynamic design of your Wiggly Crochet Rug.
Q: Is the Wiggly Crochet Rug pattern suitable for beginners?
A: Yes. While it involves increases and decreases, the stitches themselves are simple, making it beginner-friendly with careful attention to counting.
Q: What yarn is recommended?
A: Medium-weight acrylic or cotton blends are ideal. They balance softness, durability, and stitch definition.
Q: Can I customize the size?
A: Absolutely. Adjust your foundation chain and the number of rows to make any size rug, from small mats to large area rugs.
Q: How do I maintain the wave shape?
A: Consistent stitch counts, careful placement of increases and decreases, and optional blocking ensure even, flowing waves.
Q: Can this pattern be used in high-traffic areas?
A: Yes, especially if you choose durable yarns. Consider adding a non-slip backing for extra safety.
Q: How long does it take to make a rug?
A: Time depends on size and skill level. Small rugs can take a few hours, while larger rugs may require several days of consistent work.
Q: Can I make multiple rugs for a set?
A: Yes. Matching wiggly patterns and colors can create cohesive sets for different areas of your home.
The Wiggly Crochet Rug is a playful and versatile project that combines creativity with practicality. Its flowing curves, customizable colors, and adaptable size make it a unique addition to any home. By following the steps, tips, and techniques outlined in this guide, you can create a rug that is both visually striking and comfortable underfoot.
Start your project today and experience the joy of turning yarn into a dynamic, hand-crafted masterpiece. Share your results, leave honest feedback, and offer suggestions — your insights can inspire other crafters to create their own Wiggly Crochet Rugs.


