Crochet Pig In A Granny Square Blanket Pattern


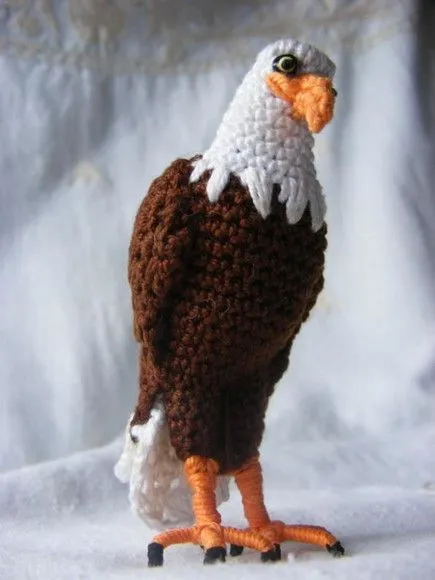
The Amigurumi Eagle Pattern is a delightful way to bring one of nature’s most majestic birds into your crochet projects. Perfect for both beginners and experienced crocheters, this pattern allows you to craft a detailed, lifelike eagle in miniature form.
Using basic amigurumi techniques combined with step-by-step instructions, you can create a cuddly yet realistic bird that makes a wonderful gift, display piece, or part of a larger collection.
Creating an Amigurumi Eagle is not only fun but also educational. It allows you to study the bird’s anatomy, feather patterns, and colors while translating them into yarn and stitches.
By following this pattern, you will learn how to shape body parts, attach wings and beak, and combine various techniques to achieve a balanced and proportionate design.
The Amigurumi Eagle Pattern also encourages creativity. You can choose different yarn types, colors, and sizes to make your eagle unique. Whether you opt for realistic brown, white, and yellow tones or whimsical, playful colors, the end result is a charming handmade piece that showcases your crochet skills.
To start the Amigurumi Eagle Pattern, gather the right materials and tools. You will need medium-weight acrylic yarn in brown, white, yellow, and optional black for details. A 2.5–3 mm crochet hook is ideal for tight stitches that maintain the shape of the eagle.
Additional supplies include fiberfill for stuffing, a yarn needle for sewing pieces together, stitch markers to track rounds, and safety eyes if you want a polished, finished look. A pair of scissors is also essential for trimming yarn ends neatly.
Choosing the right yarn is important. Smooth, non-fuzzy yarn works best because it allows you to see the stitches clearly and maintain a clean shape. Acrylic yarn is recommended as it is durable, easy to wash, and holds stuffing well.
For beginners, it is helpful to prepare a small swatch of the main yarn color to practice the stitches used in the eagle pattern. This ensures your gauge is consistent, which is crucial for a well-proportioned amigurumi.
Safety is also important if you are making this toy for children. Consider using embroidered eyes instead of plastic safety eyes for a fully child-safe version.
Having all materials ready before starting your Amigurumi Eagle Pattern makes the process smoother and more enjoyable, ensuring each step goes as planned.
Start the Amigurumi Eagle Pattern by crocheting the body. Begin with a magic ring and single crochet stitches to form a tight, round base. Gradually increase stitches to shape the body and then decrease towards the neck for a natural taper.
Next, create the head using a similar technique. Crochet a separate ball, slightly smaller than the body, and attach it securely using a yarn needle. This creates a firm connection that maintains the eagle’s posture.
The beak is formed using yellow yarn. Work in a small cone shape, then attach it to the center of the face. Ensure it is centered and securely sewn to avoid shifting during handling.
For the wings, crochet two elongated oval shapes using brown yarn. Attach them symmetrically on each side of the body, positioning slightly below the neck to resemble natural wing placement. Press and shape the wings to give the eagle a dynamic, lifelike appearance.
Tail feathers are crafted similarly to the wings but shorter and slightly pointed. Attach them to the back of the body, ensuring they fan out evenly for balance and aesthetic appeal.
Legs and talons can be made using yellow yarn in tubular shapes. The claws are created by forming small pointed shapes and sewing them to the ends of the legs. Attach the legs to the bottom of the body, checking that the eagle can stand properly or balance when placed on a flat surface.
Finally, add eyes either using safety eyes, embroidery, or small yarn stitches. Position them carefully to capture the alert and majestic expression of the eagle. Complete your Amigurumi Eagle by weaving in all loose ends and lightly stuffing to ensure a firm but soft feel.
To achieve the best results with the Amigurumi Eagle Pattern, maintain even tension throughout. This ensures all parts have a consistent look and the body maintains its intended shape.
Use stitch markers to keep track of rounds. This prevents accidental increases or decreases that can distort the eagle’s form.
Stuff carefully. Overstuffing can stretch stitches and distort the shape, while understuffing may result in a floppy toy. Aim for a balanced stuffing to achieve a firm yet cuddly feel.
Shape the wings and tail feathers before fully attaching them. Pinning them in place can help you visualize the final arrangement and adjust as needed.
Experiment with yarn textures for feathers. Slightly fuzzy or textured yarn can add realism, giving the wings and tail a soft, feathery appearance.
Take breaks during assembly. Working on multiple small parts can strain your hands, and resting ensures precision and accuracy throughout the process.
Consistency in color placement and stitch direction enhances the overall aesthetic of your Amigurumi Eagle, making it a professional-looking finished piece.
The Amigurumi Eagle Pattern allows for creativity and customization. You can create smaller or larger versions depending on your desired final size. Adjust your yarn weight and hook size accordingly.
Color variations are another option. Traditional brown and white can be complemented with shades of grey or golden highlights for a more artistic rendition.
Adding accessories, such as a small crocheted branch or nest, enhances the display potential of your eagle. These props make it perfect for seasonal decor or gift sets.
You can also modify the wings to create a flying eagle. By angling and shaping them differently, the amigurumi can appear in mid-flight, adding a dynamic touch.
For collectors, creating multiple eagles in various sizes creates a charming set. Each eagle can feature different patterns or colors while maintaining the signature amigurumi style.
Finally, you can personalize the eagle with embroidery, such as adding feather details or subtle shading, to enhance realism and uniqueness.
Q: Is the Amigurumi Eagle Pattern suitable for beginners?
A: Yes! Beginners can follow step-by-step instructions, though some assembly may require patience.
Q: What yarn is recommended?
A: Medium-weight acrylic yarn works best for shape and durability. Smooth yarn helps maintain a clean stitch pattern.
Q: How do I make the eagle stand properly?
A: Position the legs symmetrically and stuff them firmly. You can also sew a small base to stabilize if needed.
Q: Can I make the eagle in different colors?
A: Absolutely! While natural tones are realistic, you can choose whimsical colors for fun or themed projects.
Q: Are safety eyes necessary?
A: Safety eyes are optional. For child-safe versions, embroider the eyes instead.
Q: Can I make this pattern larger or smaller?
A: Yes. Adjust yarn weight and hook size to create different scales while following the same stitch pattern.
Q: How should I care for the finished amigurumi?
A: Hand wash gently with mild soap and air dry. Avoid machine washing to maintain shape and stuffing integrity.
The Amigurumi Eagle Pattern is a rewarding project that combines creativity, skill, and patience. From shaping the body and head to attaching wings, beak, and talons, every step brings your majestic eagle to life. This amigurumi makes a beautiful gift, collectible, or decorative piece, showcasing both craftsmanship and imagination.
By following this guide, you can create a detailed, professional-looking eagle in miniature form. Share your experience, tips, or color choices — your feedback helps inspire others and encourages the joy of crafting beautiful amigurumi creatures.


