Crochet Pig In A Granny Square Blanket Pattern


The PDF Pattern – Amigurumi Dragon is the ultimate guide for crocheters who love creating cute and collectible creatures. This step-by-step pattern allows you to craft your very own dragon with precise instructions, clear diagrams, and helpful tips to ensure success.
Perfect for beginners and advanced crocheters alike, the amigurumi dragon is a charming project that combines creativity, skill, and imagination.
Crocheting your own Amigurumi Dragon provides a sense of accomplishment while allowing you to explore color, texture, and 3D shaping techniques.
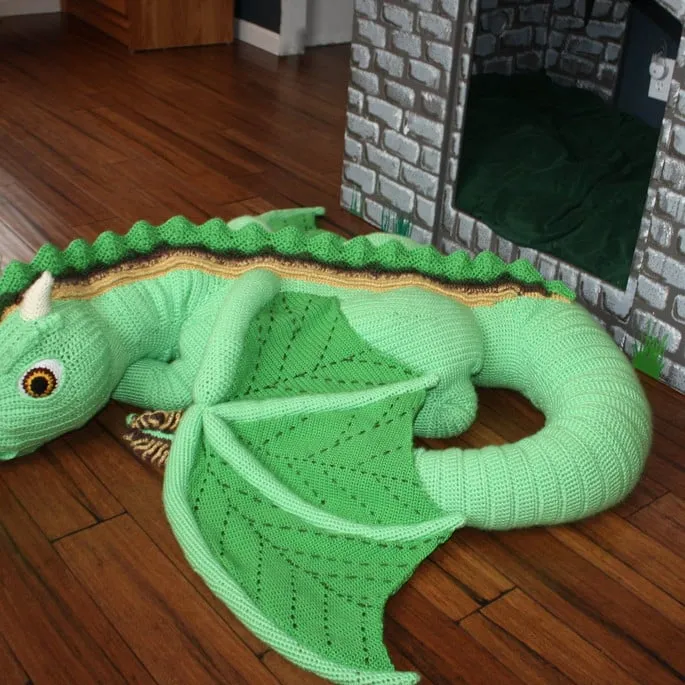
Unlike store-bought toys, handmade dragons are customizable — you choose the colors, size, and even the style of wings, horns, and tail. This makes each creation truly unique and personal.
The PDF Pattern – Amigurumi Dragon is also a perfect gift idea. Handmade dragons are adorable collectibles for children, teens, and even adults who appreciate cute crochet creatures. With detailed instructions and high-quality illustrations, this PDF ensures that anyone can follow along and complete their dragon, regardless of skill level.
Before starting your Amigurumi Dragon, gather all necessary materials. You will need: medium-weight yarn in the colors of your choice, a suitable crochet hook (usually 2.5–3.5 mm depending on your yarn), fiberfill stuffing, safety eyes, a yarn needle, stitch markers, and scissors. Having everything ready ensures a smooth crafting experience.
The choice of yarn can dramatically affect the final appearance. Smooth acrylic or cotton yarns provide excellent stitch definition, while soft blends offer a cuddly texture. For the dragon’s features like wings, horns, and tail, you may select contrasting colors to make them stand out.
Next, familiarize yourself with the basic crochet stitches used in amigurumi: magic ring, single crochet, increase, decrease, slip stitch, and chain stitch. These form the foundation of your dragon and ensure a consistent shape throughout.
The PDF Pattern – Amigurumi Dragon provides a recommended order for constructing parts. Typically, you start with the head and body, then move on to arms, legs, wings, tail, and finally assembly. Following the order in the PDF simplifies the process and prevents mistakes.
Stitch markers are very useful in keeping track of rounds, especially since amigurumi is worked in continuous spirals. Consistent tension is also crucial — too tight stitches make stuffing difficult, while too loose stitches can result in gaps between stitches.
Finally, set aside a dedicated workspace. Good lighting, comfortable seating, and organized materials improve focus and make crocheting more enjoyable. The Amigurumi Dragon PDF Pattern is designed for stress-free crafting when you are ready to begin.
Starting with the PDF Pattern – Amigurumi Dragon, follow these instructions carefully. Begin by creating a magic ring and crocheting the first round of the head. Increase stitches evenly to form a smooth, rounded shape.
Next, continue working the head, decreasing where indicated to shape the snout and jaw. Pay attention to the placement of safety eyes — this step brings your dragon to life with expression and character.
After the head, work on the body. Typically, the body is slightly elongated, with increases and decreases shaping a natural contour. Stuff the body lightly as you go to ensure even firmness and maintain its structure.
Once the body is complete, crochet the arms and legs separately. Each limb is usually worked in rounds, stuffed lightly, and attached securely to the body using a yarn needle. The PDF Pattern – Amigurumi Dragon provides exact stitch counts and positions for realistic placement.
Wings are optional but recommended. They can be worked flat and then sewn onto the back of the dragon. For extra detail, you can add a ridge or membrane effect with surface stitches or embroidery, following the instructions in the PDF.
Finally, create the tail and any additional features, such as horns, spikes, or frills. These finishing touches elevate your dragon from a simple amigurumi to a detailed and unique collectible. Once all parts are attached, weave in any loose ends and smooth the stuffing to achieve the desired shape.
To make a flawless Amigurumi Dragon, maintain consistent stitch tension throughout the project. Uneven tension can cause bulging or misshaped sections, which may affect the overall appearance.
Always stuff lightly in layers. Overstuffing can stretch stitches and distort shapes, while under-stuffing leads to a floppy or uneven figure. Check the firmness as you go.
Use stitch markers to keep track of rounds and specific stitch locations. This prevents errors when shaping curves or adding appendages like arms, legs, wings, or horns.
Choose colors thoughtfully. Contrasting or complementary shades can highlight details like wings, spikes, or eyes. Soft pastels give a cute effect, while jewel tones create a bold and magical appearance.
Take your time during assembly. Position each limb and feature before sewing it in place to ensure symmetry. Test placement visually and adjust as needed.
Finally, don’t skip blocking lightly if necessary. Some yarns benefit from gentle shaping to smooth curves and enhance the 3D structure of the dragon.
The PDF Pattern – Amigurumi Dragon encourages creativity. You can make miniature dragons, large cuddle-sized dragons, or even a family of dragons with varying sizes and colors.
Try experimenting with textures by using fuzzy or variegated yarns for unique effects. Adding embroidery, sequins, or felt accents can also enhance the personality of your dragon.
For holiday gifts, you can adapt colors to fit themes — green and red for Christmas, orange and black for Halloween, or pastel colors for baby gifts.
Another fun idea is to create dragons with different wing types — bat-like wings for a fantasy style, butterfly wings for a whimsical look, or small rounded wings for a cute, cartoonish effect.
You can also pair the amigurumi dragon with other crocheted creatures for storytelling, display, or play purposes. Combining multiple amigurumi patterns creates an imaginative collection perfect for gifting or decoration.
Q: Is the Amigurumi Dragon pattern suitable for beginners?
A: Yes! The PDF includes detailed instructions, stitch counts, diagrams, and tips. Beginners can follow along with patience and practice.
Q: What type of yarn works best?
A: Medium-weight acrylic or cotton yarn is ideal for durability and stitch definition. Blends work well for softer, plush dragons.
Q: Can I adjust the size of the dragon?
A: Absolutely. Using a larger hook and thicker yarn makes a bigger dragon, while a smaller hook and fine yarn create a mini version.
Q: How do I attach the limbs securely?
A: Use a yarn needle to sew each piece firmly in place, stitching through several rounds of the body to prevent loosening.
Q: Are wings necessary?
A: No, wings are optional, but they enhance the dragon’s appearance. The PDF provides instructions for both winged and wingless versions.
Q: How do I care for the finished amigurumi dragon?
A: Gently hand wash in cold water and air dry to preserve shape and color. Avoid machine washing to prevent distortion.
Q: Can I customize colors and features?
A: Yes! The pattern is highly versatile. Change yarn colors, add spikes, embroidery, or embellishments to make a unique dragon.
The PDF Pattern – Amigurumi Dragon is an exciting project that combines creativity, skill, and imagination. By following step-by-step instructions, crocheters of all levels can produce a charming, high-quality dragon.
From choosing yarn colors to shaping features like wings, horns, and tails, each part contributes to a magical finished product that’s perfect for gifting or displaying.
We hope this tutorial inspires you to start your own amigurumi dragon project. Share your creations, tips, and feedback! Your honest opinion and suggestions help others in the crochet community explore, learn, and create their own adorable dragons.


