Crochet Pig In A Granny Square Blanket Pattern


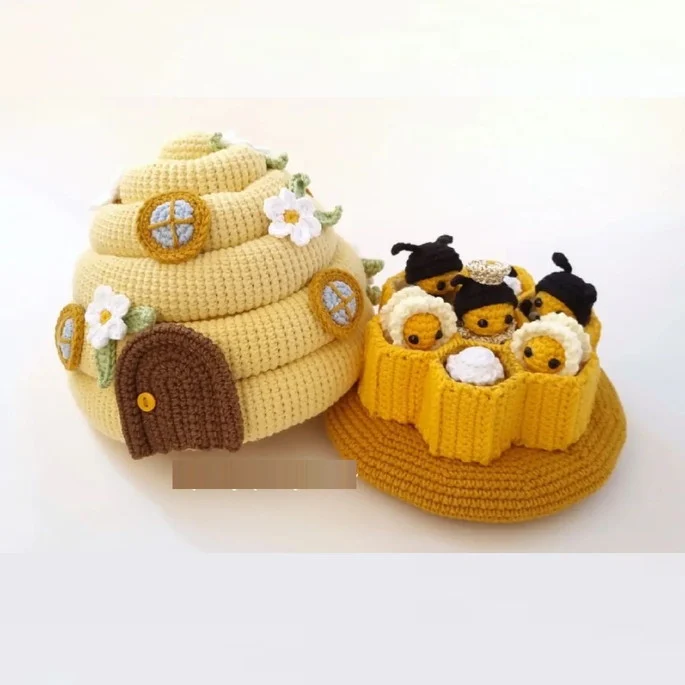
The Amigurumi Beehive Pattern is a charming and fun crochet project that brings the buzz of creativity right into your hands. Whether you’re an experienced crocheter or just starting out, this pattern allows you to craft a cute, three-dimensional beehive that can serve as decoration, a toy, or even a gift.
The Amigurumi Beehive Pattern combines simple crochet techniques with a playful design, making it enjoyable and satisfying from start to finish.
Crocheting the Amigurumi Beehive Pattern is a wonderful way to improve your skills while creating a tangible piece of art. Amigurumi, the Japanese art of crocheting small, stuffed figures, focuses on precision, symmetry, and creativity.
With this beehive pattern, you’ll learn to work in rounds, increase and decrease stitches, and join pieces together neatly. By following this pattern, you’ll not only make a cute beehive but also gain confidence in amigurumi techniques.
The Amigurumi Beehive Pattern is also incredibly versatile. You can use it as a playful decoration for a nursery, a whimsical addition to a craft display, or even as part of a themed gift set with small crocheted bees. The compact size and soft texture make it perfect for any space, and its vibrant design brings warmth and charm wherever it is placed.
The Amigurumi Beehive Pattern is designed to be approachable yet detailed enough to create a realistic-looking beehive. Typically, it is made using single crochet stitches worked in continuous rounds, which allows for a smooth, seamless structure. The hive is built from layers that taper slightly toward the top, mimicking the natural shape of a real beehive.
Working in rounds is essential for achieving the three-dimensional shape. You start at the base, crocheting a circle, and gradually increase stitches to expand the diameter. As you move upward, strategic decreases help create the tapered effect. This layering technique is what gives the beehive its charming, dome-like appearance.
Yarn choice is critical for the Amigurumi Beehive Pattern. Soft acrylic or cotton yarn is ideal, as it provides structure while remaining easy to work with. Yellow and brown are traditional colors for a realistic beehive, but creative variations using pastel or bright shades can also make a playful decorative item.
Maintaining consistent tension is key in amigurumi projects. Uneven tension can lead to a distorted shape, so it’s important to practice your stitch technique and maintain a comfortable grip on your yarn. Using a slightly smaller hook than recommended for your yarn helps achieve a tight, firm fabric that holds the stuffed shape well.
Finally, the Amigurumi Beehive Pattern can be customized to your preference. You can adjust the size by adding more rounds, or create a mini version for keychains or ornaments. Adding small embellishments, such as tiny crocheted bees or embroidered details, enhances the visual appeal and brings your beehive to life.
To make your Amigurumi Beehive Pattern, gather your materials: yellow and brown yarn, a suitable crochet hook (usually 3.5–4 mm), fiberfill stuffing, scissors, and a yarn needle for finishing.
Step 1: Start with a magic ring in brown yarn to form the base. Work six single crochet stitches into the ring and pull it tight to close. This forms the foundation of your beehive.
Step 2: Increase evenly in the following rounds to expand the base. For example, round two doubles the stitches by placing two single crochets in each stitch, creating a stable circle that will support the layers above.
Step 3: Once the base reaches the desired diameter, switch to yellow yarn for the main body of the hive. Continue working in rounds, maintaining the stitch count for several layers to create a cylindrical section.
Step 4: Gradually decrease stitches toward the top of the hive to create a tapered dome shape. This mimics the natural beehive contour and gives your amigurumi piece a realistic appearance.
Step 5: Stuff the hive with fiberfill as you go. Adding stuffing gradually prevents lumps and ensures a smooth, uniform shape. Continue until the hive is fully shaped.
Step 6: Finish the top with a slip stitch closure and weave in the yarn ends neatly. You can also create small openings or indentations to mimic natural hive textures, adding character to your amigurumi piece.
For an extra touch, consider crocheting tiny bees using black and yellow yarn. These can be attached to the hive or left as separate decorations to enhance the overall theme of your Amigurumi Beehive Pattern.
The Amigurumi Beehive Pattern requires attention to detail to achieve a polished, professional look. First, always use tight stitches to maintain the shape. Loose stitches may cause the stuffing to show through or distort the structure.
Second, mark the start of each round with a stitch marker. This prevents miscounting and ensures that your rounds remain even throughout the project.
Third, choose a quality stuffing material. Soft polyester fiberfill works best, as it holds shape and gives your hive a firm, cuddly texture without being too rigid.
Fourth, practice your increases and decreases before starting the main project. These techniques are essential for shaping the beehive and achieving a smooth taper at the top.
Fifth, take breaks as needed. Amigurumi requires precision, and working too long at a stretch may affect your tension and consistency.
Lastly, get creative with embellishments. Embroidered hexagon details, small crochet bees, or decorative flowers can make your hive even more eye-catching and unique.
One of the joys of the Amigurumi Beehive Pattern is its versatility. You can scale the hive up or down to create different-sized projects, from small keychains to large plush decorations.
Color variations allow for endless possibilities. Classic yellow and brown create a realistic effect, while pastels or bright shades can give a whimsical, modern look.
Adding little crochet bees buzzing around the hive adds a playful dimension and makes the piece more interactive, perfect for gifts or display purposes.
You can also incorporate the hive into themed sets, such as a garden scene, nursery décor, or a bee-inspired amigurumi collection.
Experiment with textures by using different yarn types, such as soft cotton for a matte finish or sparkly yarn for a festive touch.
Finally, the hive can be used functionally, such as a pin cushion or a small storage container, adding practicality to its adorable aesthetic.
Q: Is the Amigurumi Beehive Pattern suitable for beginners?
A: Yes, it is beginner-friendly with basic single crochet stitches, though some experience with increases and decreases is helpful.
Q: What yarn is best for this project?
A: Soft acrylic or cotton yarn in yellow and brown is ideal. It provides structure while remaining easy to handle.
Q: Can I make the hive bigger or smaller?
A: Absolutely. Add or remove rounds to adjust the size to your preference, from mini hives to larger plush versions.
Q: How do I make the beehive stand upright?
A: Use tight stitches and firm stuffing. Adjust increases and decreases evenly to maintain stability.
Q: Can I add small bees to the pattern?
A: Yes, crocheted bees in black and yellow can be attached or displayed around the hive for a charming effect.
Q: How should I care for my amigurumi hive?
A: Hand wash gently with cold water and mild soap, then air dry to maintain shape and color.
Q: Can I use this pattern for gifts or sales?
A: Yes, handmade amigurumi items using this pattern are perfect for gifts or small business sales, following general copyright rules.
The Amigurumi Beehive Pattern is a delightful and versatile project that brings charm, creativity, and skill together. By following the steps carefully, practicing consistent tension, and experimenting with color and size, you can create a beautiful, three-dimensional beehive that serves as decoration, toy, or gift. Its whimsical design and soft texture make it a cherished piece for crafters and recipients alike.
We hope this tutorial has inspired you to try the Amigurumi Beehive Pattern. Share your honest feedback, creative variations, and any tips you discover along the way. Your insights help others enjoy the project and keep the joy of crochet alive.


