Crochet Pig In A Granny Square Blanket Pattern


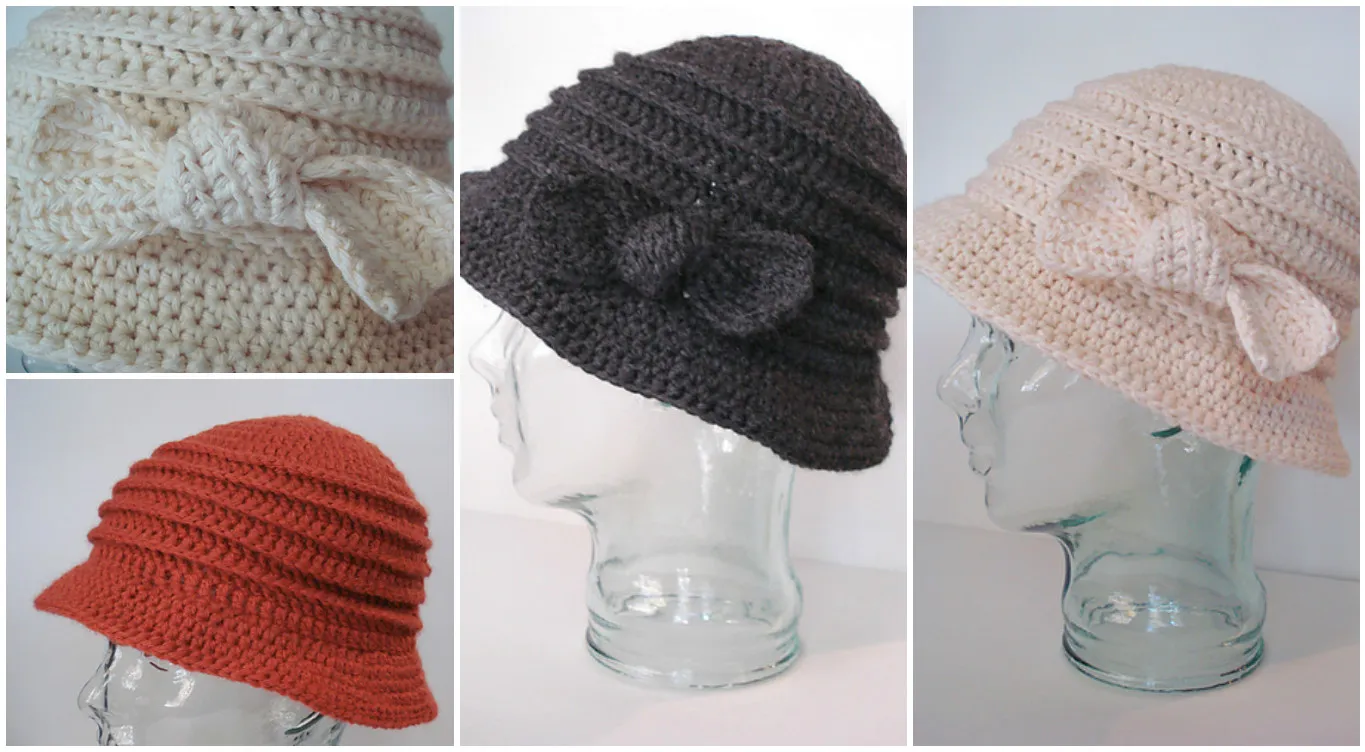
The Ewa Hat Pattern – FREE PATTERN is a stylish and versatile crochet project that allows crafters of all levels to create a chic and comfortable hat.
Whether you’re making it for yourself, as a gift, or to sell, this pattern is easy to follow and provides professional-looking results. With the Ewa Hat Pattern, you can combine creativity and practicality to craft a hat that’s perfect for any season.
Crocheting your own Ewa Hat gives you complete control over colors, yarn types, and embellishments. Unlike store-bought hats, handmade versions are customizable to fit personal style and head size.
This FREE PATTERN offers step-by-step guidance, making it accessible to beginners while still being enjoyable for experienced crocheters.
One of the standout features of the Ewa Hat Pattern is its elegant stitch design, which balances texture and simplicity. The pattern creates a subtle, modern look with slight ribbing or decorative motifs depending on the chosen variation. By following this tutorial, you’ll achieve a hat that is both comfortable and visually appealing, showcasing your crochet skills in every stitch.
The Ewa Hat Pattern is constructed using basic crochet stitches combined with clever shaping techniques to create a rounded, flattering fit. Most versions start from the crown and work downward in continuous rounds, allowing the hat to gradually expand to the desired circumference.
The crown shaping involves increases spaced evenly around each round. This creates a smooth, dome-like shape without bulky seams. Once the desired diameter is reached, the hat continues in straight rounds to form the body, providing a snug but comfortable fit around the head.
Different textures can be added to the Ewa Hat Pattern through stitch variations. Common options include half-double crochet, front post and back post stitches, and simple ribbing techniques. Each variation offers a unique look while remaining easy to execute, making the pattern suitable for creative experimentation.
Yarn selection is crucial. Medium-weight (worsted or DK) yarns work best, as they provide warmth and structure without being too heavy. Soft acrylics, cotton blends, or wool options are all excellent choices, depending on the season and wearer’s comfort.
Hook size also plays a role in the final fit. Using a slightly smaller hook than recommended produces a denser, warmer hat, while a larger hook creates a lighter, stretchier fabric. Testing gauge with a small swatch ensures your hat fits as intended.
Lastly, color selection allows you to personalize the Ewa Hat Pattern. Solid colors highlight stitch textures, while variegated yarns add a fun and modern look. You can even combine contrasting yarns for stripes or decorative accents.
Follow these instructions to crochet your Ewa Hat – FREE PATTERN:
Step 1: Begin with the Crown
Start with a magic ring or chain 4 and join to form a ring. This creates the foundation for the hat’s crown. Work the first round of stitches (usually double crochets) into the ring, making increases evenly spaced to form a flat circle.
Step 2: Increase for the Crown
Continue increasing in subsequent rounds, following the pattern’s instructions for stitch counts. This gradual increase ensures the crown expands evenly, producing a smooth, rounded top.
Step 3: Crochet the Body
Once the crown reaches the desired size, stop increasing and continue working in the established stitch pattern. This section forms the body of the hat, providing the necessary length for coverage and fit.
Step 4: Add Ribbing (Optional)
To create a snug fit around the head, you can add a ribbed band using front and back post stitches or single crochet in the back loop only. This adds elasticity and ensures the hat stays securely in place.
Step 5: Shape the Brim (Optional)
Some variations of the Ewa Hat Pattern include a small, folded brim. This is created by working additional rows in a tighter stitch or folding the bottom edge and securing it with slip stitches. The result is a neat, finished look.
Step 6: Finish and Weave in Ends
After reaching the desired length, finish off the yarn and weave in all loose ends carefully. Blocking the hat gently can also help smooth stitches and improve the overall appearance.
By following these steps, you’ll create a polished, stylish hat that reflects your creativity and craftsmanship.
To achieve the best results with your Ewa Hat Pattern, consider these expert tips:
With these tips, your Ewa Hat will not only fit well but also look professional and stylish.
The Ewa Hat Pattern can be easily customized to suit your taste:
These variations make the Ewa Hat Pattern – FREE PATTERN highly versatile, suitable for all ages and occasions.
Q: Is the Ewa Hat Pattern suitable for beginners?
A: Yes! The pattern uses basic stitches like double crochet and simple increases, making it beginner-friendly.
Q: What yarn works best for this hat?
A: Medium-weight (worsted or DK) yarn in acrylic, cotton blends, or wool is ideal for comfort and structure.
Q: How do I adjust the hat size?
A: Adjust the foundation circle diameter by adding or reducing rounds during the crown shaping.
Q: Can I add a brim or ribbing?
A: Yes, optional ribbing or folded brims can be added for fit and style.
Q: How long does it take to make an Ewa Hat?
A: Most hats can be completed in a few hours to a day, depending on skill and yarn choice.
Q: Can I sell hats made from this pattern?
A: Yes, handmade items using the pattern can be sold, but crediting the design is appreciated when shared online.
Q: How do I care for the finished hat?
A: Machine wash on gentle with mild detergent, lay flat to dry to maintain shape and texture.
The Ewa Hat Pattern – FREE PATTERN is a simple yet elegant crochet project that produces a stylish, wearable hat suitable for all occasions.
Its combination of comfort, texture, and ease of construction makes it perfect for beginners and experienced crocheters alike. By following this pattern, you can create a beautiful hat that is customizable in color, size, and design details.
Start your own Ewa Hat today, experiment with colors and textures, and enjoy the satisfaction of creating something handmade and unique.
Share your thoughts, tips, and experiences — your feedback can inspire others to explore their creativity and complete their own beautiful crochet hats.


