
Ballerina pencil case with zipper Pattern


The Miniraitablokki – Mini Stripe Block is a versatile and charming quilt pattern that adds a playful touch to any sewing project. Its compact size and clean lines make it ideal for beginners and experienced quilters alike.
Using this pattern, you can create quilts, cushion covers, table runners, or even wall hangings with a fresh and modern look.
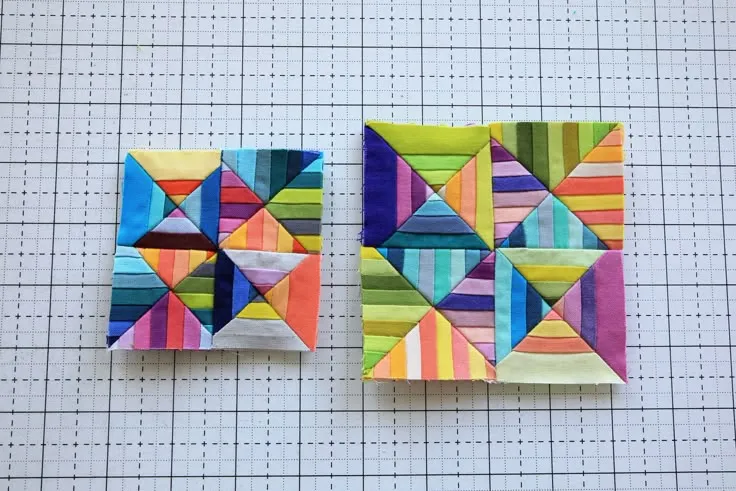
Creating a Mini Stripe Block allows quilters to experiment with colors, textures, and fabric combinations in a small, manageable format. Each block consists of narrow stripes arranged in a thoughtful sequence, making it perfect for using scrap fabrics or mixing different tones.
The Miniraitablokki – Mini Stripe Block is not only visually appealing but also provides an excellent opportunity to refine your piecing skills.
The beauty of the Miniraitablokki – Mini Stripe Block lies in its simplicity and adaptability. While the basic block is small and straightforward, arranging multiple blocks together can create stunning geometric patterns and color flows. This pattern is particularly popular among quilters who enjoy modern, minimalist designs, as it balances clean lines with subtle complexity.
The Mini Stripe Block is a quilt block composed of narrow strips of fabric sewn together to form a rectangular or square unit. The term “Miniraitablokki” is Finnish, reflecting the block’s European popularity. Its straightforward construction makes it accessible to beginners while providing endless possibilities for more advanced design layouts.
Each block typically uses a combination of light, medium, and dark fabrics to create depth and contrast. The narrow strips highlight the beauty of small scraps, making it an eco-friendly option for quilters looking to repurpose leftover materials.
The Mini Stripe Block can be arranged in various layouts, such as vertical stripes, horizontal stripes, or a combination of both to create a herringbone or diamond effect. Using multiple blocks in a coordinated manner allows quilters to achieve dynamic visual results with minimal effort.
This pattern is also suitable for practicing precise seam allowances and consistent stitching. Accurate alignment of the narrow strips ensures that the final quilt looks polished and professional.
Finally, the Mini Stripe Block’s versatility makes it an excellent choice for creating quilts of all sizes. You can start with a small lap quilt or expand the design into a full-sized bedspread by repeating and arranging the blocks in creative ways.
To create the Miniraitablokki – Mini Stripe Block, begin by selecting your fabrics. Choose a range of colors that complement each other, focusing on contrast and harmony. Pre-cut strips of fabric approximately 1–2 inches wide, depending on the desired block size.
Step 1: Arrange your strips in the order you want them to appear in the block. Consider alternating colors to create visual interest or grouping similar shades for a subtle gradient effect.
Step 2: Sew the strips together using a consistent quarter-inch seam allowance. Press each seam to one side or open, depending on your preference. Proper pressing ensures flat blocks and accurate alignment.
Step 3: Trim the assembled strips to the desired block size, making sure the edges are square. This step is crucial for maintaining clean lines when joining multiple blocks.
Step 4: Repeat the process to create as many blocks as needed for your quilt or project. Vary the color sequence for different blocks to introduce variety and prevent repetition.
Step 5: Arrange the blocks on a flat surface to visualize the final layout. Experiment with different orientations, such as rotating every other block, to achieve the most pleasing pattern.
Step 6: Sew the blocks together, ensuring seams align correctly. Press the completed quilt top before adding batting and backing for quilting.
Once finished, you will have a polished Miniraitablokki – Mini Stripe Block quilt that demonstrates both simplicity and sophistication.
Achieving professional results with the Miniraitablokki – Mini Stripe Block requires attention to detail and consistency. Maintaining accurate seam allowances ensures that the narrow strips align properly, giving the quilt a clean, geometric look.
Use a rotary cutter, ruler, and cutting mat for precise cuts. This helps prevent uneven strips, which can disrupt the block’s symmetry.
Press seams carefully after sewing each strip. Flat seams prevent bulkiness and make it easier to piece blocks together accurately.
Plan your color layout in advance. Sketching the arrangement or using digital tools can help visualize how the final quilt will appear and avoid unintended color clashes.
Consider alternating light and dark strips within each block. This creates contrast and adds depth, enhancing the visual impact of the quilt.
Finally, take your time when joining blocks. Pin carefully and check alignment before sewing. Small adjustments during assembly ensure a professional finish.
The Miniraitablokki – Mini Stripe Block offers limitless design possibilities. By varying strip widths, you can create subtle differences between blocks that add interest and uniqueness.
Mixing fabric textures, such as cotton, linen, or flannel, introduces a tactile dimension to your quilt. This variation enhances the block’s appeal while maintaining a cohesive look.
Combine multiple Mini Stripe Blocks in different orientations to produce herringbone, chevron, or diamond patterns. These arrangements create dynamic visuals that are both modern and timeless.
For a playful effect, use brightly colored or patterned fabrics for select strips. This introduces focal points and prevents the quilt from appearing monotonous.
You can also scale the block size. Smaller blocks are ideal for intricate, detailed quilts, while larger blocks work well for lap quilts or wall hangings.
Adding borders or sashing between blocks can highlight each Mini Stripe Block and create a framed effect, further enhancing the quilt’s overall appearance.
Q: Is the Miniraitablokki – Mini Stripe Block suitable for beginners?
A: Yes, it’s simple to construct and perfect for practicing precise piecing and seam allowances.
Q: What fabric types work best?
A: Cotton fabrics are ideal, but linen and flannel can also be used for added texture and variety.
Q: How wide should each strip be?
A: Typically 1–2 inches, but you can adjust depending on the desired block size.
Q: Can I use scrap fabrics?
A: Absolutely! This pattern is perfect for utilizing leftover fabric pieces.
Q: How many blocks do I need for a full quilt?
A: The number depends on your quilt size. For a lap quilt, 16–20 blocks usually suffice.
Q: How do I prevent uneven seams?
A: Use a consistent quarter-inch seam allowance, press seams flat, and carefully align strips during sewing.
Q: Can I combine Mini Stripe Blocks with other block patterns?
A: Yes, pairing them with other quilt blocks creates interesting and unique layouts.
The Miniraitablokki – Mini Stripe Block is a versatile, beginner-friendly, and visually appealing quilt block. Its compact design allows quilters to experiment with color, texture, and layout while producing polished, professional-looking results.
By following this guide, you can create stunning quilts, table runners, or decorative items that showcase your creativity and craftsmanship.
Whether you stick to a uniform color scheme or mix and match scraps, the Mini Stripe Block allows endless possibilities for personalization. Try arranging blocks in unique orientations or combining them with other patterns to make your quilt truly one-of-a-kind.
We’d love to hear your feedback! Share your experiences, tips, or creative variations of the Miniraitablokki – Mini Stripe Block — your insights may inspire fellow quilters to start their own projects.


