Crochet Pig In A Granny Square Blanket Pattern


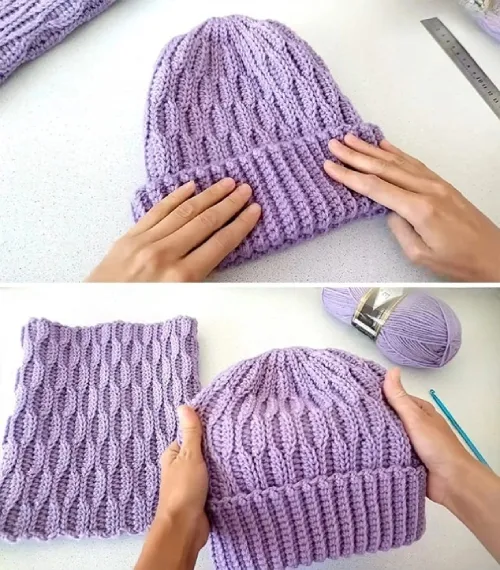
The Stunning Honeycomb Crochet Hat is an eye-catching accessory that combines texture, style, and warmth. This hat features the classic honeycomb stitch pattern, creating a raised, geometric design that resembles a beehive.
Whether you’re a beginner or an experienced crocheter, this tutorial allows you to create a hat that is both stylish and functional.
Crocheting a honeycomb hat provides a satisfying project that balances creativity and skill. The stitch pattern adds depth and texture, giving the hat a professional, intricate appearance while remaining surprisingly easy to follow.
The Stunning Honeycomb Crochet Hat is versatile in style and color. You can choose bold, vibrant shades to make a statement or soft, neutral tones for a classic look. By customizing the yarn and size, this hat can suit any age or fashion preference, making it a thoughtful handmade gift.
The honeycomb stitch is the signature feature of this crochet hat. It creates a raised, three-dimensional texture using a combination of front post double crochets (FPDC) and back post double crochets (BPDC). The alternating stitches form the hexagonal honeycomb pattern that gives the hat its unique look.
To begin, you start with a basic foundation chain or magic ring, depending on whether you prefer crocheting in the round or working flat. Maintaining consistent tension is essential to ensure that the honeycomb texture appears even across the entire hat.
The stitch pattern is highly adaptable. You can create wider or narrower honeycomb rows by adjusting the number of stitches, which affects the final size of the hat. This flexibility allows you to make hats for children, teens, and adults using the same pattern principles.
Yarn choice plays a critical role in the finished appearance. Medium-weight yarn (category 4) works best, as it holds the texture without being too bulky. Wool or wool blends provide warmth, while acrylic yarns are soft, durable, and easy to care for.
Color changes can be incorporated into the honeycomb design. Alternating colors for different rows enhances the three-dimensional effect and creates striking visual contrast. You can also create an ombre effect by gradually transitioning shades throughout the hat.
Finally, mastering the honeycomb stitch opens the door to other textured crochet projects. Once comfortable, you can adapt the stitch to scarves, cowls, or even blankets, making it a versatile addition to your crochet skills.
Start by making a magic ring or foundation chain, then join it to form a circle. The size of the initial loop determines the crown of your hat, so ensure it fits your head comfortably.
Step 1: Work the first round in single or double crochet, depending on your desired hat height. This forms a sturdy base for the honeycomb texture.
Step 2: Begin the honeycomb stitch by alternating front post and back post double crochets around the hat. Each post stitch creates the raised texture that mimics a honeycomb.
Step 3: Continue crocheting in rounds, maintaining the stitch pattern. Check periodically to ensure the hat maintains a circular shape without puckering or widening.
Step 4: Adjust the size by adding more rounds if you need a taller hat or decreasing rounds for a snugger fit. Remember to keep the honeycomb pattern consistent across all rows.
Step 5: Finish the top of the hat by gradually decreasing stitches while preserving the honeycomb texture. This ensures a neat closure and rounded crown.
Step 6: Add a decorative touch such as a pom-pom or a contrasting trim at the brim. This enhances the visual appeal and personalizes the hat.
Step 7: Weave in all loose yarn ends and block the hat if necessary. Blocking smooths the stitches and enhances the honeycomb texture, giving the hat a polished, professional finish.
To achieve the best results, maintain consistent tension throughout the project. Uneven tension can distort the honeycomb pattern.
Choose a hook size that works well with your yarn. A slightly larger hook may make the texture more pronounced, while a smaller hook tightens the stitches for a snug fit.
Always count your stitches at the end of each round. Missing or adding stitches can disrupt the honeycomb texture and affect the final fit.
Practice the honeycomb stitch on a small swatch before starting the hat. This helps you understand the pattern and ensures consistent texture.
Color planning is key. Decide whether you want a solid color hat or one with alternating honeycomb rows in different shades for added depth and dimension.
Finally, consider the hat’s intended use. Thicker yarns and tighter stitches create warmer hats, while lighter yarns make stylish, breathable accessories suitable for milder weather.
The Stunning Honeycomb Crochet Hat can be customized in countless ways. Use variegated yarn to allow colors to blend naturally, creating a gradient honeycomb effect.
Add a wide brim for a slouchy style, perfect for casual wear or layering over winter jackets. The honeycomb texture maintains its appeal regardless of the brim’s width.
Incorporate stripes of different colors in every few rounds to highlight the raised honeycomb sections. This technique draws attention to the intricate texture.
Combine the honeycomb stitch with other textures, such as ribbing or popcorn stitches, to create unique patterns for hats or matching accessories.
For a cozy winter look, add a faux fur pom-pom or a crocheted flower at the top. Decorative touches enhance the hat’s charm and make it stand out.
You can also scale the pattern up or down to create matching hats for the entire family. Adjusting the initial magic ring or chain ensures the hat fits each wearer comfortably.
Q: Is the honeycomb crochet stitch difficult for beginners?
A: Not at all. While it involves front and back post double crochets, with practice, beginners can master the stitch quickly.
Q: What type of yarn is best for a honeycomb hat?
A: Medium-weight yarn (category 4) works best, such as acrylic, wool, or wool blends, as it provides warmth and shows the texture well.
Q: Can I make the hat in multiple colors?
A: Yes! Alternating colors in different rows enhances the honeycomb texture and adds visual interest.
Q: How do I ensure the hat fits properly?
A: Measure the head circumference before starting and adjust the number of rounds to achieve the desired height and width.
Q: Can I add decorations?
A: Absolutely. Pom-poms, flowers, or trim can be added to customize the hat and make it more stylish.
Q: How do I care for my honeycomb crochet hat?
A: Wash gently by hand or in a machine on a delicate cycle, then lay flat to dry to preserve the texture and shape.
The Stunning Honeycomb Crochet Hat is a versatile and stylish accessory that combines texture, creativity, and functionality.
If you’re excited to dive into this pattern, grab your favorite yarn and hook, and let’s get started! Keep reading to learn about the materials you’ll need, step-by-step instructions, and helpful tips to make your honeycomb crochet hat a stunning masterpiece.
By mastering the honeycomb stitch and following this guide, you can create a cozy hat that is perfect for gifting or keeping. The intricate pattern gives a professional finish, while customization options allow you to showcase your personal style.


