Crochet Pig In A Granny Square Blanket Pattern


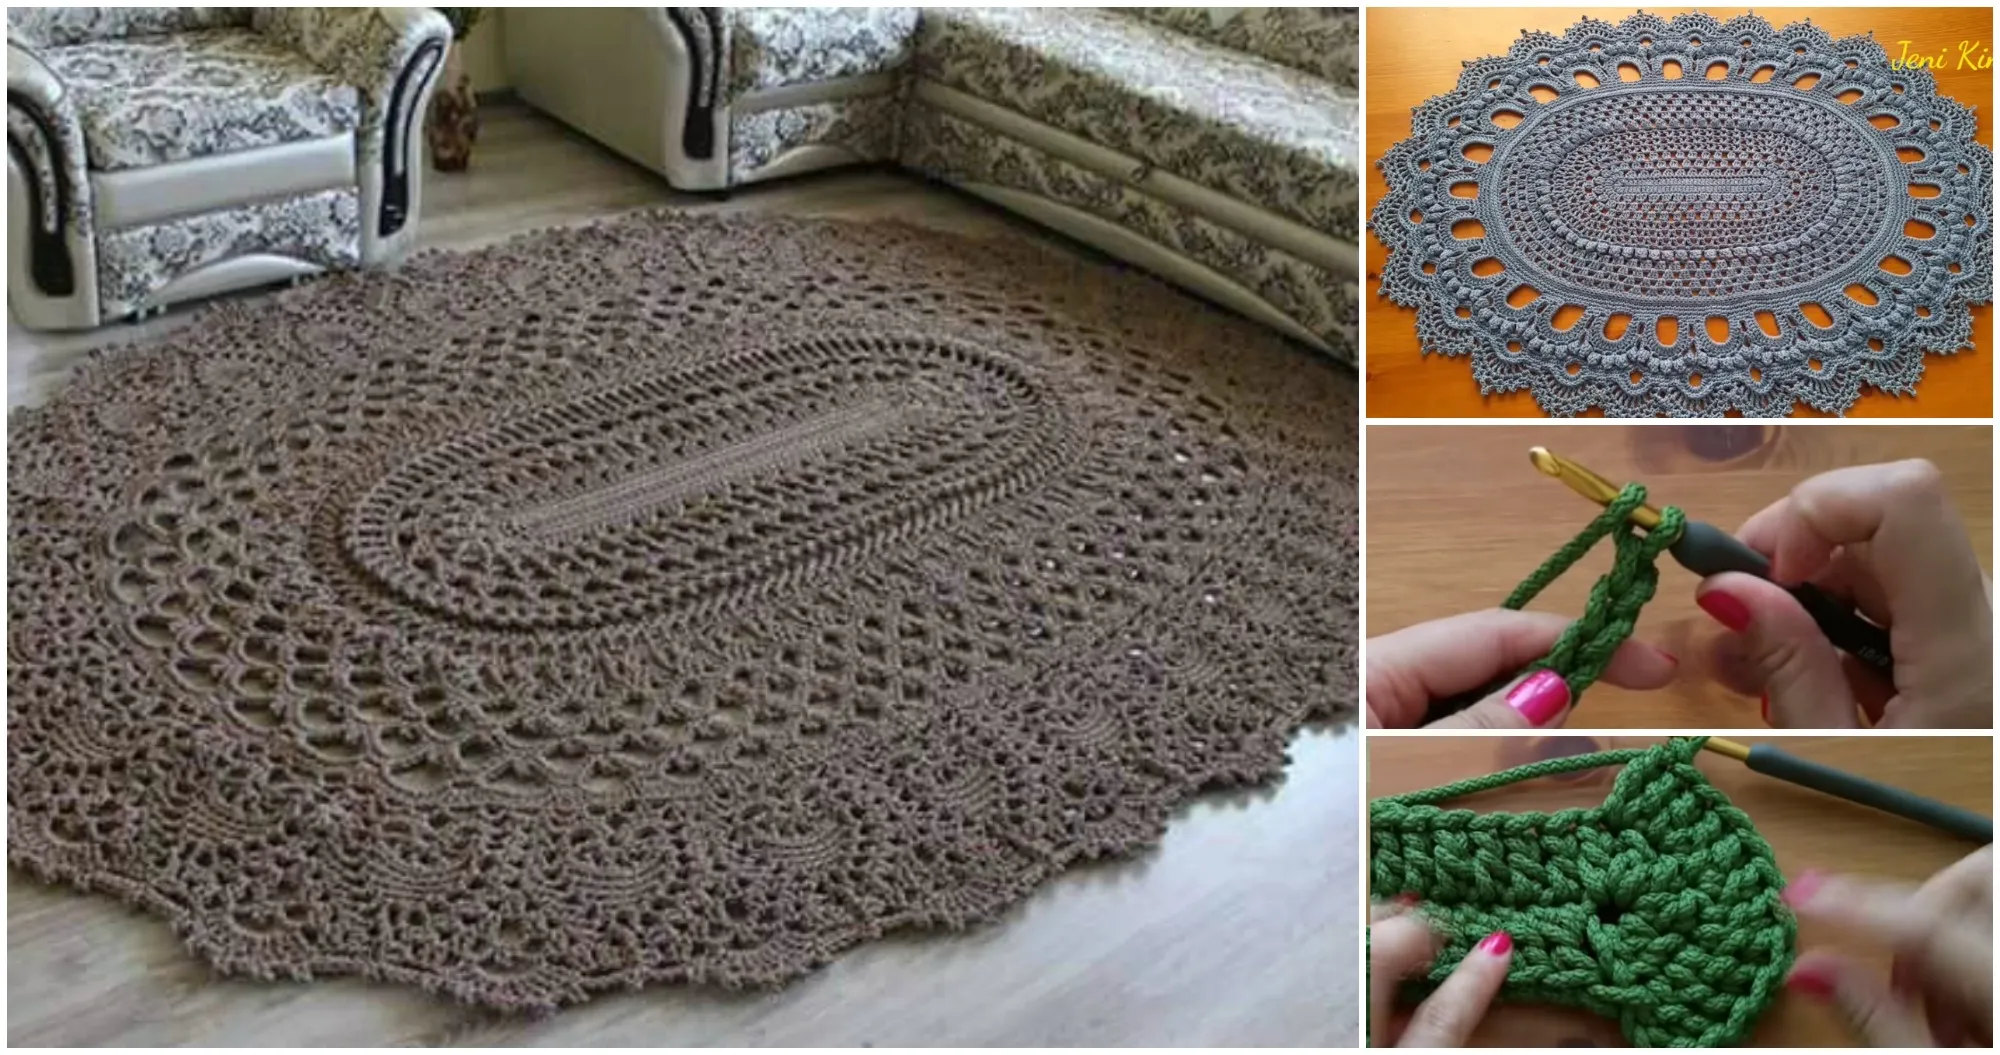
The Crochet Oval Rug – Free Pattern is a timeless and versatile project that adds a touch of warmth and handmade charm to any space in your home.
Whether placed in your living room, bedroom, or entryway, this pattern combines both function and beauty. Crocheting your own oval rug allows you to personalize colors, textures, and sizes, creating a piece that perfectly fits your style.
With this step-by-step guide, you’ll learn how to craft a durable and stylish rug using simple stitches and techniques that even beginners can master.
The beauty of a Crochet Oval Rug lies in its adaptability. You can use thick cotton yarn for a soft, washable mat or experiment with t-shirt yarn for a chunky, modern look.
The oval shape offers an elegant alternative to traditional round or rectangular rugs, fitting perfectly in narrow spaces or beside a bed. Plus, this pattern is practical, fun, and surprisingly quick to complete — making it an ideal project for weekend crafting sessions.
Creating your own Crochet Oval Rug – Free Pattern not only gives you a sense of accomplishment but also helps reduce waste if you choose to repurpose old yarn or fabric strips. Handmade rugs are durable, customizable, and add a unique handmade touch that mass-produced pieces simply can’t replicate. With a few materials and a bit of patience, you’ll have a stunning rug ready to enhance your home décor.
Before you start your Crochet Oval Rug, it’s important to gather the right materials. Choosing quality supplies will make your project easier and ensure long-lasting results.
You’ll need:
When selecting colors, consider where your rug will be placed. Neutral shades like beige, cream, or gray create a cozy, minimalist feel, while bold tones like teal, mustard, or terracotta add character and vibrancy. You can also mix multiple colors for a striped effect that makes your rug truly unique.
Prepare your workspace by ensuring you have ample room to spread out the rug as it grows. A flat surface helps you maintain symmetry and shape while crocheting.
Lastly, practice maintaining even tension. Rugs should be sturdy yet flexible, so avoid overly tight stitches, which can cause curling, or loose stitches, which can make the rug floppy.
Creating the Crochet Oval Rug – Free Pattern involves working in continuous rounds, gradually increasing stitches to form a smooth oval shape. Follow these easy steps to get started:
Step 1: Create the Foundation Chain
Begin with a slip knot and make a chain of about 20 stitches. This will determine the rug’s initial length. You can adjust this number depending on how large you want your rug to be.
Step 2: First Round
Work single crochets along the chain, then add multiple stitches (usually 3 to 5) into the last chain to form the first curve of your oval. Continue crocheting along the opposite side of the foundation chain, mirroring the first half. End with a slip stitch to join the round.
Step 3: Increasing the Rounds
Start the next round by chaining one, then continue working single crochets. Increase evenly around the curved ends to maintain the oval shape. Add two stitches in the same space where needed to prevent curling.
Step 4: Building the Body
Continue working in rounds, adding increases at both ends each time. The number of increases determines how flat your rug will stay — too few, and it curls; too many, and it ripples. Adjust as necessary for smooth results.
Step 5: Changing Colors (Optional)
If you want to introduce stripes or patterns, switch colors at the beginning of a new round. Carry the yarn neatly along the back to maintain a clean finish.
Step 6: Finishing the Edges
When your rug reaches the desired size, finish with a round of slip stitches or half-double crochets. This creates a sturdy, polished border that keeps the edges from stretching.
Flatten the rug on a smooth surface and gently stretch it into shape. You can block it with light steam if needed to smooth out any uneven areas.
To achieve a flawless Crochet Oval Rug – Free Pattern, here are some practical tips that will help improve your results and make the process smoother:
First, count your stitches at the end of each round. Missing increases can cause your rug to curve upward, while adding too many can make it wave.
Second, maintain consistent tension throughout. A firm, even tension produces a rug that lies flat and maintains its shape.
Third, use sturdy yarn suitable for high-traffic areas. Cotton, polyester blends, or recycled fabric yarns are great choices because they resist wear and tear.
Fourth, experiment with different stitches for texture variation. While this pattern uses single crochets, you can add rows of half-double or double crochets for a thicker, more dimensional look.
Fifth, secure your ends properly. Rugs endure frequent use, so weaving in yarn tails tightly ensures they won’t unravel over time.
Lastly, consider adding a non-slip backing. If your rug will be placed on tile or hardwood, applying a thin layer of rug gripper or sewing on a non-slip mat enhances safety and durability.
The Crochet Oval Rug – Free Pattern offers endless possibilities for creativity. Once you’ve mastered the basic version, try these fun variations to make your rug one-of-a-kind:
By experimenting with textures, yarn weights, and color schemes, you can transform the Crochet Oval Rug – Free Pattern into a design that complements any style — from minimalist modern to rustic farmhouse.
Q: Is the Crochet Oval Rug pattern beginner-friendly?
A: Yes! It’s an excellent project for beginners since it uses basic stitches and simple increases. Once you understand the oval construction, it’s easy to expand.
Q: What yarn type works best for rugs?
A: Cotton or t-shirt yarn is ideal because it’s sturdy, easy to clean, and provides a firm texture suitable for floor use.
Q: Can I wash my crochet rug?
A: Yes, most cotton rugs can be hand-washed or machine-washed on a gentle cycle. Always air dry flat to preserve shape.
Q: How do I stop my rug from curling?
A: Make sure to increase evenly around the curved edges and keep your tension consistent throughout each round.
Q: Can I make this rug with leftover yarn?
A: Absolutely! Mixing yarn scraps can create a beautiful multicolored rug with a charming, eco-friendly twist.
Q: What size should I make for a small entryway rug?
A: A chain of 15–20 stitches at the start usually creates a small to medium rug perfect for entryways or bedside use.
Q: How long does it take to complete this rug?
A: Depending on the size and yarn used, it typically takes 3–5 hours for smaller versions and up to a weekend for larger rugs.
The Crochet Oval Rug – Free Pattern is a beautiful blend of creativity and functionality, allowing you to craft something that’s both practical and stylish.
With simple stitches and endless customization options, it’s the perfect project for anyone who loves crochet and home décor. Whether you stick to a classic single-color rug or experiment with textures and bold patterns, your handmade creation will add warmth and personality to your home.
Now that you’ve learned every step, gather your yarn, pick up your hook, and start your own Crochet Oval Rug today. Once finished, share your thoughts and experiences — we’d love to hear your honest opinion and any creative suggestions for making this pattern even better!


