
Ballerina pencil case with zipper Pattern


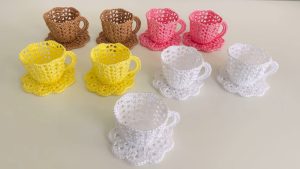
The Walking in Circles Tutorial is a delightful crochet project that combines rhythm, repetition, and creativity into a soothing, circular design.
Whether you’re creating coasters, mandalas, rugs, or even blankets, this pattern lets you explore the beauty of working in continuous rounds.
Perfect for beginners and experienced crocheters alike, it offers a meditative experience where each round builds gracefully upon the last, producing a balanced and visually striking piece.

When you start the Walking in Circles Tutorial, you’ll quickly realize that crocheting in the round isn’t just about technique — it’s about flow. Every new round expands your creation like ripples in water, creating harmony through texture and color.
The result can be playful or elegant depending on the yarn and palette you choose. This project is as versatile as it is beautiful, suitable for home décor, gifts, or even practical items like trivets and mats.
One of the best things about the Walking in Circles Tutorial is its simplicity. With just basic stitches and a little patience, you can produce professional-looking circular patterns. You’ll also gain valuable skills that translate to countless other crochet projects, from hats to bags to doilies. This tutorial will walk you step-by-step through the process while offering tips for perfect tension, smooth increases, and neat finishing.
At its core, the Walking in Circles Tutorial teaches you how to crochet in continuous rounds without seams or harsh edges. You begin in the center and gradually expand the circle by adding evenly spaced increases each round. This technique allows your piece to lay flat while growing symmetrically outward.
The pattern starts with a magic ring or chain loop — the foundation of most circular projects. Inside that ring, you’ll place a specific number of stitches depending on your project’s size and desired shape. From there, you’ll build outward, adding increases at consistent points to maintain the circle’s form.
A key element in mastering the circular pattern is understanding stitch placement. Placing increases correctly ensures that your circle remains flat rather than curling or rippling. If it starts to warp, adjusting your stitch count or hook size usually corrects the problem.
Choosing the right yarn also plays an important role. Cotton or acrylic yarns with smooth textures work best, as they provide structure and make the stitches clearly visible. Thicker yarns are great for rugs, while thinner yarns produce delicate coasters or mandalas.
You can also get creative with color transitions. Changing yarn colors every few rounds gives your Walking in Circles project a stunning striped or gradient effect. Self-striping yarns add an effortless touch of artistry, making each piece unique.
Finally, pay attention to tension. Consistent tension keeps the circle balanced and neat. Practice a few rounds first to ensure that your gauge remains even throughout the project.
Step 1: Begin with the Center
Start with a magic ring or chain four and join with a slip stitch to form a loop. Into this loop, crochet 6 single crochets (or another stitch type if your pattern specifies). Pull the ring tight to close the center.
Step 2: Create the First Round of Increases
Work two stitches into each stitch around. This doubles your count, creating the first flat round. Join with a slip stitch if you’re working in joined rounds, or continue in a spiral for a seamless look.
Step 3: Build Additional Rounds
For each new round, increase evenly. For example, in round three, work one stitch in the next stitch, then two in the next and repeat around. In round four, work two stitches normally, then an increase, and so on. This pattern of spacing increases by one each round helps maintain a perfect circle.
Step 4: Add Color or Texture
Once your base rounds are established, feel free to add color changes or textured stitches like half-double crochets, puff stitches, or clusters. These add character and make your Walking in Circles piece stand out.
Step 5: Keep the Shape Balanced
If your piece begins to ripple, it means there are too many increases. Skip one increase in the next round. If it curls inward, add an extra increase per round. Adjustments like these keep your circle flat and even.
Step 6: Finishing Touches
When you’ve reached your desired size, finish with a round of single crochets to give the edge a clean, professional look. Fasten off, weave in the ends with a yarn needle, and gently block your work to perfect its shape.
The Walking in Circles Tutorial can be used for many projects. Small versions make excellent coasters, medium ones work well as placemats or doilies, and large versions become beautiful rugs or wall art.
Creating flawless circles takes a combination of consistency and awareness. The Walking in Circles Tutorial is easy to follow once you understand a few key principles.
First, always count your stitches at the end of each round. Missing an increase or adding an extra one can quickly distort the circle’s symmetry.
Second, use stitch markers to mark the beginning of each round. This helps you stay on track, especially when working in spirals.
Third, consider your yarn type. Smooth, medium-weight yarns make your stitches clearer and easier to manage. Avoid overly stretchy or fluffy yarns when learning the technique.
Fourth, maintain steady tension. If your stitches vary in tightness, your circle may develop wobbles or waves. Practicing a few test rounds before your main project can help you get comfortable.
Fifth, experiment with stitch variety. You can alternate between rounds of single crochet, half-double crochet, or double crochet to add subtle texture differences while keeping the same circular structure.
Finally, always finish neatly. A well-woven tail and blocked surface make your final Walking in Circles creation look professional and ready for display or use.
The versatility of the Walking in Circles Tutorial is one of its most appealing features. Once you master the technique, you can use it to craft an endless array of handmade items.
You can start by creating colorful coasters. These are quick, satisfying projects that let you play with color combinations and yarn types.
For something larger, try a crochet rug using thick t-shirt yarn or bulky cotton. The continuous circle technique makes rugs durable, soft, and easy to wash.
Another idea is to make table mats or placemats. They add charm to dining spaces and can be customized to match any home décor.
If you enjoy decorative pieces, the Walking in Circles method can be used to create mandalas or wall hangings. Add fringe, beads, or embroidery for a personalized touch.
You can even adapt this pattern for round pillows. Simply crochet two identical circles, join them around the edge, and stuff them with fiberfill. The result is a cozy, handmade cushion with a modern flair.
Finally, for creative gifts, small Walking in Circles motifs can be used as appliqués on bags, sweaters, or blankets. They add texture and personality to any handmade project.
Q: Is the Walking in Circles Tutorial suitable for beginners?
A: Yes! It’s a great starting point for anyone learning to crochet in the round. Basic stitches and counting are all you need to create beautiful circular pieces.
Q: How do I keep my circle from curling?
A: If your circle curls upward, you need more increases. Add an extra one in the next round to flatten it out.
Q: What’s the best yarn for this project?
A: Medium-weight cotton or acrylic yarn works best for structure and durability. Use thicker yarn for rugs and thinner yarn for delicate projects.
Q: Can I make this pattern without joining rounds?
A: Absolutely. Working in continuous spirals eliminates seams and gives a smoother finish. Just remember to use a stitch marker to mark each round’s start.
Q: How do I add color changes cleanly?
A: Change colors at the beginning of a new round. Secure the new yarn with a slip stitch and continue crocheting as usual for a neat transition.
Q: Can this pattern be made into larger projects like blankets?
A: Yes! You can continue increasing and adding rounds until you reach the desired size. Just maintain the increase pattern to keep the shape flat.
Q: How can I block my finished piece?
A: Wet your crochet piece lightly, pin it flat on a foam board, and let it dry. This helps even out stitches and maintain a perfect circular shape.
The Walking in Circles Tutorial is a celebration of simplicity, creativity, and balance. By mastering this technique, you can create stunning circular crochet pieces that are both functional and decorative. Whether you’re crafting coasters, rugs, or mandalas, each piece becomes a reflection of patience and artistry.
Now that you know how to bring your circles to life, grab your yarn, hook, and start your own Walking in Circles journey. As you crochet, enjoy the relaxing rhythm of each stitch and the satisfaction of watching your project expand outward in perfect harmony.
Once finished, share your honest opinions and suggestions — your experience can inspire others to begin their circular crochet adventures too.


