
Ballerina pencil case with zipper Pattern


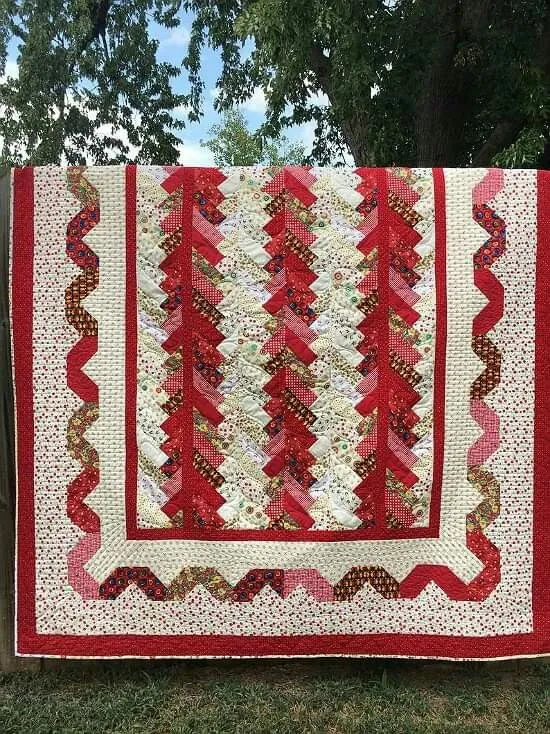
The French Braid Quilt Pattern is one of the most elegant and timeless quilting designs, known for its graceful flow and captivating visual rhythm.
Inspired by the art of braiding hair, this pattern arranges fabric strips in a cascading, interwoven formation that mimics the movement of a braid.
Whether you are an experienced quilter or a beginner looking for a rewarding project, the French Braid Quilt Pattern offers an enjoyable process that results in a breathtaking finished piece.
Creating a French Braid Quilt allows you to explore endless color combinations and fabric contrasts. Each strip adds to the beauty of the braid, making it a mesmerizing design that draws the eye from top to bottom.
This pattern is perfect for using up fabric scraps or showcasing a coordinated set of fabrics that blend from dark to light, giving a stunning gradient effect that adds depth and sophistication to your quilt.
One of the greatest advantages of the French Braid Quilt Pattern is its versatility. It can be adapted into table runners, wall hangings, bed quilts, or even accent pillows. The technique remains the same, but the size and arrangement can vary to suit your desired project. With patience and creativity, you’ll produce a quilt that looks intricate yet is surprisingly simple to assemble.
At its core, the French Braid Quilt Pattern is built from a series of fabric strips arranged in a mirrored sequence. Each strip is sewn diagonally onto a foundation piece, creating a flowing zigzag pattern that resembles the weaving of a traditional braid. The key to success lies in careful color placement and precision stitching.
To start, choose fabrics in a gradient sequence — from light to dark or from one color family to another. This creates the visual illusion of movement and direction within the braid. Many quilters prefer ombre or batik fabrics because their subtle color transitions naturally enhance the braid’s beauty.
Each strip is sewn one by one, alternating from side to side along a central axis. This method gives the quilt its signature braided look. As the braid expands, the pieces join together seamlessly, forming a beautiful column of flowing fabric.
When planning your layout, remember that contrast is what makes this pattern shine. Pairing bold hues with neutrals or combining warm and cool tones can make the braid more striking. The arrangement of color will determine whether your quilt feels soft and serene or bold and dramatic.
Precision cutting is also crucial. Using a rotary cutter and ruler ensures clean, straight edges for each strip. This accuracy helps maintain consistent seam allowances and a polished, professional finish.
Finally, pressing each seam as you go will make assembly easier and give the quilt top a crisp, flat appearance. The French Braid Quilt Pattern rewards careful attention to detail with results that are both stunning and symmetrical.
To begin your French Braid Quilt, gather your supplies: fabric strips, rotary cutter, cutting mat, ruler, sewing machine, thread, and an iron. Choose your fabric palette and organize it in the order you plan to sew.
Step 1: Cut fabric strips, typically 2½ inches wide, though you can adjust the size based on your desired braid width. Cut enough strips to complete your chosen quilt size.
Step 2: Lay out your fabric strips in a sequence that transitions smoothly in color. This visual plan helps you stay organized while sewing.
Step 3: Take your first two strips and place them right sides together at an angle, forming a “V” shape. Sew along the edge with a ¼-inch seam allowance, then press the seam open.
Step 4: Add the next strip to the opposite side of the center strip, aligning the top edges and maintaining the same diagonal direction. Continue alternating sides to form the braid.
Step 5: Once the braid reaches your desired length, trim the sides to even them out. Repeat the process to create additional braid panels if you plan to make a larger quilt.
Step 6: Join the braid panels together with sashing or border strips to frame and separate each section. This not only enhances the overall look but also gives structure to the quilt.
Step 7: Finish by layering the quilt top, batting, and backing. Quilt as desired using straight-line stitching, echo quilting, or free-motion designs to highlight the braided pattern. Bind the edges neatly to complete your quilt.
Following these steps, your French Braid Quilt Pattern will come to life with fluid motion and color harmony. Even though it looks intricate, the process is straightforward once you understand the basic structure.
Achieving perfection in your French Braid Quilt Pattern depends on thoughtful preparation and precise technique. Here are some expert tips to help you succeed:
First, plan your color transitions carefully. Lay out your fabrics before cutting to visualize how the braid will flow. Smooth gradations of color make the final quilt cohesive and visually appealing.
Second, use a design wall or flat surface to test different arrangements before sewing. Seeing the full layout helps you spot areas that may need more contrast or balance.
Third, maintain consistent seam allowances. Even small variations can distort the braid’s alignment. A ¼-inch presser foot is ideal for accuracy.
Fourth, press seams carefully after each addition. Pressing toward the darker fabric usually prevents shadowing and keeps the quilt flat.
Fifth, trim the edges evenly once each braid panel is finished. This ensures smooth assembly and prevents the quilt from looking uneven.
Lastly, choose quilting designs that enhance movement. Diagonal or wavy lines work beautifully with this pattern, reinforcing the illusion of flow that makes the French braid so distinctive.
With these tips, your French Braid Quilt Pattern will display the perfect blend of precision and artistry that sets handmade quilts apart.
The French Braid Quilt Pattern can be adapted into countless variations depending on your creativity. From classic elegance to modern vibrancy, this design is endlessly flexible.
You can create multiple narrow braids side by side for a sophisticated look, or make one large central braid as a statement piece.
Experiment with monochromatic color schemes for a subtle, minimalist vibe, or go bold with rainbow gradients that burst with energy.
For a modern twist, use printed fabrics such as florals, geometrics, or batiks. Each print adds personality and dimension to the overall design.
Adding contrasting sashing between braids gives a clean, structured appearance, while eliminating sashing creates a continuous woven effect.
If you’re short on time, try making a French Braid table runner or wall hanging instead of a full quilt. These smaller projects let you practice the technique while still producing a beautiful piece.
Lastly, enhance your project with decorative quilting or embroidered accents to personalize your design even further. The possibilities with the French Braid Quilt Pattern are limited only by your imagination.
Q: Is the French Braid Quilt Pattern good for beginners?
A: Yes, it’s beginner-friendly once you understand basic quilting skills like cutting, piecing, and pressing. The pattern’s repetition makes it easy to learn while producing striking results.
Q: What type of fabric should I use?
A: Quilting cottons work best because they are easy to cut, sew, and press. Choose high-quality fabrics for sharp seams and durability.
Q: Can I use precut fabric strips?
A: Absolutely. Jelly Rolls (2½-inch precut strips) are perfect for this pattern and save cutting time.
Q: How do I prevent the braid from curving?
A: Maintain even seam allowances and press each seam carefully. Trimming the edges as you go also helps keep the braid straight.
Q: How should I quilt the finished piece?
A: You can quilt straight lines along the braid edges, or use free-motion quilting to add swirls and waves that enhance the braided flow.
Q: What size can I make the French Braid Quilt?
A: The pattern is fully customizable — from small runners and lap quilts to large bed quilts. Simply add or remove braid panels to adjust the size.
Q: How do I choose colors for the best effect?
A: Gradual color transitions (light to dark) or complementary color pairs (such as blue and orange) emphasize the woven motion beautifully.
The French Braid Quilt Pattern is a timeless design that combines tradition, artistry, and modern style. Its elegant flow and seamless color transitions create a captivating effect that makes every quilt unique.
Whether you are crafting a gift or a centerpiece for your home, this pattern will always impress with its sophistication and charm.
By following this guide, you’ve learned how to cut, piece, and assemble your own French Braid Quilt, while exploring ways to personalize it through color and creativity.
Remember, quilting is about more than just stitches — it’s about expression, patience, and the joy of creating something truly beautiful with your hands.


