
Ballerina pencil case with zipper Pattern


The Orion’s Wheel Quilt Block – Free Tutorial brings together geometry, symmetry, and artistry to create one of the most captivating quilt designs in modern patchwork.
Inspired by the celestial beauty of the Orion constellation, this block pattern combines dynamic shapes and radiant color contrasts that mimic the spinning movement of a star wheel.
Whether you are an experienced quilter or a curious beginner, this tutorial will guide you step by step through the process of creating your very own Orion’s Wheel masterpiece.
The Orion’s Wheel Quilt Block is not only visually stunning but also rewarding to make. Its combination of half-square triangles, diamonds, and background pieces creates a balanced circular motion that looks intricate but is achievable with precise cutting and careful piecing. This pattern is perfect for quilts, wall hangings, or as a single block accent for decorative pillows.
By following this Free Tutorial, you’ll learn how to choose fabrics that enhance the illusion of motion, how to align seams perfectly, and how to assemble each section with accuracy. This project emphasizes patience, color coordination, and precision—three key elements that transform a simple block into a breathtaking piece of textile art.
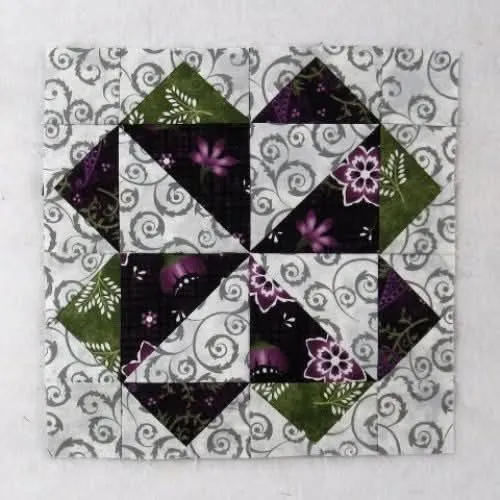
At its core, the Orion’s Wheel Quilt Block is built upon geometric repetition and contrast. The design revolves around a star-like wheel, formed by alternating light and dark triangles radiating from the center. The visual effect is mesmerizing, giving the impression of movement even though the design is static.
The block typically starts as a square foundation divided into symmetrical segments. Most versions use a combination of half-square triangles (HSTs) and quarter-square triangles (QSTs) to achieve the dynamic circular effect. The use of contrasting fabrics—light against dark, warm against cool—creates a sense of depth and rotation, reminiscent of celestial patterns in the night sky.
One of the beauties of this pattern is its adaptability. You can adjust the color palette to evoke different moods: cool blues and silvers for a night-sky effect, or warm golds and reds for a fiery, sunburst design. Regardless of the color scheme, the interplay of tones and angles makes this block visually captivating.
The finished block size can vary depending on your intended project. A common size is 12 inches, but you can enlarge or reduce it by modifying your template and seam allowances. With careful scaling, the pattern fits beautifully into any quilt layout.
Finally, while the Orion’s Wheel Quilt Block looks intricate, it’s essentially composed of straightforward units that become complex through repetition and arrangement. Once you understand the basic structure, you’ll find it surprisingly approachable and deeply satisfying to piece together.
To make the Orion’s Wheel Quilt Block, you’ll need a rotary cutter, cutting mat, quilting ruler, and a sewing machine with a consistent ¼-inch seam guide. Begin by selecting three to four fabrics that contrast well — one light background fabric, one medium tone, and one or two darks for the star points.
Step 1: Cutting the Pieces
Start by cutting your fabrics into precise squares and triangles. For a 12-inch block, cut:
Pair the squares and draw a diagonal line across the lighter fabric. Sew a ¼-inch seam on each side of the line, then cut along it to create two half-square triangles (HSTs). Press seams toward the darker fabric.
Step 2: Assembling the Wheel Segments
Arrange your HSTs to form a circular pattern radiating from the center. Alternate light and dark triangles to create the illusion of spinning movement. Assemble four identical segments and ensure all points meet at the center when joined.
Step 3: Building the Center Star
Use smaller triangles or diamond-shaped pieces to form the central star. Precision is key here — align the tips carefully and press each seam flat to avoid bulk.
Step 4: Joining the Segments
Once all four segments are complete, join them together to form the full Orion’s Wheel Quilt Block. Match all intersecting seams and pin them securely before sewing. Press the block from the back first, then gently from the front.
Step 5: Trimming and Squaring
Trim your finished block to ensure it measures the correct size and has clean edges. Use a quilting ruler to square it perfectly. This step ensures your block will fit seamlessly into a larger quilt layout.
Step 6: Optional Borders or Sashing
To frame your Orion’s Wheel, you can add a narrow border using one of your contrast fabrics. This makes the central design stand out and gives a finished, professional look to your block.
When you complete these steps, you’ll have a stunning, symmetrical Orion’s Wheel Quilt Block ready to be incorporated into any quilting project you desire.
To achieve a professional finish with your Orion’s Wheel Quilt Block, precision is essential. Begin by ensuring all your pieces are cut accurately. Even a small misalignment in triangles can throw off the final symmetry.
Pressing your seams as you go makes a significant difference. Press toward darker fabrics and avoid ironing back and forth — instead, use gentle pressing motions to keep your pieces from stretching.
Consider using a color wheel to select complementary or contrasting colors. Opposite hues, such as blue and orange or purple and yellow, enhance the spinning effect of the block.
Chain piecing can save time and ensure consistency across multiple blocks. This method helps maintain rhythm and efficiency while piecing several identical segments.
Always lay out your block before sewing final seams. Seeing the overall design allows you to spot potential misplacements before they’re permanent. Taking a quick photo can also help visualize symmetry and alignment.
Lastly, invest time in trimming your units as you go. Perfectly squared half-square triangles and precise seam allowances guarantee that your finished block will come together beautifully without distortion.
The Orion’s Wheel Quilt Block lends itself to endless creative variations. You can experiment with color gradients, fabric textures, and layout orientations to give each quilt a distinct personality.
For a minimalist look, use monochrome fabrics—such as shades of gray or blue—for subtle sophistication. For a bold, eye-catching design, use high-contrast fabrics that emphasize each geometric shape.
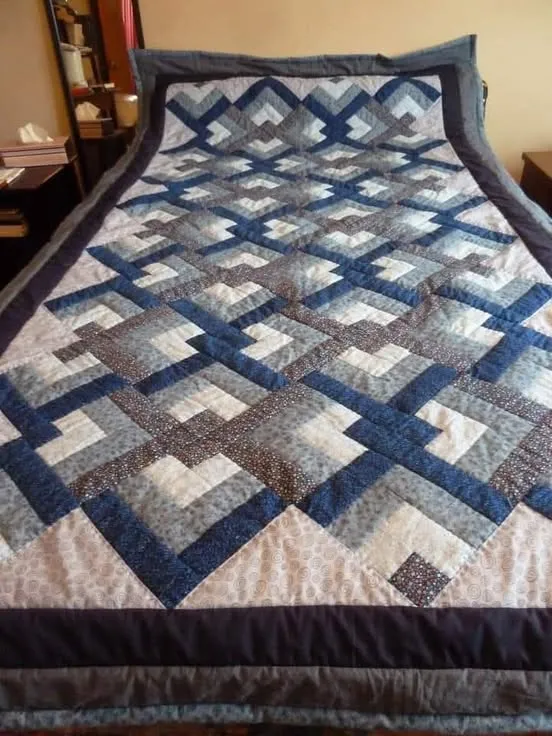
You can rotate the blocks to create secondary patterns when joined in rows. When arranged alternately, they form interlocking stars and wheels, giving your quilt a continuous motion effect.
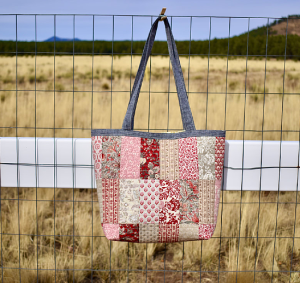
This block also works beautifully for smaller projects like table runners, wall art, or cushion covers. A single block framed with fabric borders becomes a statement piece of home décor.
Quilters who love intricate designs can add appliqué or embroidery to the center star for an extra celestial touch. Metallic threads or small beads can enhance the galactic inspiration behind the Orion theme.
Finally, if you enjoy hand quilting, outline each star point or wheel section with tiny running stitches to highlight the structure and add dimension. The Orion’s Wheel Quilt Block offers limitless possibilities for personalization and artistry.
Q: Is the Orion’s Wheel Quilt Block suitable for beginners?
A: Yes! Although it looks complex, it’s composed of simple units like half-square triangles. Beginners can follow this free tutorial step by step and achieve excellent results.
Q: What size should my finished block be?
A: The most common size is 12 inches square, but you can adjust measurements proportionally to create smaller or larger versions.
Q: Which fabrics work best for this pattern?
A: 100% cotton quilting fabrics are ideal because they hold shape well and press smoothly. Mixing solids with subtle prints enhances contrast without overwhelming the design.
Q: Can I make a full quilt using only this block?
A: Absolutely. Repeating the block across your quilt creates a stunning pattern of spinning wheels that looks dynamic and cohesive.
Q: How do I ensure perfect points in the center?
A: Use precise cutting, accurate seam allowances, and press seams open where necessary to reduce bulk and allow points to align cleanly.
Q: What is the best color combination for this block?
A: There’s no single best choice—it depends on your aesthetic. However, using one light background with two contrasting darks enhances the star-wheel illusion.
Q: How can I display a single Orion’s Wheel block?
A: A single block can be framed, turned into a wall hanging, or used as the centerpiece of a pillow. Its symmetry makes it ideal for standalone projects.
The Orion’s Wheel Quilt Block – Free Tutorial offers a perfect balance of geometry, creativity, and craftsmanship. This celestial-inspired design captivates quilters with its movement and depth while remaining accessible for all skill levels. Through careful cutting, color selection, and precise piecing, you can create a quilt block that shines as brightly as the constellation it’s named after.
Whether you choose to make one block as an art piece or an entire quilt of spinning stars, the process will be both relaxing and rewarding. Take your time, experiment with colors, and enjoy every stitch as your Orion’s Wheel Quilt Block comes to life.


