Crochet Pig In A Granny Square Blanket Pattern


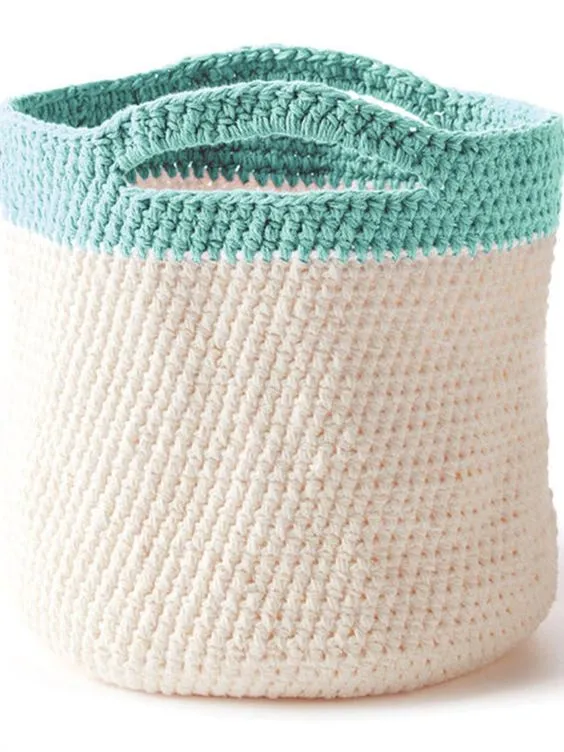
Handy Basket – Free Pattern is a versatile and practical crochet project that is perfect for organizing your home while adding a touch of handmade charm.
This free pattern allows both beginners and experienced crocheters to create a functional basket that can store anything from yarn to toys, making it a must-have accessory for any room.
Using simple stitches and easy-to-follow instructions, you can make a durable and stylish basket that complements your home décor.
Crocheting your own Handy Basket provides not only utility but also a sense of accomplishment. Handmade baskets are often more sustainable than store-bought options, and creating them with your own hands adds a personal touch.
This free pattern guides you step by step, from selecting the right yarn to finishing your basket with a neat edge, ensuring that even beginners can enjoy the process.
With this Handy Basket – Free Pattern, you can explore different sizes and color combinations to suit your needs. Whether you want a small basket for storing craft supplies or a larger one for blankets, this tutorial is flexible and adaptable. The simple design makes it easy to follow, yet it results in a finished product that is both elegant and functional, perfect for everyday use or gifting.
To start your Handy Basket, you will need some basic crochet supplies. First, choose a medium-weight cotton or acrylic yarn, which provides the durability and structure necessary for a sturdy basket. You will also need a matching crochet hook—typically size H/8 (5 mm) works well for most yarns used in this project. Additional materials include scissors, a yarn needle for weaving in ends, and optionally, stitch markers to keep track of your rounds.
Selecting the right yarn is crucial because it affects both the basket’s strength and appearance. Cotton yarn is ideal for durability and a clean finish, while acrylic yarn offers flexibility and softness. Using a slightly firmer yarn ensures that your basket maintains its shape even when storing heavier items.
The crochet hook size also impacts the texture and firmness of the basket. A slightly larger hook creates a looser weave, which may be better for decorative baskets, while a smaller hook produces a tighter, more structured fabric suitable for holding weight.
Color choice is entirely up to you, and mixing shades can create a playful or sophisticated look. Stripes, ombre effects, or even solid tones can make your basket unique. Choosing complementary colors enhances its visual appeal and ensures it fits your home décor seamlessly.
Other optional materials, like a cardboard base, can be added for extra stability. This is particularly useful if you plan to store heavier items such as books or craft supplies. Adding a base is simple and doesn’t require altering the main crochet pattern.
Finally, make sure to have a comfortable workspace with good lighting. Working in a well-lit area reduces eye strain and makes it easier to follow the Handy Basket – Free Pattern accurately, ensuring professional-looking results.
Start your Handy Basket by creating a foundation chain, typically 4–6 chains, and join them with a slip stitch to form a ring. This ring serves as the base of your basket, and all subsequent rounds will build on this foundation.
Next, work single or double crochet stitches into the ring, gradually increasing stitches to form a flat circular base. Each round should include evenly spaced increases to keep the base flat and prevent curling or warping.
After achieving the desired base size, stop increasing stitches. From this point, work even rounds without increases to start building the sides of the basket. This creates vertical walls that give the basket structure and depth.
Continue crocheting in the round, checking periodically to ensure the walls remain straight. Adjust tension if necessary, as uneven tension can cause ripples or slanting in the basket’s sides.
Once the basket reaches the desired height, finish the top edge with a decorative stitch like crab stitch or single crochet to give it a clean, professional look. This final touch enhances both appearance and durability.
Weave in all loose ends using a yarn needle to prevent unraveling. This step is crucial for ensuring your basket lasts a long time, especially if it will hold heavier items.
The beauty of the Handy Basket – Free Pattern is its flexibility. You can easily customize size, color, and stitch patterns to suit your needs. Want a smaller basket for desk supplies? Reduce the number of base rounds. For a larger storage solution, increase both the base diameter and wall height.
Experimenting with different stitch patterns can add texture and visual interest. For instance, alternating front post and back post stitches creates a ribbed effect, while shell stitches add a delicate decorative touch.
Handles are another practical customization. Simply crochet small openings or attach separate handles using the same yarn. This makes your basket easier to carry and adds a charming design element.
Color changes can be incorporated at any point. Stripes or color blocks make the basket more visually appealing and can match your home’s color scheme. You can even use leftover yarn scraps from other projects, making this an eco-friendly option.
Adding embellishments like buttons, ribbons, or appliqué crochet shapes allows further personalization. These decorative touches make your basket stand out as a handmade piece and can also make it a perfect gift.
Finally, lining your basket with fabric is optional but adds extra durability and polish. A simple fabric insert can prevent smaller items from slipping through stitches while giving the basket a finished, professional look.
Maintaining consistent tension is key to a well-shaped Handy Basket. Uneven stitches can cause bulging or slanting, affecting both aesthetics and functionality. Practicing tension control ensures a neat, professional finish.
Using stitch markers is highly recommended. They help track the beginning of rounds, especially when working in continuous rounds without joining, and prevent accidental mistakes.
Blocking your finished basket is optional but can help improve its shape. Simply dampen the basket slightly, mold it to the desired shape, and allow it to dry completely. This ensures it sits properly and looks polished.
Always count your stitches in each round to avoid unintentional increases or decreases. This simple step saves time and prevents frustration caused by uneven shapes or mismatched stitch counts.
If your basket starts to curl at the edges, adjust your tension or add a few extra stitches in the following round. Small corrections during the process prevent major issues at the end.
Experiment with different yarn types to achieve varying textures and firmness. Combining cotton with acrylic can provide both durability and softness, creating a basket that is both functional and visually appealing.
Q: Can beginners follow the Handy Basket – Free Pattern?
A: Absolutely. This pattern is beginner-friendly with clear, step-by-step instructions. Simple stitches like single and double crochet are used throughout, making it accessible for all skill levels.
Q: What type of yarn is best for crochet baskets?
A: Medium-weight cotton yarn is ideal for durability and structure, while acrylic yarn can provide softness. A blend of cotton and acrylic can also work well for both strength and flexibility.
Q: Can I make different sizes using this pattern?
A: Yes. Adjust the number of base rounds and the height of the walls to create small, medium, or large baskets. This pattern is highly customizable.
Q: Is it possible to add handles to my basket?
A: Definitely. Handles can be crocheted directly into the basket or added separately using yarn or other materials. They enhance portability and functionality.
Q: How do I prevent my basket from losing shape?
A: Using firm yarn and maintaining consistent tension helps keep the basket structured. Adding a fabric lining or cardboard base can also improve stability.
Q: Can I use leftover yarn for this project?
A: Yes. This pattern is perfect for using scraps from other projects. Mixing colors adds creativity and makes your basket unique.
Creating a Handy Basket – Free Pattern is a rewarding crochet project that combines practicality with creativity. By following this step-by-step tutorial, you can craft a durable and stylish basket that meets your storage needs while adding charm to your home.
We explored materials, techniques, customization options, and helpful tips to ensure a successful project. Try making your own baskets, experiment with colors and sizes, and enjoy the process of bringing a handmade item to life.
Leave your honest opinion and suggestions in the comments—we’d love to hear how your baskets turned out and any creative variations you came up with!


