Crochet Pig In A Granny Square Blanket Pattern


Colorful Crochet Rooster – Complete Tutorial & Diagram is the ultimate guide for anyone looking to create a vibrant and charming rooster using crochet techniques.
This tutorial and diagram are designed for both beginners and experienced crocheters who want to make a decorative piece that can brighten up any space.
By following this guide, you will learn how to transform simple yarn into a detailed and colorful rooster, combining creativity with precise crochet skills.
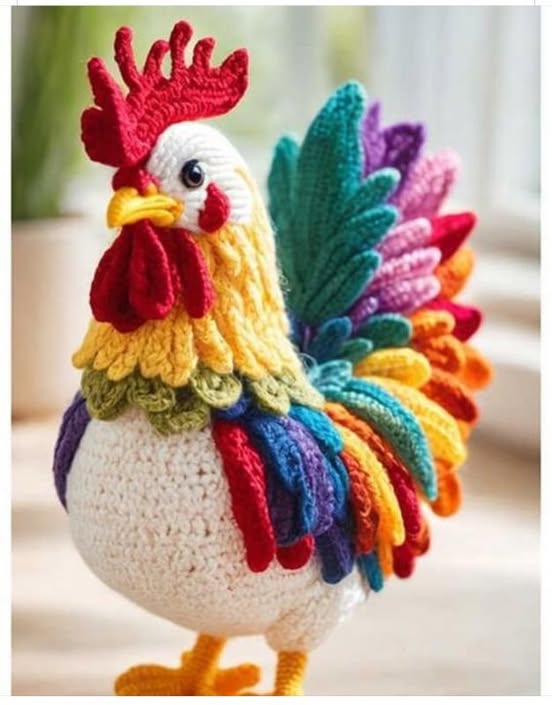
Crocheting a colorful rooster is a rewarding project that allows you to explore different stitch patterns and color combinations. Unlike store-bought decorations, a handmade crochet rooster has a personal touch, making it a perfect gift or a unique addition to your home.
The complete tutorial and diagram provided in this article will help you understand each step, ensuring that your rooster turns out beautifully every time.
This project also helps improve your crochet skills by introducing you to amigurumi techniques, including shaping, color changes, and assembly. With clear instructions and a visual diagram, even those new to crochet can successfully create a detailed and lively rooster. The Colorful Crochet Rooster – Complete Tutorial & Diagram emphasizes both fun and precision, making it an enjoyable and satisfying craft project.
To create your colorful crochet rooster, gather the following materials: yarn in various colors, a suitable crochet hook, stuffing for the body, and a yarn needle for assembly. Choosing high-quality yarn ensures that your rooster will be durable and vibrant. The combination of colors can be customized to match your personal taste or seasonal themes, making your project truly unique.
Selecting the right crochet hook is essential for maintaining consistent tension throughout the project. The tutorial and diagram suggest the ideal hook size based on your yarn, which helps you achieve the correct size and shape for the rooster. Using a slightly smaller or larger hook can affect the final look, so pay close attention to the recommendations.
Stuffing the rooster properly is key to maintaining its shape and stability. Overstuffing can make it difficult to attach parts, while under-stuffing may result in a floppy figure. This complete tutorial includes detailed instructions on how to stuff each part evenly to create a balanced and visually appealing rooster.
Color changes are a significant part of making your rooster vibrant and lively. By following the diagram, you can learn how to switch colors seamlessly without leaving gaps or loose ends. This technique enhances the overall appearance and gives your rooster a professional finish.
Finally, you will need a yarn needle for assembly. This tool is essential for sewing parts together neatly, such as attaching the wings, comb, and tail. The Colorful Crochet Rooster – Complete Tutorial & Diagram explains how to use the needle effectively to achieve clean and secure joins.
Proper preparation of materials ensures a smooth crochet process, making it easier to follow the steps and achieve a beautiful final result.
Start by crocheting the rooster’s body using the main color yarn. Work in rounds, gradually increasing stitches to form a rounded shape. Following the diagram carefully helps maintain symmetry and proportions, which are crucial for a well-shaped figure.
Next, create the head and comb using contrasting yarn colors. The tutorial provides specific stitch counts and increases for shaping, ensuring that the rooster’s face is expressive and lively. Accurate color placement will bring your rooster to life.
The wings are made separately and then attached to the body. You can experiment with different stitch patterns to add texture and interest. The tutorial explains how to crochet symmetrical wings that complement the overall design.
Tail feathers are a highlight of the colorful crochet rooster, allowing you to showcase multiple colors and stitch styles. By following the diagram, you can create a balanced arrangement that fans out naturally, adding elegance and charm.
Assembly is the final step, where all parts are joined using a yarn needle. The tutorial includes tips on positioning each piece correctly to maintain proportion and balance. Proper assembly is key to achieving a polished and professional-looking rooster.
Finishing touches, such as embroidering the eyes or adding subtle details with yarn, complete your crochet rooster. These small details enhance personality and make your project unique.
Consistency in tension is critical for creating a uniform and professional-looking crochet rooster. Practice maintaining even tension to avoid uneven stitches or gaps in your design.
Use stitch markers to keep track of rounds and important points in your project. This helps you follow the diagram accurately and prevents mistakes that may be difficult to correct later.
Choosing the right yarn colors can make a significant difference. Bright, contrasting colors make your rooster eye-catching, while more muted tones can give it a subtle charm.
Pay attention to stitch counts and increases. Following the tutorial and diagram ensures that each part is the correct size and fits together perfectly during assembly.
Experimenting with different yarn textures can add depth and interest. Combining smooth and fluffy yarns creates a tactile and visually appealing figure.
Take your time with assembly. Carefully positioning each part ensures that your rooster is well-proportioned and stable, resulting in a finished product you can be proud of.
Skipping stitch counts can distort the rooster’s shape. Following the diagram carefully helps prevent this issue.
Inconsistent tension can lead to uneven or floppy parts. Practice and attention to detail are essential for a polished result.
Improper color changes may create gaps or loose ends. Learn the techniques provided in the tutorial for seamless transitions.
Overstuffing or understuffing parts can affect stability. Add stuffing gradually and check the shape frequently.
Attaching parts incorrectly may cause imbalance. Use pins or stitch markers to test placement before sewing.
Rushing through finishing touches can reduce the overall quality. Take your time to add details neatly for a professional appearance.
Q: What skill level is needed for this crochet rooster?
A: The Colorful Crochet Rooster – Complete Tutorial & Diagram is suitable for beginners with basic crochet knowledge as well as experienced crafters who want a fun and detailed project.
Q: Can I use any yarn for this project?
A: Yes, but using medium-weight, high-quality yarn is recommended for durability and vibrant colors. Follow the suggested yarn types in the tutorial for best results.
Q: How long does it take to complete the rooster?
A: Depending on your skill level and available time, it can take anywhere from a few hours to a couple of days. Following the step-by-step tutorial ensures efficient progress.
Q: Can I customize the colors?
A: Absolutely. The tutorial encourages using your preferred color combinations to make each rooster unique and personalized.
Q: Is stuffing necessary?
A: Yes, proper stuffing is essential to maintain shape and stability. The tutorial provides detailed guidance on how to stuff each part evenly.
Q: Can I make smaller or larger versions?
A: Yes, by adjusting yarn weight and hook size, you can scale the rooster to your desired size while following the same steps in the diagram.
The Colorful Crochet Rooster – Complete Tutorial & Diagram offers a comprehensive guide to creating a vibrant, detailed, and charming rooster using crochet.
By following the materials list, step-by-step instructions, and helpful tips, you can make a handmade decoration that is both personal and visually appealing.
Experimenting with colors, textures, and stitches adds a creative touch while improving your crochet skills. Don’t forget to take your time with assembly and finishing details to achieve a polished result.
We invite you to leave your honest opinion and suggestions about your experience creating this crochet rooster, as your feedback helps improve future tutorials and inspires other crafters.


