Crochet Pig In A Granny Square Blanket Pattern


Sunburst Front Post Granny Square – Tutorial for Beginners is a fun and engaging project that introduces you to a slightly advanced crochet technique while still being approachable for beginners.
This pattern uses front post stitches to create a stunning raised effect that gives the classic granny square a beautiful sunburst appearance. If you’ve been looking for a way to add texture and depth to your crochet projects, this tutorial is perfect for you.
Creating a Sunburst Front Post Granny Square is not only satisfying but also versatile. These squares can be used to make blankets, cushions, bags, or even garments.
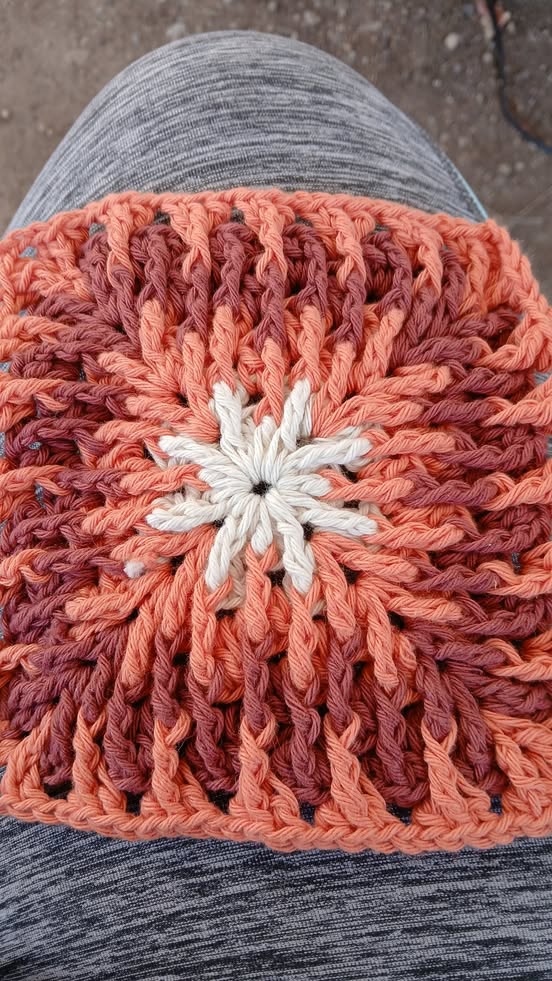
The raised sunburst effect adds a decorative element that transforms a simple granny square into a show-stopping design. By following this step-by-step tutorial, you will gain confidence in using front post stitches and learn techniques that can be applied to other crochet patterns.
This tutorial for beginners ensures that even those new to crochet can achieve professional-looking results. By breaking down each stitch and providing clear instructions, this guide takes the guesswork out of making Sunburst Front Post Granny Squares. You will learn how to maintain consistent tension, count your stitches accurately, and join rounds seamlessly for a polished final product.
Before starting the Sunburst Front Post Granny Square, gather all the necessary materials to make your project smooth and enjoyable. You will need medium-weight yarn, a suitable crochet hook (usually recommended on the yarn label), a yarn needle, and scissors. Choosing yarn colors that contrast well can enhance the sunburst effect, making your squares visually appealing.
Having the right tools is essential for achieving the best results. Using a hook that matches your yarn weight ensures that your granny square maintains even stitches. Beginners often benefit from using smooth, light-colored yarn as it makes counting stitches and identifying front post stitches easier.
It’s also helpful to have stitch markers handy, especially when working on larger squares or joining rounds. These small tools help you track your rounds and prevent mistakes that could affect the symmetry of your Sunburst Front Post Granny Square.
Understanding your materials fully will improve the overall experience of crocheting this pattern. The right combination of yarn and hook, along with stitch markers and a comfortable workspace, sets the foundation for a successful project. Following the materials checklist ensures you are prepared for the step-by-step tutorial ahead.
Beginner-friendly yarn options such as acrylic or cotton are ideal. Acrylic yarn is soft, easy to care for, and widely available, while cotton provides durability and a firm texture that highlights the front post stitches effectively. Choosing the right yarn can make the difference between a flat, uninspired square and a vibrant, textured sunburst granny square.
Lastly, make sure you have a comfortable seating arrangement and good lighting. Crocheting involves focusing on small details, and proper lighting prevents eye strain. With all these preparations in place, you are ready to start your Sunburst Front Post Granny Square – Tutorial for Beginners journey.
To begin your Sunburst Front Post Granny Square, start with a magic ring or chain four to form a loop. The magic ring is preferred as it creates a tighter center and avoids holes in the middle of the square. Once your loop is ready, chain three to serve as your first double crochet.
Next, you will work double crochets into the ring, separating clusters with chains according to your pattern instructions. The clusters form the foundation for the sunburst effect, so count your stitches carefully. Each round will expand outward, and your clusters will grow into the sunburst pattern as you add front post stitches.
When you reach the second round, begin incorporating front post double crochets around the posts of the previous round’s stitches. These raised stitches create the texture that defines the sunburst look. Make sure to insert your hook from front to back and around the post of the stitch, then complete the double crochet normally.
Continue following the pattern, alternating between standard double crochets and front post double crochets. Each round should be slightly larger than the previous one, forming a symmetrical square with the sunburst motif radiating from the center. Counting and checking alignment frequently will ensure uniformity.
Corners of the square are formed by placing multiple double crochets into a single space and separating clusters with chains. Pay attention to the number of stitches in each corner to maintain the square shape. Properly formed corners help your sunburst granny square lie flat and prevent curling.
Finally, after completing the desired number of rounds, fasten off the yarn and weave in ends using a yarn needle. Blocking your square can help smooth out uneven stitches and enhance the overall appearance of the sunburst effect. Your Sunburst Front Post Granny Square is now ready to be used individually or joined with others for larger projects.
Practicing front post stitches on a small sample before starting your main square can help build confidence. These stitches may feel awkward initially, but with repetition, you will become comfortable working around posts rather than into tops of stitches.
Use contrasting yarn colors to make the sunburst pattern more visible. This visual aid is particularly helpful for beginners learning to identify front post stitches within a complex pattern.
Keep your tension consistent throughout the square. Uneven tension can cause the granny square to ripple or warp, affecting the final sunburst appearance. Relax your hands and maintain an even stitch size.
Mark the beginning of each round with a stitch marker. This simple step prevents losing track of where each round starts, especially when working with front post stitches that can obscure traditional stitch lines.
Do not rush. Crocheting Sunburst Front Post Granny Squares is a meticulous process, and taking your time ensures accuracy and a professional finish. Enjoying the process makes the project rewarding and stress-free.
Review your work periodically. Compare your square to reference images or diagrams to ensure that the sunburst pattern develops correctly. Adjusting mistakes early is easier than correcting them in later rounds.
Once you have mastered the Sunburst Front Post Granny Square, you can use it for various creative projects. Combining multiple squares allows you to make stunning blankets, throws, or table runners that showcase texture and vibrant colors.
Individual squares can also become coasters, placemats, or decorative pillows. The sunburst texture adds a tactile and visual dimension that enhances the overall home décor.
Consider experimenting with color gradients. Using shades of a single color or complementary colors in each round can make the sunburst effect even more striking and unique.
These squares can also be integrated into wearable items such as bags, vests, or scarves. The raised front post stitches provide durability and aesthetic appeal, making handmade accessories stand out.
Joining techniques are essential to explore. Slip stitch, whip stitch, or crochet join methods can be used to assemble multiple squares while maintaining a neat finish. Each method offers a different visual and textural outcome.
Gift-giving is another wonderful use for these squares. Handmade Sunburst Front Post Granny Squares or items made from them are personal and thoughtful presents that demonstrate skill and care.
Q: What is a front post stitch?
A: A front post stitch is a crochet technique where the hook is inserted around the post of the stitch from the previous row instead of into the top loops. This creates a raised, textured effect ideal for patterns like the sunburst granny square.
Q: Can beginners make a Sunburst Front Post Granny Square?
A: Yes, beginners can make this square by following step-by-step instructions. Practicing front post stitches on a small swatch first can help build confidence.
Q: How do I keep my square flat?
A: Consistent tension, correct stitch counts, and properly formed corners are key to keeping your sunburst granny square flat and symmetrical.
Q: What yarn is best for this pattern?
A: Medium-weight acrylic or cotton yarn works best. Acrylic is soft and easy to handle, while cotton provides a firm texture that highlights front post stitches.
Q: Can I make other items with these squares?
A: Absolutely! You can create blankets, pillows, bags, coasters, or even garments using Sunburst Front Post Granny Squares.
Q: How do I join multiple squares?
A: You can join squares using slip stitch, whip stitch, or crochet join techniques, depending on the look you want to achieve.
The Sunburst Front Post Granny Square – Tutorial for Beginners is a fantastic way to learn new crochet techniques while creating visually striking squares.
You learned about front post stitches, maintaining tension, forming corners, and using your squares creatively for blankets, pillows, and more.
This project combines skill-building with artistic expression, resulting in beautiful handmade items. We hope this tutorial inspires you to experiment with colors, textures, and patterns.
Leave a sincere opinion and suggestions below about your experience with this tutorial, and share how you plan to use your sunburst granny squares.


