Crochet Pig In A Granny Square Blanket Pattern


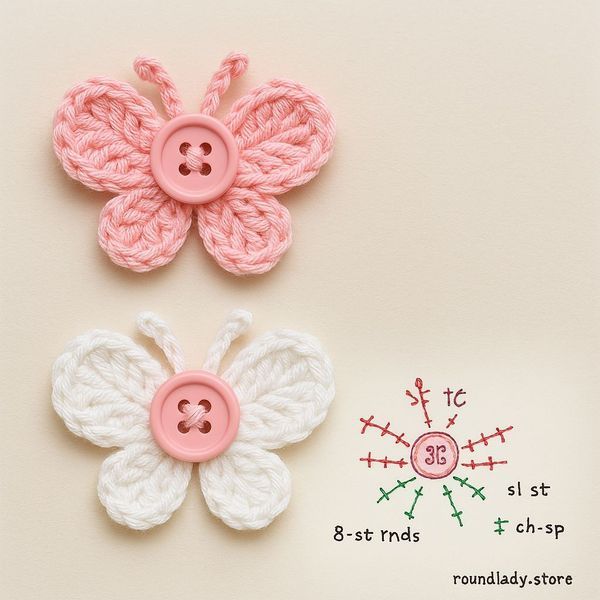
Crochet Button Butterfly – Step-by-Step Tutorial is a delightful project for anyone looking to add a touch of whimsy to their crochet collection.
This tutorial is perfect for beginners and experienced crocheters alike, guiding you through each stage of creating a charming butterfly using simple stitches and a button centerpiece.
By following this step-by-step guide, you will be able to craft a cute accessory that can be used on bags, clothes, home décor, or as a fun gift.
Creating a Crochet Button Butterfly allows you to experiment with colors, textures, and yarn types, making each butterfly unique. The button not only serves as the body of the butterfly but also adds a decorative element that enhances the overall look.
Using this tutorial, you will learn how to combine small crochet motifs with buttons to create an elegant and visually appealing piece that stands out.
The process of crocheting a butterfly is not only fun but also a great way to improve your skills. Working with tiny crochet details helps refine your technique and increases your confidence in handling intricate patterns. With patience and practice, even beginners can achieve a beautiful result. This step-by-step tutorial ensures that you can enjoy the process without feeling overwhelmed.
To begin your Crochet Button Butterfly – Step-by-Step Tutorial, gather the essential materials. You will need yarn in your preferred colors, a suitable crochet hook, a small button for the center, a yarn needle, and scissors. Choosing the right yarn is important; lightweight or medium-weight yarn works best for creating delicate wings.
Using different colors for the wings allows you to customize your butterfly and match it to the intended project. Buttons can also vary in size and style, giving your butterfly a unique personality.
It is important to have a sharp yarn needle to weave in ends neatly and securely attach the button. The right tools make the process smoother and ensure that your finished butterfly looks professional.
Understanding the materials before starting helps you plan the colors and sizes effectively. This preparation step ensures that your Crochet Button Butterfly is completed without interruptions or mistakes.
You can also include a small amount of stuffing if you want the butterfly to have a slightly puffed, three-dimensional effect. This step is optional but adds a charming touch.
Lastly, having a comfortable workspace with good lighting enhances your crocheting experience. Being organized and prepared allows you to focus on the creative process and enjoy making your button butterfly.
Begin by creating a small magic ring or chain to form the foundation of your butterfly wings. This ring will anchor your stitches and provide a solid center for the wings to expand from.
Next, work single and double crochet stitches to form the top wings. Pay attention to stitch count to ensure symmetry. The granny square-inspired structure helps keep the butterfly balanced.
Once the top wings are complete, move on to the bottom wings. These are slightly smaller and can use fewer stitches for a delicate look. Consistency in stitch height is key to maintaining the butterfly’s shape.
Attach a button in the center to act as the butterfly’s body. Sew it securely using a yarn needle, ensuring that it is tightly fastened to prevent movement or detachment.
Add finishing touches by weaving in loose yarn ends. Use small, tight stitches to keep everything neat and avoid fraying. A tidy finish makes your Crochet Button Butterfly ready for display or use.
Optional embellishments, such as beads or embroidery, can enhance the butterfly’s appearance. This step allows you to personalize your project and add flair to your handmade creation.
Experiment with different yarn textures to create unique visual effects. Smooth cotton yarn gives a clean look, while fuzzy or textured yarn adds depth.
Try combining multiple colors in one butterfly for a rainbow or gradient effect. Color transitions can make your butterfly stand out and appear more realistic.
Vary button sizes and shapes for interesting results. Round buttons give a classic look, while novelty buttons add a playful element.
Consider making a set of butterflies in various sizes. These can be used for decorating clothing, hair accessories, or even as ornaments.
Adjust wing sizes to create different styles. Larger wings give a bold statement, while smaller wings look delicate and refined.
Finally, practice different stitch patterns for wings, such as shell stitches or picots. This variation allows you to create butterflies with intricate designs and fine detailing.
Crochet Button Butterflies can enhance a variety of projects. Sew them onto hats, scarves, or sweaters to add a personal touch and pop of color.
Use them as bag charms or zipper pulls. The small, lightweight nature makes them ideal for portable accessories.
Incorporate butterflies into home décor, such as attaching them to cushions, curtains, or wall hangings for a whimsical effect.
They make adorable gift toppers. Adding a butterfly to a wrapped gift shows attention to detail and creativity.
Create a mobile or garland with multiple butterflies for decorative purposes. This is perfect for nurseries or themed parties.
Butterflies can also be used in scrapbooking or card-making, adding a tactile and visual element that enhances your crafts.
Q: What level of experience is needed to make a Crochet Button Butterfly?
A: This project is beginner-friendly, but having basic knowledge of crochet stitches like single and double crochet is helpful.
Q: What type of yarn works best?
A: Lightweight or medium-weight yarn is ideal. Cotton yarn gives a clean look, while acrylic or blends can add softness.
Q: Can I use different buttons for the butterfly’s body?
A: Yes, any small button can be used. Choose a size that fits the scale of your butterfly.
Q: How do I make the butterfly wings symmetrical?
A: Count your stitches carefully for both top and bottom wings. Consistent stitch height ensures symmetry.
Q: Can I attach the butterfly to clothing?
A: Absolutely. Sew the button and edges securely to the fabric to ensure it stays in place.
Q: Can I make the butterfly larger or smaller?
A: Yes, adjust the number of stitches or use thicker/thinner yarn to change the size.
The Crochet Button Butterfly – Step-by-Step Tutorial provides a complete guide to creating a beautiful, customizable accessory. By following this tutorial, you can make butterflies that are perfect for decorations, gifts, or personal embellishments.
By mastering the Crochet Button Butterfly – Step-by-Step Tutorial, you not only gain the ability to create a delightful handmade accessory but also develop valuable crochet skills that can be applied to countless other projects.
Each butterfly you make can be tailored in color, size, and embellishments, giving you endless opportunities for creativity and personalization. This project encourages patience, precision, and artistic expression, making it both a relaxing hobby and a rewarding craft.
Sharing your finished butterflies with friends, family, or the crochet community can inspire others and spread the joy of handmade creations, while also building your confidence and pride in your abilities.
Experimenting with yarn colors, textures, and button styles allows endless creativity. Share your creations, leave your honest opinions, and suggest improvements or variations to inspire others.
This project is not only fun but also a wonderful way to enhance your crochet skills while producing something charming and functional.


