Crochet Pig In A Granny Square Blanket Pattern


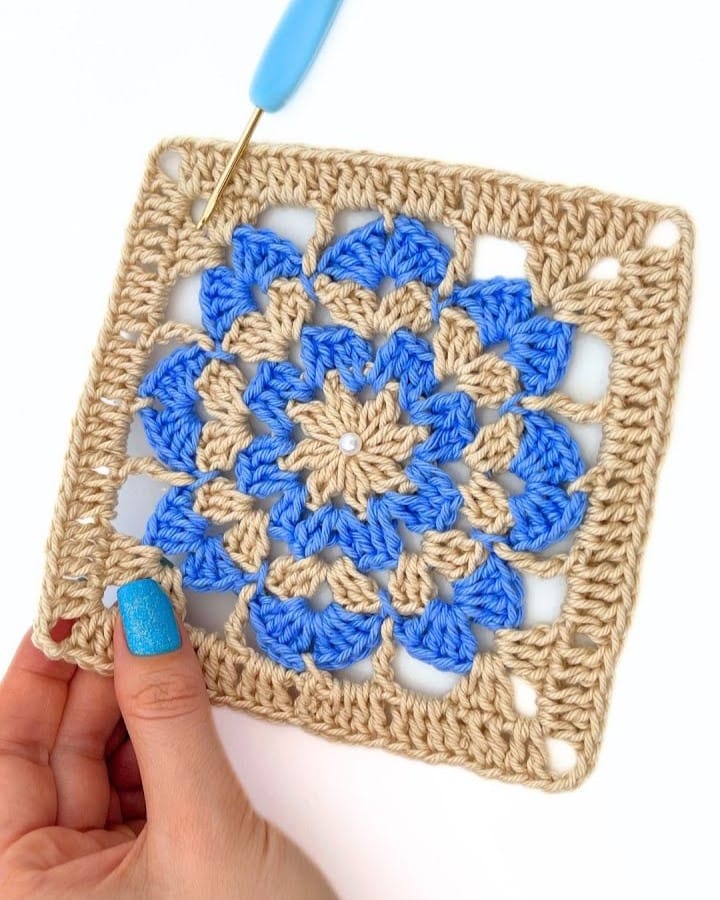
Floral Granny Square – Step-by-Step Tutorial is a delightful way to add a touch of elegance to your crochet projects. Whether you are a beginner or an experienced crocheter, this tutorial will guide you through creating beautiful floral granny squares that can be used for blankets, pillows, bags, or even clothing.
With detailed instructions and easy-to-follow steps, you will quickly learn how to combine colors and textures to achieve stunning floral patterns.
Crocheting a Floral Granny Square allows you to explore your creativity and personalize your projects. Each square can be made unique by choosing different color combinations for the petals and background.
This step-by-step tutorial focuses on simplicity while providing enough detail to ensure your finished squares look professional and polished.
In addition to being a fun and creative project, making floral granny squares offers several benefits. It helps improve your crochet skills, strengthens hand-eye coordination, and provides a calming, meditative activity. With this tutorial, you will gain confidence in your ability to follow complex patterns while still enjoying a relaxing crafting experience.
To start your Floral Granny Square – Step-by-Step Tutorial, gather all the necessary materials. You will need yarn in multiple colors, typically one color for the center flower, another for the petals, and a contrasting color for the background. Use a medium-weight yarn for best results.
A crochet hook suitable for your chosen yarn is essential. Commonly, a 4mm to 5mm hook works well for medium-weight yarn. Choosing the correct hook size ensures that your squares are even and consistent.
You will also need scissors to cut your yarn and a tapestry needle to weave in the ends. This will give your squares a neat and finished appearance.
Optional materials include stitch markers to keep track of rounds and blocking tools to shape your squares perfectly after finishing. Using these tools can elevate the final look of your project.
It’s important to pre-wash your yarn if it is made from natural fibers. This prevents future shrinkage and ensures your granny squares maintain their shape after washing.
Finally, organize your workspace with good lighting and a comfortable chair. This will make the crocheting process more enjoyable and reduce strain during longer crafting sessions.
Start your Floral Granny Square by creating a magic ring or chain 4 and join to form a ring. This will be the base for the center of your flower. Working in the round ensures that your flower grows evenly.
Next, crochet a set number of double crochets (dc) into the center ring to form the flower’s petals. Choose a bright or contrasting color for the center to make the flower stand out.
Once the center is complete, switch to the petal color. You will create clusters of stitches around the center to form the petals. Be sure to follow the pattern closely to maintain symmetry.
After completing the petals, add the background color. This will form the square around the flower, giving it a structured shape. Use double crochets or treble crochets to expand the square evenly.
Corners are essential for forming a perfect square. Typically, you will use a corner cluster consisting of multiple stitches separated by chains. This allows the square to lay flat without curling.
Finally, fasten off your yarn and weave in all ends using a tapestry needle. If desired, block the square to ensure it maintains a uniform shape, giving a polished and professional finish.
Choosing the right yarn combination is key to making your squares visually appealing. Contrasting colors for the center, petals, and background make the floral pattern pop.
Maintain consistent tension while crocheting. Uneven tension can cause the square to warp or the flower to look distorted.
Use stitch markers if necessary. They help you keep track of corners, rounds, and changes in color, making complex patterns easier to manage.
Experiment with different stitch patterns for the petals. For example, popcorn stitches or puff stitches can add texture and depth to your flower.
Consider making multiple squares in a coordinated color palette. This allows you to create larger projects like blankets, throws, or bags with a cohesive design.
Finally, practice patience. Floral granny squares may seem intricate at first, but with consistent practice, your speed and accuracy will improve significantly.
A common mistake in Floral Granny Square projects is uneven corners. Always count your stitches carefully and follow the pattern to prevent this.
Skipping stitches or miscounting rounds can distort the flower. Use stitch markers and double-check your work frequently.
Using a crochet hook that is too large or small for your yarn can also affect the square’s shape. Stick to the recommended hook size for your yarn type.
Inconsistent tension may result in wavy or tight squares. Try to keep your stitch size uniform throughout the project.
Choosing too many colors without planning can make the square look cluttered. Plan your color scheme in advance for a harmonious design.
Finally, neglecting to weave in ends properly can make your squares look messy. Always secure and hide yarn tails neatly using a tapestry needle.
Floral granny squares are versatile and can be used in numerous projects. Consider creating a blanket by joining multiple squares in a grid pattern.
You can make pillow covers using floral squares for a decorative touch. Each pillow can feature a unique color combination or flower design.
Bags and totes are another creative use. Sew or crochet squares together to form a stylish and functional bag that showcases your floral designs.
Even clothing items, like vests or shawls, can incorporate granny squares for a charming, handcrafted look.
Smaller projects like coasters or placemats can also benefit from floral granny squares, adding a pop of color to your home decor.
Gift projects are particularly rewarding. Handmade Floral Granny Square items make thoughtful presents for friends and family, showing care and creativity.
Q: Can beginners make Floral Granny Squares?
A: Yes! This tutorial is designed for beginners. Follow the step-by-step instructions, and practice patience and consistent tension.
Q: What type of yarn is best?
A: Medium-weight yarn (worsted weight) works well. You can use cotton, acrylic, or blends depending on the desired texture and warmth.
Q: How do I join multiple squares together?
A: Use slip stitches, whip stitch, or single crochet join methods. Planning the layout before joining ensures a cohesive final project.
Q: Can I change the size of the squares?
A: Yes. Adjust the number of rounds or the hook size to make larger or smaller squares. Consistency is key for multi-square projects.
Q: How do I prevent squares from curling?
A: Blocking is essential. Pin the square to shape while damp and allow it to dry flat. Proper stitch tension also helps prevent curling.
Q: How do I choose colors?
A: Use complementary or contrasting colors for the center, petals, and background. Planning a color palette in advance ensures a cohesive design.
The Floral Granny Square – Step-by-Step Tutorial has shown you how to create stunning and versatile crochet squares. From choosing materials and colors to crocheting petals and finishing the square, you now have the knowledge to make beautiful floral designs.
Share your completed projects, leave your honest opinions, and offer suggestions for others who want to explore the charm of floral granny squares. Your feedback helps the crochet community grow and inspires new ideas for future creations.


