Crochet Pig In A Granny Square Blanket Pattern


If you love making fun and functional crochet projects, this Crochet Pocket Tissue Holder Pouches Pattern, Crochet Capybara, Bear, And Panda Pattern PDF is perfect for you.
These adorable pouches are not only practical for carrying tissues anywhere but also a creative way to practice your crochet skills.
Whether you are a beginner or an experienced crocheter, this tutorial provides clear instructions for creating cute animal-themed holders that can brighten your day and make great gifts.
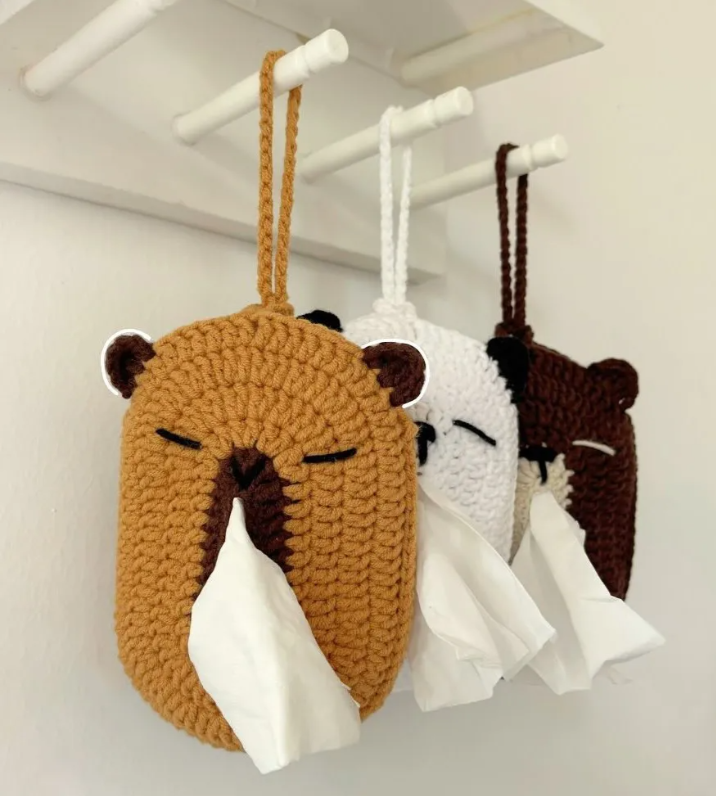
The charm of this Crochet Pocket Tissue Holder Pouches Pattern is in its versatility and cuteness. You can customize the colors and sizes to match your preferences, creating a capybara, bear, or panda holder with personality.
These patterns are designed to be approachable, ensuring that even someone new to crochet can follow along and complete the project successfully. Each step is carefully explained to guide you through the process of creating soft, sturdy, and functional pouches.
Using this Crochet Capybara, Bear, And Panda Pattern PDF, you can transform simple yarn into delightful creations. These holders are perfect for personal use, classroom gifts, or small boutique items. By following the pattern, you’ll learn not only how to crochet shapes and assemble them but also how to add finishing touches like facial features and functional openings. This combination of practicality and cuteness makes the project extremely satisfying.
To start the Crochet Pocket Tissue Holder Pouches Pattern, Crochet Capybara, Bear, And Panda Pattern PDF, gather a few basic materials. You will need medium-weight yarn in various colors, a crochet hook that fits your yarn, a yarn needle, and scissors. These simple tools are enough to create soft and durable pouches.
Choose yarn colors that match the animal you want to create. For example, brown shades work well for capybaras, beige or cream for bears, and black and white for pandas. Using contrasting colors can make the features stand out beautifully.
A comfortable crochet hook ensures even tension and smooth stitches. If you tend to crochet tightly, using a slightly larger hook will prevent the fabric from being too stiff for the tissue holder.
You will also need a yarn needle for sewing parts together and weaving in loose ends. Blunt-ended needles are ideal for finishing without splitting the yarn.
Scissors will be essential for trimming yarn and keeping your work neat as you go. Clean cuts make assembly easier and improve the final appearance.
Optional embellishments, such as buttons or small safety eyes, can add personality to your animal pouches, giving them a more lifelike and appealing look.
The base of this Crochet Pocket Tissue Holder Pouches Pattern forms the foundation for your animal design. Start by crocheting a rectangle to fit a standard tissue pack. The pattern uses simple stitches like single crochet or half double crochet to create a durable fabric.
Measure the tissue pack carefully to determine the correct size. Adjust the number of stitches and rows to ensure a snug but flexible fit. This ensures your holder will keep tissues in place without stretching or sagging.
Once the base rectangle is complete, add a border around the edges to strengthen the structure. This step helps maintain the shape and gives a neat finishing touch.
For an extra professional look, block the rectangle lightly to flatten it. This small step makes it easier to attach the animal features and maintain uniformity in the pouch.
If desired, you can create a flap or opening at the top using simple chains and slip stitches. This allows for easy insertion and removal of tissue packs while keeping the design secure.
Finally, ensure all yarn ends are woven in neatly to prevent unraveling. A well-finished base makes the entire project look polished and ready for assembly.
The Crochet Capybara is a fun and friendly animal to add to your tissue holder. Start by crocheting the head using basic increases and decreases to shape a rounded form. Pay attention to the size relative to the base to keep it proportional.
Once the head is complete, create small ears by crocheting semi-circular pieces and attach them to the sides. These little touches add charm and personality.
Add facial features such as eyes and a nose using yarn or small safety eyes. Placement is key — a well-positioned face gives the capybara a cute and approachable look.
For the body, crochet a simple oval shape that can be sewn securely onto the base pouch. Make sure it is slightly padded to add dimension and a soft feel.
You can finish with embroidered details, such as a smiling mouth or subtle shading, to enhance the lifelike appearance.
Finally, attach the head and body securely to the base using a yarn needle. Reinforce stitches at stress points to ensure durability, especially if the pouch will be used frequently.
Creating the Bear or Panda follows similar principles. The head is formed by crocheting a rounded piece with carefully placed increases and decreases to shape the cheeks and forehead.
For bears, use neutral or brown yarns, while pandas use contrasting black and white for the ears, eyes, and limbs. Color contrast is what makes the animals instantly recognizable and visually appealing.
Crochet small ears, limbs, and facial details separately and sew them carefully onto the head and base pouch. Symmetry is important to maintain a balanced look.
Eyes, noses, and mouths can be embroidered with yarn or attached as small safety items. This adds personality and gives each pouch a unique character.
The body should be soft and slightly stuffed to provide depth and a huggable feel. Securely sew the body onto the base rectangle to prevent shifting.
Check proportions and alignment as you assemble the pieces. Adjust if necessary before completing the final stitches to ensure the bear or panda sits neatly on the pouch.
The Crochet Pocket Tissue Holder Pouches Pattern can be personalized with small details to make each piece unique. Adding bows, buttons, or embroidered features enhances the charm of your animal pouch.
You can also experiment with size by enlarging the base rectangle for larger tissue packs or mini versions for travel-sized packs. Creative color choices can make each pouch stand out.
Weaving in all loose ends and trimming excess yarn ensures a polished look. Neat finishing is important for both aesthetics and durability.
Consider adding a small loop at the top for hanging your pouch on hooks, bags, or backpacks. This increases functionality while keeping the playful design intact.
Optional linings can be sewn inside to make the pouch more rigid or to reinforce areas that might experience frequent handling. This step is useful if you plan to gift the pouches or sell them.
Finally, enjoy your creation! Each completed Crochet Capybara, Bear, And Panda Pattern PDF pouch combines fun, functionality, and handmade charm, making it a perfect craft project for any crocheter.
1. Can beginners make these crochet animal pouches?
Yes, this pattern is designed to be beginner-friendly, with clear instructions for basic stitches and assembly.
2. What yarn works best for tissue holder pouches?
Medium-weight cotton or acrylic yarn is ideal for durability, softness, and easy handling.
3. How do I adjust the size for different tissue packs?
Measure your tissue pack and increase or decrease the number of stitches and rows in the base rectangle accordingly.
4. Can I mix and match animal features?
Absolutely. You can combine ears, eyes, and facial shapes to create unique animals beyond the capybara, bear, or panda.
5. Are the pouches machine washable?
Hand washing is recommended to maintain shape and color. Lay flat to dry to prevent stretching.
6. Can I sell the pouches I make using this pattern?
Yes, handmade items created from this pattern can be sold, but do not redistribute the PDF pattern itself.
7. How do I make the features secure?
Sew all parts firmly with a yarn needle, and reinforce points that may experience stress, such as the head and body attachment.
This Crochet Pocket Tissue Holder Pouches Pattern, Crochet Capybara, Bear, And Panda Pattern PDF tutorial has guided you through creating functional and adorable crochet pouches step by step.
You’ve learned how to make the base, shape animal features, assemble parts, and add finishing touches. These pouches are not only practical for everyday use but also display your creativity and crochet skills.
Share your creations, offer feedback, and experiment with colors, sizes, and animals to continue improving your handmade projects. Your opinion and suggestions are valuable for helping others enjoy this fun and rewarding crochet adventure.


