Crochet Pig In A Granny Square Blanket Pattern


The beauty of this crochet door stop lies in its versatility. You can customize it with different yarn colors, textures, and patterns to match any room.
Whether you prefer neutral shades for a minimalist look or bright tones to make it a focal point, this project is a great way to use leftover yarn and small crochet pieces creatively.
In this Crochet Door Stop – FREE PATTERN, you will learn step by step how to crochet the main body, fill it securely, and finish with neat stitching.
Even if you’ve never made a door stop before, this tutorial guides you from start to finish, ensuring your project is both fun and successful.
To start your Crochet Door Stop – FREE PATTERN, gather the necessary materials. You will need medium-weight yarn, a crochet hook suitable for your yarn, fiberfill or sand for stuffing, a yarn needle, and scissors. Using soft but durable yarn ensures your door stop lasts while remaining easy to handle.
Select at least two colors if you want to add decorative stripes or patterns. Contrasting colors can make your crochet door stop visually appealing while maintaining functionality.
A comfortable crochet hook matching your yarn thickness ensures even stitches and consistent tension. This helps your door stop hold its shape properly.
You will need fiberfill for a soft, lightweight option or sand for extra weight if the door stop needs to hold heavier doors. Use a secure bag or fabric liner if you’re using sand to prevent leaks.
A yarn needle is essential for sewing pieces together and weaving in ends neatly. Scissors are needed to trim excess yarn during finishing.
Finally, have a measuring tape handy to check dimensions. This allows you to adjust the size according to your door stop needs.
Once the base is complete, continue working in rounds without increasing to build the height. This creates the body of your door stop. You can make it as tall or short as you’d like, depending on your needs and aesthetic.
When your door stop reaches the desired height, stop crocheting and begin filling it. Start by stuffing it with polyester fiberfill to maintain shape. Then, add your heavier filler, like dried beans or rice, placing it securely in the center.
Once stuffed, crochet a flat top in the same way as the base and attach it securely using single crochet or whip stitch. Make sure to close it tightly so that the filling doesn’t spill out with use.
The main structure of this Crochet Door Stop – FREE PATTERN is formed by a simple crochet shape, typically a cone or cylinder. Begin by making a magic ring or chain a few stitches and join to form a circle.
Work single or double crochet stitches into the ring, gradually increasing to shape the base. This ensures stability and balance when the door stop is placed.
Continue crocheting upward to form the body, decreasing stitches near the top if you’re making a cone shape. Maintaining consistent tension is important for an even shape.
Use different colors for stripes or patterns if desired. Changing yarn shades every few rows can create decorative effects while keeping the structure intact.
Once the body reaches the desired height, fasten off the yarn and leave a long tail for assembly.
Check your work periodically by lightly pressing the base to ensure it is stable. This prevents the door stop from tipping over easily.
After completing the crochet body, it’s time to fill your Crochet Door Stop – FREE PATTERN. If using fiberfill, stuff evenly to create a firm yet flexible shape. For sand, use a small bag or secure liner to contain the weight.
Distribute the filling carefully to maintain symmetry. Uneven stuffing can cause the door stop to lean or wobble.
Once filled, close the opening using a yarn needle and the long tail left from finishing. Sew securely with tight stitches to prevent the filling from escaping.
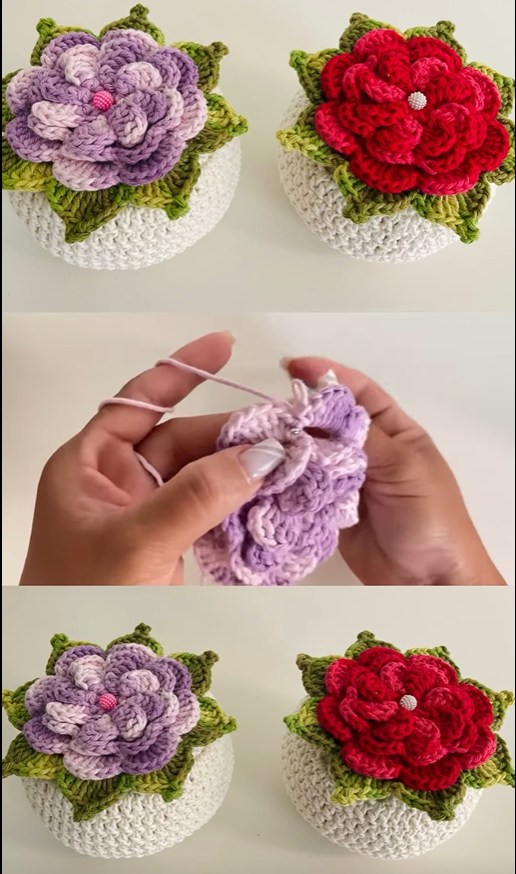
Add decorative elements if desired, such as small crochet flowers, buttons, or stripes. This personalization enhances the visual appeal of your door stop.
Trim any excess yarn and check all seams for stability. Your door stop should be sturdy enough to keep doors in place without collapsing.
Finally, place your handmade crochet door stop in its designated spot and admire the functional and decorative touch it brings to your home.
This Crochet Door Stop – FREE PATTERN works best when using consistent tension throughout. Avoid loose stitches that could compromise stability.
Choose a yarn that matches the room’s décor and consider using washable options for easy maintenance.
Experiment with different shapes, such as round, square, or pyramid forms, to find the one that best suits your door type.
Ensure the base is wide enough to support the door’s weight. Too narrow a base may cause tipping.
If using sand, double-check the liner or bag to avoid leakage and protect your floor from spills.
Personalize your door stop by adding fun patterns, contrasting stripes, or small crocheted embellishments. These details make it unique and attractive.
Start with sturdy yarn. Cotton or acrylic worsted weight yarns are both great choices. Cotton gives your door stop a heavier, denser feel, while acrylic is lighter and comes in a wide range of vibrant colors.
Choose a crochet hook that matches your yarn weight. Typically, a 4.5 mm or 5 mm hook works well for worsted yarn. A slightly smaller hook will give you tighter stitches, which is ideal for projects that require filling.
For the stuffing, many people use polyester fiberfill combined with something heavier like dried beans, rice, or small pebbles. This combination gives your door stop enough weight to hold the door open or closed effectively.
1. Can beginners make this crochet door stop?
Yes, this Crochet Door Stop – FREE PATTERN is suitable for beginners with basic crochet skills. Clear step-by-step instructions make it accessible.
2. What type of filling should I use?
You can use fiberfill for a lightweight door stop or sand for extra weight. Sand may need a secure inner liner to prevent leaks.
3. What yarn works best?
Medium-weight cotton or acrylic yarn works well, providing both durability and structure. Choose colors that match your décor.
4. Can I customize the size?
Yes. Adjust the number of stitches and rounds to make the door stop larger or smaller depending on the door it needs to hold.
5. How do I make it stable?
Ensure a wide, flat base, even filling, and consistent stitch tension to keep the door stop balanced.
6. Can I add decorations?
Absolutely. Crochet flowers, stripes, or buttons can personalize your door stop while keeping it functional.
7. How do I clean it?
Lightly spot clean with a damp cloth. If the yarn is washable, you can hand wash and reshape it carefully.
Creating your own Crochet Door Stop – FREE PATTERN is a fun and practical way to enhance your home décor. You’ve learned how to crochet the body, fill it for stability, and finish it neatly while adding personal touches.
Handmade door stops are both functional and charming, reflecting your creativity and skill. Try this pattern, experiment with colors and shapes, and share your results with others. Leave your feedback and suggestions for improvements, and inspire fellow crafters to make their own unique crochet door stops.


