Crochet Pig In A Granny Square Blanket Pattern


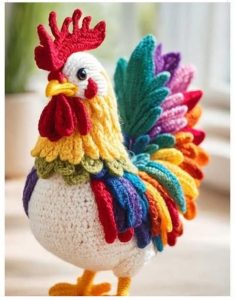
If you’re looking for a fun and practical crochet project, this Crochet Egg-Carrying Chicken – Free Pattern is perfect for you. This adorable amigurumi chicken is not only a charming decorative piece but also a functional item that can hold eggs.
Perfect for Easter gifts, kitchen decoration, or as a unique present for crochet lovers, this pattern combines creativity and practicality in one delightful project.
Creating this Crochet Egg-Carrying Chicken allows you to practice basic crochet stitches while producing something useful. Even beginners can follow along because the pattern uses simple techniques such as single crochet, increases, and decreases.
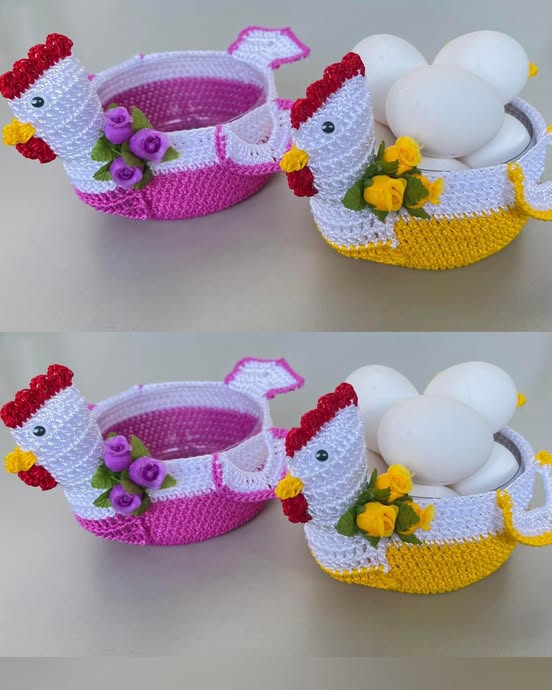
The chicken’s charming details — like wings, beak, and comb — make it a satisfying project that looks impressive once completed.
In this Crochet Egg-Carrying Chicken – Free Pattern, you’ll learn how to crochet the body, assemble the pieces, add adorable features, and finish with a functional egg holder. The step-by-step instructions ensure that even someone new to amigurumi can succeed. You can also customize the colors and size to make your chicken truly unique.
To start the Crochet Egg-Carrying Chicken – Free Pattern, gather the necessary materials. You’ll need medium-weight yarn in colors such as yellow for the body, red for the comb and wattle, orange for the beak, and a contrasting color for the wings.
A 3.5mm or 4mm crochet hook is recommended, depending on your tension. Using the right hook ensures tight stitches so the stuffing does not show through. A yarn needle is essential for sewing the parts together and weaving in ends.
You will also need fiberfill or polyester stuffing for the chicken body. Proper stuffing ensures the chicken holds its shape and can support a small egg. Safety eyes, buttons, or felt pieces can be used for the eyes depending on your preference.
Scissors and stitch markers will help you keep track of rounds and manage yarn ends neatly. These small tools make the crocheting process more efficient and organized.
Optional materials include a small basket or an egg-shaped object if you want to test the chicken’s egg-carrying feature while making it. This ensures the fit is correct before finishing.
Always keep your workspace clean and well-lit. A tidy environment helps avoid mistakes and makes the crocheting process more enjoyable.
The main focus of this Crochet Egg-Carrying Chicken – Free Pattern is the body. Begin by creating a magic ring and crochet six single crochets into the ring. Pull it tight to close the center hole.
Increase stitches evenly in each round until you reach the desired width for the chicken body. The body is typically worked in continuous rounds to maintain a smooth, seamless shape. Remember to use stitch markers to indicate the beginning of each round.
Once the body reaches the correct height, start decreasing gradually to form the top of the chicken. The decreasing rounds shape the chicken’s back and allow it to sit comfortably over an egg.
Crochet the wings, beak, comb, and tail separately using the specified stitches. These details are small but essential, giving the chicken its cute, distinctive look. Attach them securely using a yarn needle.
Stuff the body with fiberfill as you go to maintain the correct shape. Avoid overstuffing, which can distort the stitches or make the chicken too rigid to carry an egg.
Finally, weave in all loose ends, ensure all features are attached firmly, and check that the egg fits perfectly in the bottom of the chicken. Adjust stuffing if necessary.
One of the joys of this Crochet Egg-Carrying Chicken – Free Pattern is the ability to customize it. You can experiment with yarn colors, stitch patterns, and sizes to create a unique piece.
Use variegated yarn for a multicolored effect on the body. This gives the chicken a lively, playful appearance and adds visual texture without changing the pattern.
Adjust the size of the chicken by using a thicker yarn or larger hook for a bigger chicken, or a finer yarn and smaller hook for a miniature version. Make sure to adjust stuffing accordingly.
Add embellishments such as embroidery for eyes or felt feet for more realism. Creative touches allow you to personalize the chicken and make it even more charming.
You can also crochet matching chickens in different sizes to create a family of egg-carrying chickens. These make excellent decorative pieces or gifts for friends and family.
Experiment with adding a small loop at the top to hang the chicken as a decoration or attach a ribbon for festive occasions. These subtle touches enhance functionality and aesthetic appeal.
Assembling your Crochet Egg-Carrying Chicken – Free Pattern is simple but requires attention to detail. Position the wings, comb, and tail before sewing to ensure symmetry and balance.
Use small, tight stitches when attaching the parts to prevent them from coming loose during handling. Reinforce areas that will carry weight, such as the bottom where the egg sits.
Check all seams carefully. If necessary, reinforce them with additional stitches to make sure the chicken is sturdy and safe to hold an egg.
Ensure that the stuffing is evenly distributed inside the body. This keeps the chicken upright and prevents it from tipping over when holding an egg.
Add any decorative elements, such as a bow or ribbon, after assembly. These finishing touches enhance the overall charm and make the chicken more presentable as a gift or display piece.
Once fully assembled, test with a small egg to verify fit and stability. Make adjustments if needed to improve balance and overall shape.
The Crochet Egg-Carrying Chicken – Free Pattern is versatile. You can use it as a functional egg holder, a decorative item, or a gift for holidays like Easter.
Place it in your kitchen to hold real or decorative eggs. It serves as a whimsical centerpiece and conversation starter during family meals or gatherings.
These chickens make excellent handmade gifts. Create a set with multiple colors or sizes for a unique and thoughtful present that stands out.
Combine several crochet chickens in a small display to brighten up a kitchen shelf or windowsill. They can also be part of a seasonal decoration for spring or Easter.
Use different yarn textures such as cotton, wool, or acrylic to change the feel of your chicken. Soft yarns create cuddly pieces, while firmer yarns make decorative, durable items.
Share your creations with friends or in crochet groups. The Crochet Egg-Carrying Chicken is a fun project to showcase and inspires others to try similar patterns.
1. Is this pattern suitable for beginners?
Yes, this Crochet Egg-Carrying Chicken – Free Pattern uses basic crochet stitches and simple assembly, making it beginner-friendly.
2. What type of yarn is recommended?
Medium-weight cotton or acrylic yarn is ideal for structure and ease of handling. Soft yarn enhances comfort and appearance.
3. Can I make it larger or smaller?
Absolutely. Adjust hook size or yarn weight, and modify stitch counts to change the chicken’s size.
4. How do I attach the wings and comb securely?
Use tight, small stitches and reinforce points that will endure handling to ensure parts do not come loose.
5. Can I wash the finished chicken?
Yes, gently hand wash in cold water and lay flat to dry. Avoid harsh detergents to preserve shape and color.
6. Can this chicken hold a real egg?
Yes, it is designed to hold a small egg securely. Test fit before gifting or using.
7. Are there customization options?
You can change colors, add embellishments, vary sizes, and even create a hanging version for decorations.
The Crochet Egg-Carrying Chicken – Free Pattern is a fun and functional crochet project suitable for all skill levels. By following this step-by-step guide, you can create a charming chicken that holds eggs, decorates your kitchen, or serves as a thoughtful handmade gift.
Customizing colors, sizes, and embellishments allows your creativity to shine. Share your creations, leave feedback, and enjoy the satisfaction of completing a delightful and practical crochet project.


