Crochet Pig In A Granny Square Blanket Pattern


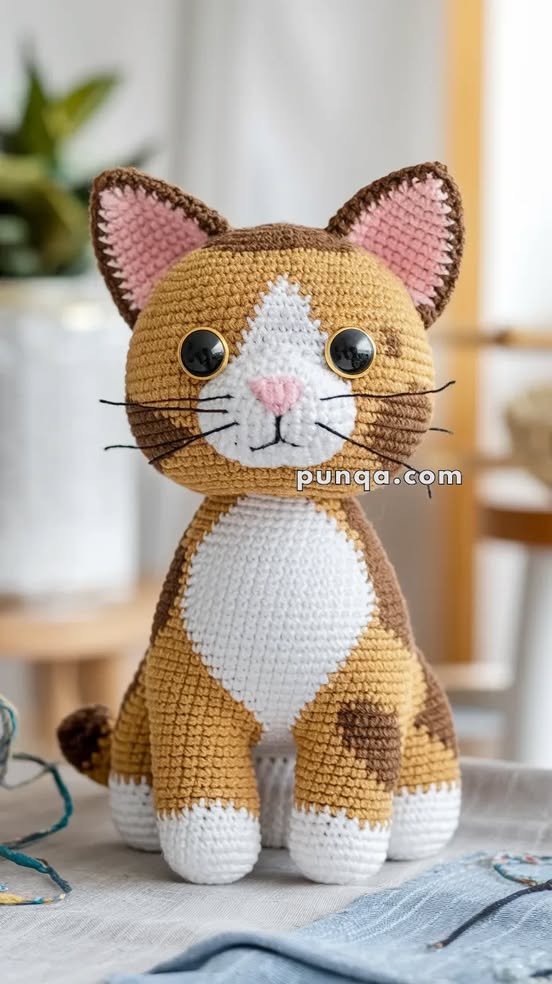
If you are a fan of cute and cuddly creations, this Amigurumi Tom Cat – FREE Crochet Pattern is the perfect project to try. Creating your own amigurumi cat combines creativity, patience, and the joy of handmade crafts.
Whether you are an experienced crocheter or a beginner eager to learn, this tutorial will guide you step by step through the process of making a charming Tom Cat. With the right materials and techniques, you can craft a toy that is both adorable and durable, ideal for gifts or personal collection.
The beauty of this Amigurumi Tom Cat – FREE Crochet Pattern lies in its simplicity and versatility. Each stitch contributes to building a soft, huggable cat with expressive features.
By following the instructions carefully, you will learn important crochet skills such as working in rounds, increasing and decreasing stitches, and sewing pieces together seamlessly. This project also allows for creativity in choosing yarn colors and adding small details that personalize your Tom Cat.
In this Amigurumi Tom Cat – FREE Crochet Pattern, you will discover how to crochet each part, including the head, body, limbs, ears, and tail, then assemble them into a complete toy. Every step is explained clearly with tips for beginners and guidance on common mistakes to avoid. By the end of this tutorial, you will have a lovable amigurumi cat that can be treasured for years or shared as a handmade gift.
To start your Amigurumi Tom Cat – FREE Crochet Pattern, gather the necessary materials to ensure a smooth crafting experience. You will need medium-weight yarn in the main color for the body, plus small amounts of black and white for details. Soft acrylic yarn is ideal for durability and ease of handling.
A crochet hook that matches your yarn size is essential. Most patterns recommend a 3.5mm or 4mm hook for standard amigurumi. Choosing the correct hook ensures that your stitches are tight enough to prevent stuffing from showing.
You will also need a yarn needle for sewing parts together and weaving in ends. A blunt-ended needle is preferable to avoid splitting your yarn while stitching.
Scissors will be used for cutting yarn cleanly at various stages. Keeping a small pair dedicated to crochet projects can make your work easier.
Stuffing material is essential to give your Tom Cat its soft shape. Polyester fiberfill is recommended for its lightness and fluffiness, making the toy huggable.
Optional tools include stitch markers to keep track of rounds and safety eyes for the cat’s eyes, though you can also crochet or embroider eyes if preferred.
The main structure of your Amigurumi Tom Cat – FREE Crochet Pattern begins with the body and head. Start with a magic ring or chain 2 and work in continuous rounds to create a seamless base.
Begin crocheting the head by making single crochet stitches, gradually increasing the number of stitches in each round to form a spherical shape. Consistent stitch tension is important for a smooth appearance.
Once the head reaches the desired size, begin the body in a similar fashion, shaping it slightly wider at the bottom. This ensures your Tom Cat can sit upright and have balanced proportions.
Use increase and decrease techniques strategically to shape the body and head naturally. Following the pattern carefully helps maintain symmetry between left and right sides.
Before closing the head, insert fiberfill carefully, shaping it evenly to create a round, soft face. Stuff the body lightly but firmly to retain its shape.
Once the head and body are complete, leave a long yarn tail for sewing them together securely. Proper attachment ensures the cat’s head stays in place and maintains alignment.
After the body and head, work on the smaller parts of your Amigurumi Tom Cat – FREE Crochet Pattern, starting with the limbs. Crochet arms and legs in tubular shapes, adjusting length according to your design preference.
Stuff each limb lightly, leaving the ends open for sewing. This allows flexibility in attaching them to the body while keeping them soft and huggable.
Next, create the ears. These are typically triangular and can be made by decreasing stitches gradually after a few initial rounds. You can also slightly curve the tips to mimic a realistic cat ear shape.
The tail is usually crocheted as a long cylinder. Keep the stitches tight, stuff lightly, and taper the end for a natural look. The tail can be sewn straight or slightly curved depending on the pose you prefer.
Once all parts are crocheted, position them on the body to check alignment before stitching. Correct placement ensures your Tom Cat has a balanced, aesthetically pleasing look.
Sew each piece securely using the yarn needle, weaving the ends neatly inside the body. This gives your amigurumi a clean finish without loose threads.
Finishing touches on your Amigurumi Tom Cat – FREE Crochet Pattern bring it to life. Start with the eyes, which can be safety eyes or embroidered using black yarn. Position them symmetrically for a natural expression.
Add a small pink nose using yarn or felt. Stitch it carefully between the eyes, slightly below the midpoint of the head. A well-placed nose enhances the cat’s character.
Embroider a mouth using a few stitches in black or dark brown. A simple curve or small “W” shape gives a friendly, playful expression.
Whiskers can be added with thin yarn or fishing line, stitched into the sides of the face. Ensure they are secure to withstand handling.
Optionally, add stripes, spots, or other markings with yarn or embroidery thread to match a specific cat design. These details make your Tom Cat unique.
Once the facial features are complete, double-check all seams and ends, trimming or tucking them as needed. A well-finished amigurumi looks professional and is ready for display or gifting.
Even though this Amigurumi Tom Cat – FREE Crochet Pattern is beginner-friendly, a few tips help prevent common mistakes. Maintain consistent tension throughout the project to avoid uneven shapes.
Always count stitches carefully, especially when increasing or decreasing. Missing or adding extra stitches can distort the cat’s shape.
Use stitch markers to mark the beginning of rounds. This helps maintain orientation and ensures smooth, circular shaping.
Stuff gradually and evenly. Overstuffing can stretch stitches, while understuffing may make the toy floppy. Balance firmness and softness for the best result.
When sewing parts together, use a whip stitch or invisible stitch for a neat finish. Ensure limbs and ears are attached symmetrically for proper balance.
Finally, take breaks to avoid fatigue. Crocheting amigurumi requires patience, and working steadily ensures accuracy and enjoyment throughout the process.
1. How long does it take to crochet a Tom Cat?
It depends on your experience, but a beginner can complete one in 6–8 hours over multiple sessions.
2. Can I use different yarn types?
Yes, but medium-weight yarn is recommended for consistent shape and ease of handling.
3. Are safety eyes necessary?
No, you can embroider the eyes, especially if making a toy for a small child.
4. How should I wash my amigurumi?
Hand wash gently in cold water and air dry flat to maintain shape and softness.
5. Can I change the size of the cat?
Yes, adjust hook size or yarn thickness. Thicker yarn or larger hooks create bigger cats.
6. Can I add clothing or accessories?
Absolutely. Tiny crocheted scarves, bows, or hats personalize your Tom Cat.
7. What if my stitches are uneven?
Practice tension control and block the pieces gently before assembly to smooth minor inconsistencies.
Completing your Amigurumi Tom Cat – FREE Crochet Pattern is a rewarding and creative experience. You’ve learned how to crochet the head, body, limbs, ears, and tail, assemble them, and add charming facial features.
This project not only improves your crochet skills but also results in an adorable handmade toy that can be cherished or gifted.
Share your creations, leave feedback, and suggest improvements to help others enjoy this delightful amigurumi project. Your handmade Tom Cat reflects both skill and creativity, making it a treasure to keep or share.


