Crochet Pig In A Granny Square Blanket Pattern


Shell Stitch Blanket Crochet Pattern is one of the most elegant and timeless crochet designs you can create. This pattern combines texture, beauty, and simplicity, making it a favorite among crochet lovers of all levels.
Whether you’re crafting a cozy throw for your living room, a baby blanket, or a thoughtful handmade gift, the shell stitch creates a stunning wave-like effect that adds charm and sophistication to any piece. With just a few basic stitches, you can achieve a professional and polished look that feels soft, warm, and luxurious.
The beauty of the shell stitch lies in its versatility. It can be used for blankets, scarves, cardigans, and many other crochet projects. Its repetitive pattern is soothing to make, and it offers endless possibilities for color combinations.
Even beginners can follow this Shell Stitch Blanket Crochet Pattern easily, as it uses simple crochet techniques that quickly form a beautiful, textured fabric.
In this Shell Stitch Blanket Crochet Pattern tutorial, you’ll learn how to create this classic design step by step. We’ll cover everything from choosing the right yarn and hook to forming the shell stitches and finishing your blanket neatly. Follow along, and you’ll have a cozy, handmade blanket that you’ll cherish for years.
To begin your Shell Stitch Blanket Crochet Pattern, you’ll need just a few essential materials. Choosing the right tools and yarn ensures that your blanket turns out soft, durable, and visually appealing.
Start with your yarn. Medium-weight or worsted yarn is a great choice for shell stitch blankets. It offers good stitch definition and warmth. You can select one solid color for a classic look or mix different shades to create stripes or ombre effects. Cotton yarns are ideal for lighter blankets, while acrylic or wool blends are perfect for cozy winter throws.
Next, you’ll need a crochet hook that matches your yarn weight. Typically, a 4.5mm to 5.5mm hook works well. Check your yarn label for the recommended hook size. Using the right hook helps maintain even stitches and a comfortable drape.
You’ll also need scissors for trimming yarn, a yarn needle for weaving in ends, and a measuring tape to ensure your blanket dimensions are consistent. Having a stitch marker can also help you keep track of your rows. Once you have your materials ready, you’re set to start your Shell Stitch Blanket Crochet Pattern journey!
Now let’s get started with your Shell Stitch Blanket Crochet Pattern. Follow these easy steps to create your own beautiful blanket.
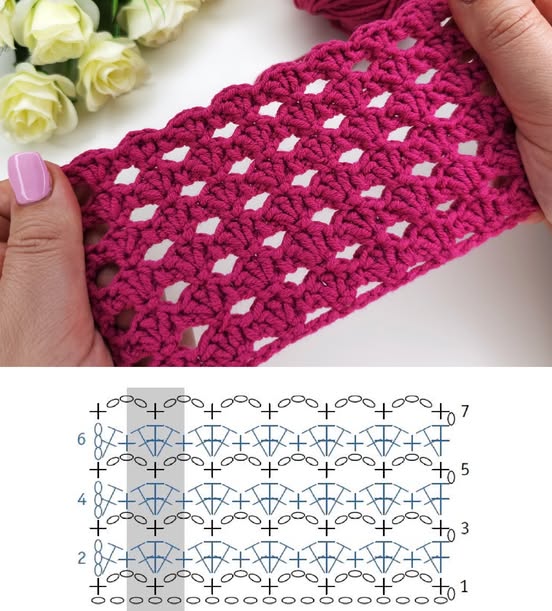
Step 1: Create a Foundation Chain.
Begin by chaining a multiple of 6 plus 2 stitches. This ensures that your shell pattern aligns correctly throughout the blanket. The length of your chain will determine the width of your blanket.
Step 2: First Row Setup.
In the second chain from your hook, make one single crochet. Skip two chains, then crochet five double crochets into the next chain—this forms your first shell. Skip two more chains and make another single crochet. Repeat this pattern across the row.
Step 3: Building the Pattern.
To start the next row, chain one and turn your work. Make five double crochets into the single crochet space from the previous row. Then skip the shell and make one single crochet into the middle of the next shell. Continue this pattern across.
Step 4: Repeat Rows.
Repeat the shell and single crochet rows until your blanket reaches the desired length. The more rows you add, the more defined and textured your shells become. You’ll start to see the beautiful scalloped design take shape.
Step 5: Changing Colors (Optional).
To add stripes or color transitions, simply change yarn colors at the end of a row. Fasten off the previous color and join the new one with a slip stitch. Weave in ends carefully for a clean finish.
Step 6: Finishing the Blanket.
Once your blanket is the size you want, you can add a border. A simple single crochet border around the edges adds a polished look. Finish by weaving in all loose ends with your yarn needle. Congratulations — your Shell Stitch Blanket Crochet Pattern is complete!
The Shell Stitch Blanket Crochet Pattern looks stunning in almost any color combination. If you prefer a modern and minimalist style, choose neutral shades like cream, beige, or soft gray. For a more playful design, use bright rainbow colors or pastel tones that transition from one shade to another.
You can also create a gradient effect using ombre yarn or alternate colors every few rows for a striped pattern. If you’re making a baby blanket, soft pastel colors such as pink, mint, or sky blue look adorable. For a cozy living room throw, rich tones like burgundy, forest green, or navy blue add warmth and elegance.
The shell stitch texture enhances the color transitions beautifully, making every hue stand out. You can even experiment with metallic or variegated yarns for a more artistic and unique look. The versatility of Shell Stitch Blanket Crochet Pattern means you can adapt it to any style or season effortlessly.
When working on your Shell Stitch Blanket Crochet Pattern, consistency is key. Keep your tension even to ensure that each shell is uniform in size and shape. Uneven tension can cause your blanket edges to curl or wave unintentionally.
Count your stitches regularly. Since the shell pattern repeats across rows, losing or adding a stitch can throw off your alignment. Using stitch markers can help you keep track of where each shell begins and ends.
Avoid pulling your yarn too tightly, especially when changing colors or finishing rows. A looser tension allows your blanket to remain soft and flexible. Blocking your finished blanket with a gentle steam or water spray can help relax the stitches and even out the edges.
Lastly, take breaks! Large crochet projects can be time-consuming, so it’s important to rest your hands and wrists. Enjoy the process — crocheting a blanket should be as relaxing as it is rewarding.
1. What level of crochet skill is needed for the shell stitch blanket?
The shell stitch blanket is perfect for beginners and intermediate crocheters. Once you know basic stitches like single and double crochet, you can easily follow this pattern.
2. How long does it take to make a shell stitch blanket?
It depends on the size and your crochet speed. A baby blanket might take a few days, while a full-size throw could take one to two weeks with regular crocheting.
3. What type of yarn works best for this pattern?
Medium-weight (worsted) yarn is ideal. It provides structure while keeping the blanket soft and cozy. Cotton, acrylic, or blends all work well depending on your preference.
4. Can I make the shell stitch blanket in multiple colors?
Absolutely! The shell stitch pattern looks beautiful in both solid and multicolor designs. Try alternating colors every few rows for a striped effect.
5. How do I make my blanket edges straight?
Ensure you count your stitches carefully and maintain consistent tension. Adding a border at the end also helps create clean, straight edges.
6. How should I wash my crochet blanket?
Always check your yarn label. Most acrylic yarns are machine washable, while wool or cotton may need gentle hand washing. Air dry to keep the blanket’s shape.
The Shell Stitch Blanket Crochet Pattern is a timeless and rewarding project that combines simplicity with beauty. Its elegant design, soft texture, and flexibility make it suitable for all skill levels and any occasion.
Whether you’re making a cozy gift or adding a handmade touch to your home, this pattern delivers warmth and style in every stitch.
Now that you’ve learned how to create your own shell stitch blanket step by step, it’s time to grab your yarn and start crocheting.
Enjoy the soothing rhythm of the stitches, watch your design come to life, and don’t forget to share your experience! Leave a sincere opinion and suggestions about what you’d like to see next — your feedback helps keep the creative inspiration flowing.


