Crochet Pig In A Granny Square Blanket Pattern


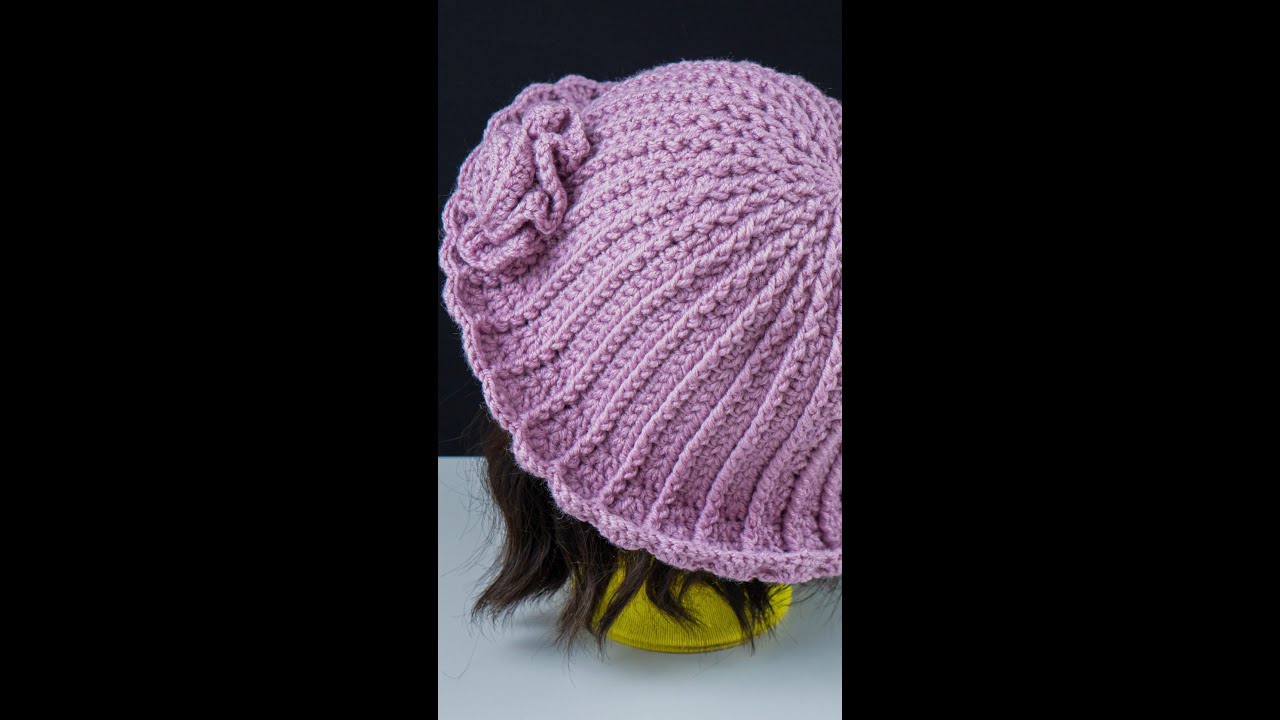
Easy and Cute Crochet Hat for Beginners – Free Pattern is the perfect project for anyone who wants to learn how to crochet something practical, stylish, and fun.
Whether you’re completely new to crochet or just looking for a simple pattern to relax with, this tutorial will guide you step-by-step through creating your very first handmade hat.
Crochet hats are one of the most rewarding beginner projects because they work up quickly, require minimal materials, and can be customized endlessly to suit your style and personality.
The beauty of an easy crochet hat pattern lies in its versatility. You can make it in any color, with any type of yarn, and adjust the size to fit anyone—from babies to adults.
It’s also a wonderful way to practice essential crochet stitches while ending up with something you can proudly wear or gift. Hats are cozy, timeless, and make fantastic handmade presents for friends and family.
In this Easy and Cute Crochet Hat for Beginners – Free Pattern, we’ll explore every detail you need to get started: the best yarn choices, hook sizes, and step-by-step instructions to create a soft, comfortable hat. You’ll also find helpful tips for customizing your hat and a few creative variations you can try once you’ve mastered the basics. By the end, you’ll not only have a beautiful crochet hat but also the confidence to take on more advanced crochet projects.
Before you begin, make sure you have everything ready. The best thing about this Easy and Cute Crochet Hat for Beginners – Free Pattern is that it doesn’t require any fancy tools. You’ll need just a few simple supplies that are easy to find at your local craft store or online.
Start with a soft, medium-weight yarn. Acrylic or cotton blends are perfect for beginners because they are easy to handle and come in a wide range of colors. Choose a yarn that feels comfortable against your skin, especially if you plan to wear the hat often.
Next, you’ll need a crochet hook suitable for your yarn. Most worsted-weight yarns work best with a 5.0mm or 5.5mm hook. Always check the label on your yarn to confirm the recommended size. Using the correct hook will ensure that your stitches are even and that your hat has the right amount of stretch.
You’ll also need a pair of scissors, a yarn needle for weaving in ends, and a measuring tape to check the hat’s length and fit. Optional items include a pom-pom maker or faux fur pom-pom if you want to add a decorative touch to the top of your hat. With these materials in hand, you’re ready to start crocheting your cozy and stylish hat.
Let’s begin the fun part of this Easy and Cute Crochet Hat for Beginners – Free Pattern: creating the hat itself. This simple pattern uses basic stitches, so even if it’s your first time crocheting, you’ll be able to follow along easily.
Start with a slipknot and chain the foundation row. The length of this chain determines the height of your hat. For an adult size, chain about 35–40 stitches. This will create a comfortable beanie length that can be folded or left slouchy.
Next, work single crochet stitches (sc) or half-double crochet stitches (hdc) into each chain. Continue until you reach the end of the row, then chain one and turn your work. Repeat this process for several rows until your piece measures the circumference of your head. You’ll be creating a rectangular panel that will later be joined to form the hat shape.
Once your panel is long enough, fold it in half and sew the two short ends together using a yarn needle. This will create a tube. Then, use your yarn needle to weave through the top stitches and pull the yarn tight to close the top of the hat. Secure it with a knot and weave in any remaining ends.
At this stage, your hat is complete—but you can customize it further! Add a fluffy pom-pom on top, attach decorative buttons, or crochet a small flower applique for a personal touch. The possibilities are endless with this Easy and Cute Crochet Hat for Beginners – Free Pattern.
One of the best things about making a crochet hat is the freedom to personalize it. Once you’ve mastered the basic pattern, you can experiment with textures, stitches, and accessories to make each hat truly unique.
Try using different yarn weights to create various looks. A chunky yarn will make your hat extra warm and give it a cozy, modern vibe. On the other hand, lightweight yarns are ideal for spring or autumn hats that feel soft but breathable.
You can also play with color changes. Striped patterns, ombre effects, or color-block combinations make your Easy and Cute Crochet Hat for Beginners – Free Pattern stand out. Don’t be afraid to mix bold shades for a playful look or stick with neutral tones for a minimalist aesthetic.
For added comfort, consider lining your crochet hat with soft fleece fabric. This not only makes it warmer but also prevents it from stretching out too much over time. Simply cut a circle of fleece to fit inside and sew it gently along the inner edge of your hat.
You can also adjust the pattern to create different styles—such as a slouchy beanie, a snug-fit cap, or even a brimmed hat. Once you understand the basics, small adjustments in stitch count or tension will allow you to explore endless designs.
Finally, don’t forget the finishing touches! A leather tag, embroidered initials, or a handmade label can add a professional touch to your crochet hat and make it even more special.
Even though this is an Easy and Cute Crochet Hat for Beginners – Free Pattern, there are a few common mistakes that can happen along the way. Understanding them early will help you achieve better results.
First, pay attention to tension. If your stitches are too tight, your hat might end up smaller and stiffer than intended. If they’re too loose, it may lose its shape. Aim for consistent tension throughout the project.
Second, count your stitches regularly. Missing a stitch or adding an extra one can cause uneven edges or an irregular fit. It’s helpful to use stitch markers at the beginning and end of each row to stay on track.
Another useful tip is to measure your work often. Try the panel around your head before sewing the edges together. This ensures a perfect fit and avoids surprises at the end.
Don’t rush the joining or finishing steps. Taking the time to neatly weave in the ends and shape your hat properly makes a huge difference in how professional the final piece looks.
Lastly, practice patience! Crocheting is as much about the process as it is about the final product. The more hats you make, the more confident and creative you’ll become.
1. Can beginners really make this hat easily?
Yes! This Easy and Cute Crochet Hat for Beginners – Free Pattern is designed for absolute beginners. The stitches used are basic, and the construction is simple enough for anyone to follow.
2. How long does it take to make a crochet hat?
For most beginners, a crochet hat can be completed in about two to three hours. With practice, you’ll be able to finish one even faster.
3. What size should I make for different ages?
To adjust sizes, simply measure the head circumference and add or reduce rows accordingly. You can easily customize this pattern for children or adults.
4. Can I use different types of yarn?
Absolutely! You can use wool for warmth, cotton for breathability, or acrylic for an affordable and easy-to-care-for option.
5. How do I wash my crochet hat?
It’s best to hand-wash your crochet hat in cool water with mild detergent. Gently press out the excess water and lay it flat to dry.
6. Can I sell hats made from this pattern?
Yes, you can sell handmade hats made using this free crochet pattern. Just be sure to credit the original design inspiration if required.
Creating your own Easy and Cute Crochet Hat for Beginners – Free Pattern is not only fun but also deeply satisfying. You’ve learned how to gather materials, follow simple steps, and customize your hat to match your style. Crochet hats make beautiful, practical items that keep you warm and allow you to express your creativity.
Now that you’ve completed your first project, you can experiment with colors, textures, and different designs to build your crochet skills.
Don’t forget to share your results—leave a sincere opinion about this pattern and suggest what kind of crochet projects you’d love to see next. Your feedback helps inspire more creative tutorials like this one!


