
Ballerina pencil case with zipper Pattern


Quilted Teacup Pattern – A Sip of Creativity in Every Stitch is a delightful and heartwarming project for anyone who loves sewing, quilting, or simply expressing creativity through fabric art.
This charming pattern captures the essence of cozy moments, blending the beauty of a traditional teacup with the intricate texture of quilting.
Whether you’re an experienced quilter or just starting out, this project offers a soothing, rewarding experience and results in a piece that feels both elegant and personal.
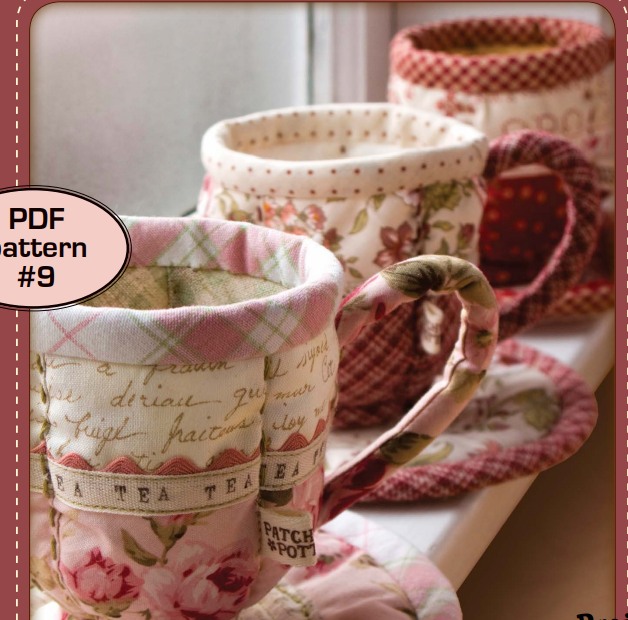
The magic of the Quilted Teacup Pattern lies in how it turns ordinary fabric into something extraordinary. By using small pieces of fabric, different textures, and harmonious colors, you can create teacups that tell a story.
Each stitch reflects patience and imagination, making this project ideal for gift-giving, home decoration, or even for framed fabric art. The pattern also offers endless opportunities for personalization—you can play with prints, color palettes, and embellishments to match your style.
In this Quilted Teacup Pattern – A Sip of Creativity in Every Stitch guide, you’ll learn how to choose materials, cut and assemble fabric pieces, and quilt them together to form a unique and beautiful teacup design. The best part is that you can use leftover fabric scraps, making it an eco-friendly and budget-friendly craft. Let’s explore how you can enjoy a creative “sip” of comfort in every stitch and make your own timeless quilted teacup masterpiece.
Before beginning your creative journey, gather all the essential materials. Having the right tools makes the process smooth, enjoyable, and precise. The Quilted Teacup Pattern doesn’t require complex equipment—just a few basics that most quilters already own.
Start by selecting your fabrics. Choose high-quality cotton fabric in a mix of patterns and colors. Floral prints, soft pastels, or even bold geometric designs work beautifully. Using contrasting fabrics for the teacup and saucer gives your project more depth and charm. If you prefer a cohesive look, choose fabrics from the same color family.
Next, you’ll need a cutting mat, rotary cutter, and quilting ruler to accurately measure and cut your fabric pieces. Precision is key when it comes to quilting, especially for detailed patterns like the Quilted Teacup Pattern. You’ll also need batting or thin quilt padding to give your design structure and texture.
A sewing machine is recommended for stitching the fabric pieces together, but you can also sew by hand if you prefer a slower, meditative pace. Don’t forget coordinating thread, sewing pins, scissors, and an iron to keep your fabric smooth and easy to work with. Finally, prepare a printed or drawn template of your teacup shape to guide your cutting and assembly process.
Now that you have everything ready, it’s time to bring your Quilted Teacup Pattern to life. This step-by-step guide will help you assemble your teacup design with ease and confidence.
Start by tracing your teacup pattern onto the fabric. You’ll need separate pieces for the cup body, handle, saucer, and background. Cut them carefully, leaving a small seam allowance around each shape. This will make it easier to sew the pieces together later.
Next, layer the background fabric, batting, and teacup cutouts in order. Pin them in place to prevent shifting. Begin stitching the teacup pieces onto the background using a straight stitch or applique technique. Take your time to follow the curves of the handle and edges of the cup, keeping your stitches even and neat.
Once the teacup is secured, it’s time to quilt the background. Use free-motion quilting or straight-line quilting to add dimension. You can create patterns like waves, spirals, or crosshatching to mimic the texture of steam, tablecloths, or ceramics. This step gives your Quilted Teacup Pattern a professional, textured finish.
After quilting, trim any excess fabric and square your design. You can now bind the edges with fabric strips to complete the look. If you want to turn your piece into a wall hanging or framed art, simply back it with felt or mount it in a wooden frame. The final result is a delicate, handcrafted fabric illustration that radiates charm and creativity.
One of the most enjoyable parts of working with the Quilted Teacup Pattern is the endless opportunity for personalization. You can create teacups that reflect different moods, seasons, or even memories. Each design can be a small work of art that tells its own unique story.
For a vintage touch, use floral fabrics and lace trims inspired by classic teacup sets. If you prefer modern aesthetics, experiment with solid colors and minimalistic designs. Adding small embroidered details like steam swirls or floral vines can enhance the overall charm of your project.
You can also create themed sets—such as a “tea for two” collection featuring matching teacups—or mix and match fabrics for a whimsical patchwork look. Metallic thread or decorative stitching can be used to highlight the rim of the cup or saucer, giving it a touch of elegance.
Another fun idea is to make seasonal Quilted Teacup Patterns: pastel tones for spring, warm reds for autumn, or snowy whites and blues for winter. These can be turned into placemats, wall hangings, or even quilt blocks for a larger quilt project. The creative options are truly limitless, allowing you to express your personality through every stitch.
Achieving a flawless finish in your Quilted Teacup Pattern requires patience and a few helpful techniques. First, always pre-wash your fabrics before cutting to prevent shrinking or color bleeding later. Ironing each piece before and during assembly ensures clean lines and accurate stitching.
Use a fine quilting needle and quality thread that complements your fabric colors. This helps maintain even tension and reduces the risk of puckering. When quilting the background, start from the center and work your way outward to keep the fabric smooth.
Don’t rush the applique process—especially around the curves of the teacup handle. Slower stitching gives you better control and cleaner results. If you’re new to quilting, practice on small fabric scraps before starting your main piece.
Finally, trust your creativity. The Quilted Teacup Pattern is all about enjoyment and self-expression. Don’t worry about achieving perfection; instead, focus on making something that reflects your personality and love for crafting. Every stitch adds character, making your final creation truly one of a kind.
1. Is the Quilted Teacup Pattern suitable for beginners?
Yes, this pattern is beginner-friendly. It uses basic quilting and applique techniques that are easy to follow with a bit of patience and practice.
2. What type of fabric works best for the Quilted Teacup Pattern?
Cotton fabric is ideal because it’s easy to handle, durable, and available in countless prints. Avoid stretchy materials, as they can distort your design.
3. Can I make the Quilted Teacup Pattern without a sewing machine?
Absolutely! You can hand-stitch your teacup pieces using small, even stitches. It will take longer, but it adds a charming, handmade touch.
4. How can I display my finished Quilted Teacup Pattern?
You can frame it, turn it into a wall hanging, a quilt block, or even a decorative cushion cover. The possibilities are endless.
5. What can I do with leftover fabric scraps from this project?
Use them to create more teacups in different colors or to make small accessories like coasters or bookmarks to match your main piece.
The Quilted Teacup Pattern – A Sip of Creativity in Every Stitch is more than just a craft—it’s a peaceful, expressive journey through fabric and imagination.
From choosing your fabrics to sewing each detail, this project allows you to create something that reflects your personal style and creativity. It’s a wonderful way to unwind, recycle fabric scraps, and produce a timeless decorative piece that radiates warmth and artistry.
Now that you’ve learned how to make your own Quilted Teacup Pattern, it’s time to start stitching your story one cup at a time. If you enjoyed this guide, share your honest opinion and suggestions below—I’d love to hear about your creative experience and how your teacup turned out!


