
Ballerina pencil case with zipper Pattern


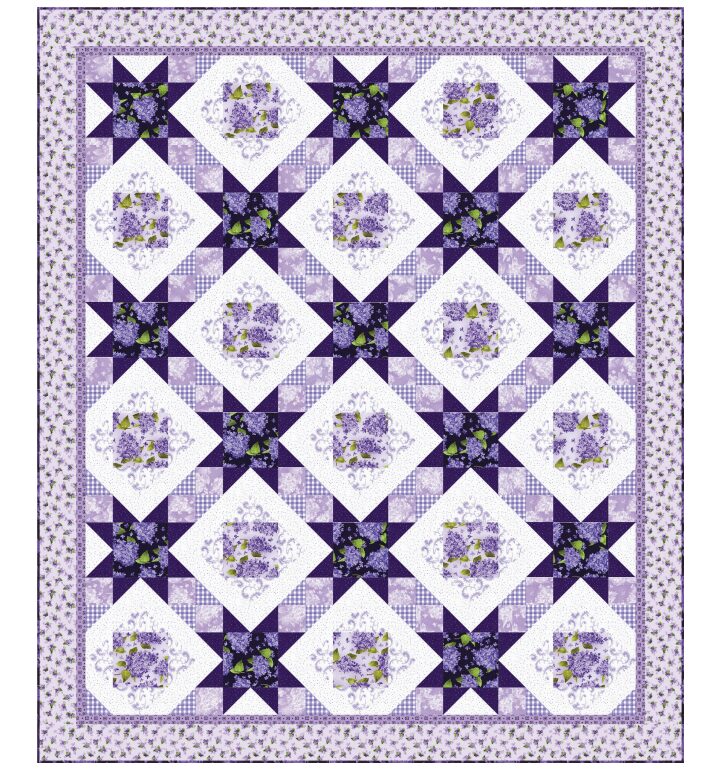
Rosy Stars Quilt Pattern is a delightful and heartwarming quilting project that combines the timeless charm of traditional patchwork with a touch of floral elegance.
Whether you are new to quilting or an experienced sewist, this pattern offers an enjoyable way to create a beautiful piece that shines in any room.
Its star-shaped design accented with rosy tones adds a soft, romantic feel that’s perfect for bedrooms, living spaces, or as a heartfelt handmade gift.
The Rosy Stars Quilt Pattern balances classic techniques and modern aesthetics, making it an ideal project for anyone who loves creativity and comfort stitched together.
The beauty of the Rosy Stars Quilt Pattern lies in its symmetry and use of color. Each star radiates with warmth and delicacy, forming a patchwork that feels both elegant and cozy. You can choose subtle pastel hues for a soft, vintage-inspired look or bold, contrasting shades for a vibrant, eye-catching result. This quilt pattern is highly versatile, suitable for full-size quilts, throws, or even smaller projects like table runners and wall hangings. It’s a rewarding way to express your style through fabric selection and color arrangement.
In this complete Rosy Stars Quilt Pattern tutorial, you’ll learn everything from choosing your materials to assembling your quilt blocks step by step. We’ll cover cutting techniques, layout tips, and finishing touches that make your quilt look professionally crafted. Quilting is more than just sewing; it’s storytelling through fabric, color, and texture. So grab your materials, prepare your sewing machine, and let’s create a masterpiece full of warmth, love, and rosy charm!
To begin your Rosy Stars Quilt Pattern, gather all the materials and tools necessary for a smooth quilting experience. Having the right supplies ensures accuracy and quality, which are essential in any quilting project. You don’t need expensive tools — just a few basics that will help you achieve clean lines and precise seams.
Start with your fabric selection. You’ll need several cotton fabrics in different shades of pink, red, cream, and white to bring the “rosy” theme to life. For the stars, choose fabrics with small floral prints or subtle patterns that contrast nicely with the background fabric. The background fabric should be light or neutral to make the stars stand out beautifully.
Next, you’ll need a rotary cutter, a self-healing cutting mat, and a quilting ruler for accurate cutting. Precision is key when creating star blocks since even small variations can affect how neatly the stars align. You’ll also need coordinating thread, pins, a sewing machine with a ¼-inch foot, and an iron for pressing seams flat.
Don’t forget the quilt batting and backing fabric. The batting adds softness and warmth, while the backing gives your quilt a polished finish. Choose a backing fabric that complements the colors on the front. Finally, prepare a binding fabric to frame your quilt edges neatly — this detail adds durability and elegance to your finished piece.
With your tools and fabrics ready, you’re set to start the creative process. The Rosy Stars Quilt Pattern is designed to be approachable, so even if you’re a beginner, you’ll enjoy every step of watching your quilt come together.
Now it’s time to bring your Rosy Stars Quilt Pattern to life. Follow these step-by-step instructions carefully to ensure your stars turn out symmetrical and beautifully balanced. Each stage builds upon the previous one, creating a cohesive design that radiates warmth and charm.
Step 1: Cutting Your Fabric
Start by cutting your fabric into precise squares and triangles. Each star block typically requires a combination of light and dark pieces. Cut all your fabric pieces at once to maintain consistency across the quilt. Accurate cutting ensures your quilt blocks will align perfectly when sewn together.
Step 2: Assembling the Star Points
Using half-square triangle units, sew the star points by pairing light and dark fabrics together. Press your seams carefully toward the darker fabric to maintain clean lines. These triangle units will form the tips of your rosy stars, creating that classic starburst effect.
Step 3: Building the Star Block
Arrange your triangle units with square center pieces to form each star block. Sew the pieces row by row, then join the rows to complete each block. Consistency in seam allowances is essential for perfect alignment. Press the finished blocks well before assembling them into the quilt top.
Step 4: Assembling the Quilt Top
Lay out your star blocks on a flat surface and arrange them in a balanced layout. Alternate colors and tones to create harmony across the quilt. Once you’re happy with the arrangement, sew the blocks together in rows, pressing each seam as you go. The quilt top should now display your beautiful rosy stars.
Step 5: Quilting and Binding
Layer your quilt top with batting and backing fabric, then baste them together. Quilt the layers either by hand or with your sewing machine using straight or diagonal lines. After quilting, trim the edges and attach the binding to secure and frame your quilt. Your Rosy Stars Quilt Pattern is now complete and ready to enjoy!
Step 6: Finishing Touches
After finishing the binding, give your quilt a gentle press and inspect it for any loose threads. Adding a quilt label with your name and date can make it a treasured keepsake. The final result will be a cozy, radiant quilt filled with handmade love.
One of the best parts of working on the Rosy Stars Quilt Pattern is the opportunity to personalize your design. Each choice of color, fabric, and layout gives your quilt its own identity. Don’t be afraid to experiment and make it truly yours.
Try incorporating ombré color schemes, starting from light pinks in the center to deeper reds at the edges. This gradient effect adds depth and visual interest. You can also mix floral and geometric fabrics to give your quilt a more modern twist while keeping the romantic theme intact.
For a vintage feel, use faded rose tones, cream backgrounds, and distressed-looking fabrics. Adding lace or embroidered details between blocks can elevate your quilt’s charm and uniqueness. On the other hand, if you prefer something bold, use high-contrast fabrics like black and rose gold for a contemporary spin.
Consider using the Rosy Stars Quilt Pattern for smaller projects too — cushion covers, placemats, or tote bags. The versatility of the design makes it suitable for various creative applications beyond full-sized quilts.
Finally, don’t rush the process. Quilting is as much about the experience as the result. Take time to enjoy each step — from selecting fabrics to stitching stars together — and you’ll end up with a quilt that tells a story only your hands could create.
Even though the Rosy Stars Quilt Pattern is beginner-friendly, a few common mistakes can affect the final outcome. Knowing how to avoid them will save time and ensure your quilt looks polished and professional.
One common mistake is uneven cutting. Always double-check your measurements before cutting fabric to keep your star blocks consistent in size. Another issue can arise from mismatched seams — this often happens if you don’t maintain a consistent ¼-inch seam allowance. Using a presser foot with a seam guide can help.
Pressing your seams in the wrong direction can also create bulk and misalignment. Always press toward the darker fabric or follow the pattern’s pressing guide. Inconsistent tension on your sewing machine may cause puckering, so test your stitches on a scrap piece first.
Finally, take your time with layout planning. Rushing the arrangement can lead to an unbalanced design. Step back and view your quilt top from a distance before sewing everything together — this helps ensure your color distribution feels natural and pleasing to the eye.
By keeping these small details in mind, you’ll ensure your Rosy Stars Quilt Pattern project turns out perfectly — with crisp lines, radiant stars, and professional finishing touches.
1. Is the Rosy Stars Quilt Pattern suitable for beginners?
Yes, it’s an excellent choice for beginners. The pattern uses basic shapes like squares and triangles, and the step-by-step assembly is easy to follow.
2. What size should I make the quilt blocks?
You can customize the block size, but a common size for star blocks is 12 inches. Adjust depending on your preferred quilt dimensions.
3. What fabrics work best for this pattern?
High-quality cotton fabrics are ideal because they are easy to cut, sew, and press. Choose prints and colors that complement your theme.
4. Can I make this quilt using a sewing machine?
Absolutely! A sewing machine with a ¼-inch foot makes sewing precise seams easier and faster.
5. How long does it take to finish the Rosy Stars Quilt Pattern?
Depending on your skill level and quilt size, it can take from a few days to a couple of weeks. Enjoy the process at your own pace.
6. Can I resize the pattern for smaller projects?
Yes, the Rosy Stars Quilt Pattern can be easily resized for smaller projects like pillows, wall hangings, or baby quilts.
The Rosy Stars Quilt Pattern is a perfect blend of tradition, creativity, and personal expression. From choosing your fabrics to sewing each star with care, every step in this process lets you create something truly unique and meaningful.
This quilt brings warmth and artistry into your home, reminding you that beauty can be handcrafted with patience and love.
If you enjoyed this tutorial, share your thoughts and experiences in the comments. Your opinion and suggestions help inspire new crafters to start their own Rosy Stars Quilt Pattern journey.


