Crochet Pig In A Granny Square Blanket Pattern


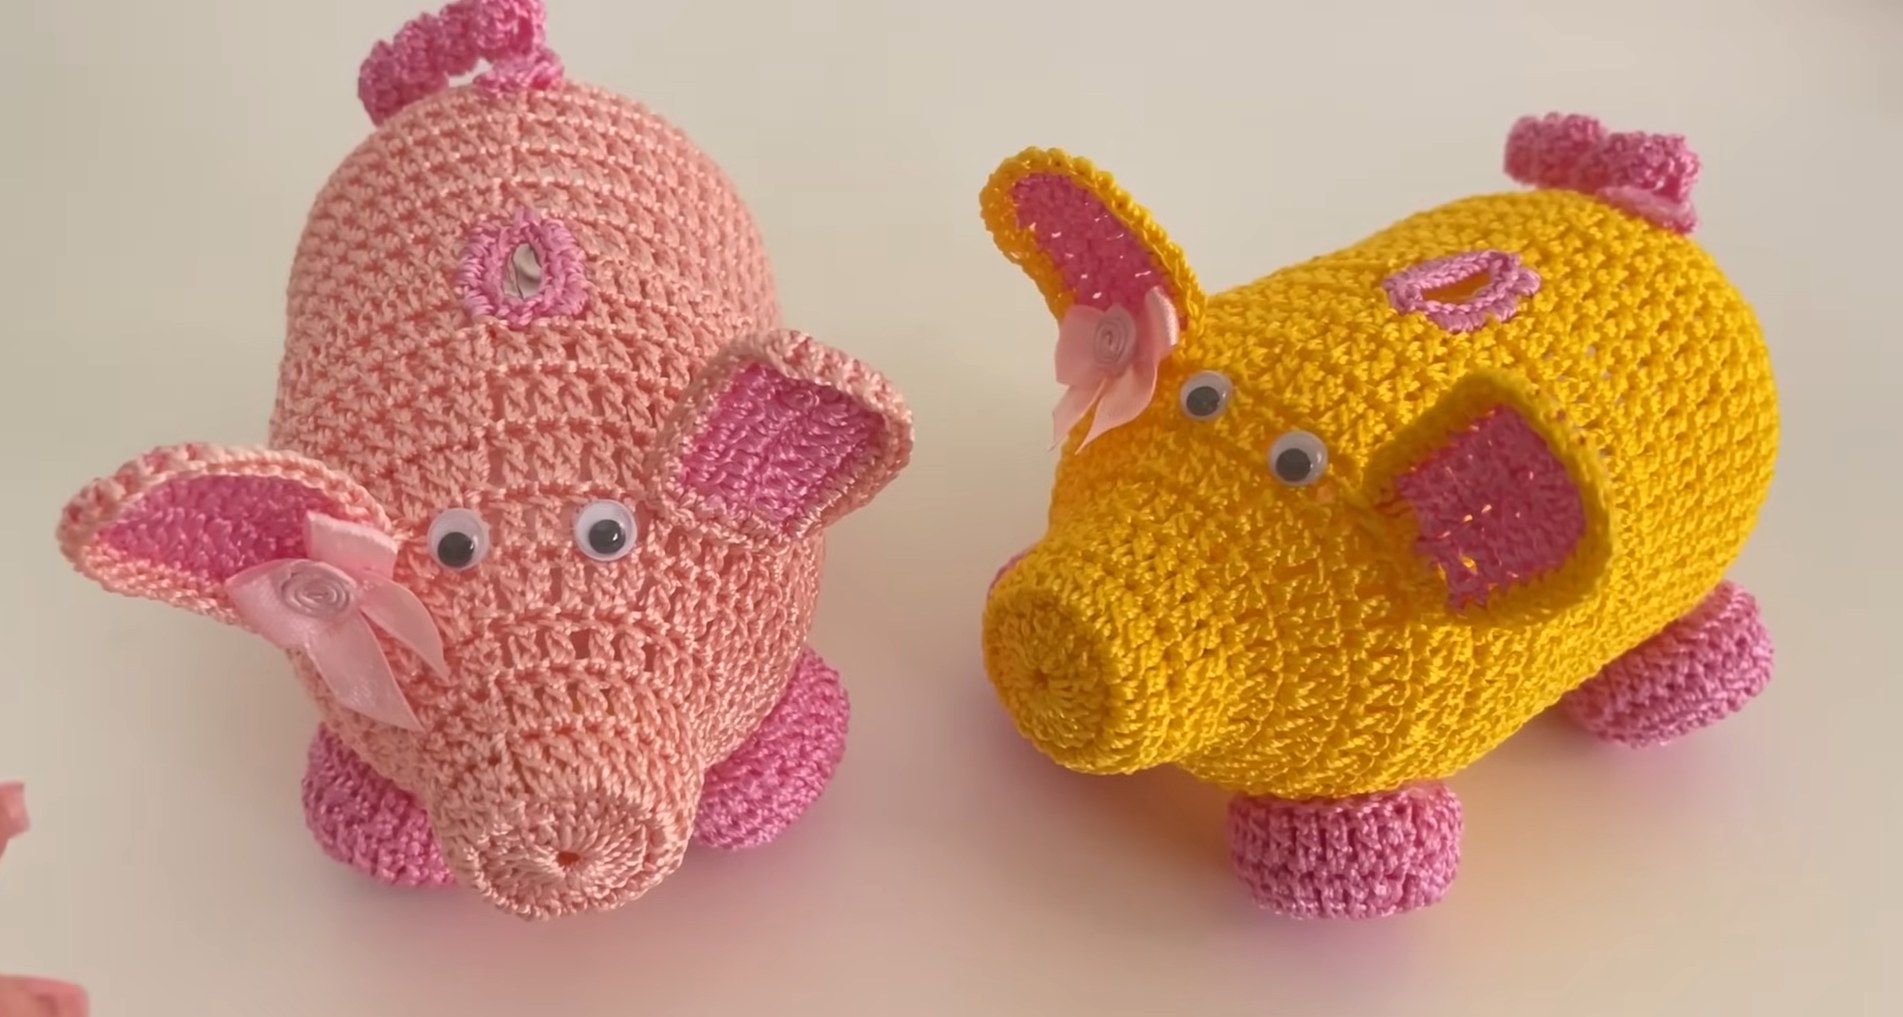
Crochet Piggy Bank is a delightful project that combines creativity, functionality, and charm. The Crochet Piggy Bank is perfect for anyone who loves handmade crafts and wants to create a practical item that can also serve as décor.
With this tutorial, you can make a cute piggy bank that is both adorable and useful, providing a fun way for children and adults to save coins.
The Crochet Piggy Bank allows crafters to explore amigurumi techniques while producing a finished product that is attractive, durable, and customizable. Whether you are a beginner or an experienced crocheter, this project is designed to be accessible and enjoyable.
Creating the Crochet Piggy Bank is an excellent way to practice precision in stitching, learn how to shape figures, and experiment with customization.
Each step of the tutorial is designed to be clear and detailed, ensuring that your finished piggy bank is balanced and functional. This pattern encourages creativity in choosing colors, facial features, and accessories, allowing you to make a piggy bank that reflects your personal style. The tutorial emphasizes neatness, consistency, and finishing touches that elevate your work from simple craft to professional-looking amigurumi.
The Crochet Piggy Bank is also a practical project. Unlike typical crochet toys, this piggy bank has a functional coin slot, making it a perfect tool for teaching children about money management or for collecting spare change at home. By following the instructions carefully, you can create a sturdy item that holds coins securely and retains its shape over time. The project’s combination of fun and utility makes it a standout choice for gift-making, home décor, or personal enjoyment.
To create your Crochet Piggy Bank, you will need some basic materials. Soft, durable yarn is recommended, with pink being the classic color for the pig, and contrasting colors for hooves, snout, and ears. Cotton or acrylic yarn works well because it maintains shape, is easy to handle, and provides a smooth finish. Choosing high-quality yarn will make your piggy bank sturdy and long-lasting.
A suitable crochet hook is essential for achieving consistent stitches. The tutorial recommends selecting a hook size appropriate for your yarn to ensure the piggy bank is tight enough to hold stuffing and coins securely. Tight, even stitches are critical, particularly around the coin slot, to prevent coins from slipping through the fabric.
Additional tools include scissors, yarn needles, stitch markers, and a measuring tape. For the face, safety eyes or embroidery floss can be used. The Crochet Piggy Bank tutorial provides instructions for securing these safely, especially for items intended for children.
Stuffing material such as polyester fiberfill is needed to give the piggy bank its shape and firmness. The tutorial explains how to distribute stuffing evenly to maintain a plump, balanced form. Correct stuffing ensures that the piggy bank is durable and maintains its charm over time.
To reinforce the coin slot, a small piece of plastic canvas or felt can be inserted. This ensures that the slot remains functional without stretching or tearing the crochet fabric. The tutorial provides clear guidance on attaching the reinforcement securely and neatly.
Optional embellishments, such as small bows, ribbons, or embroidered accents, can be added for extra charm. Following the Crochet Piggy Bank tutorial ensures that all finishing touches are clean and professional-looking, enhancing the piggy bank’s appeal.
The first step in the Crochet Piggy Bank tutorial is creating the main body. Using single crochet stitches and strategic increases, you can shape a rounded, firm base that will hold coins safely. This foundational step sets the tone for the entire project, ensuring stability and symmetry.
Next, the head is created separately. The tutorial guides you through shaping the head, adding ears, and creating the snout. Proper placement of these features is emphasized to make the piggy bank visually appealing and balanced. Each stitch and increase is explained to help achieve a professional look.
Limbs and tail are crocheted individually and then attached to the body. The Crochet Piggy Bank tutorial provides tips on correct positioning and secure stitching, ensuring that the finished pig is sturdy and proportionate. Special attention is given to small parts, as these details enhance the overall charm and durability of the project.
Creating the coin slot is a crucial step. The tutorial explains how to reinforce the opening with plastic canvas or felt and stitch it securely into the top of the piggy bank. This ensures that coins can be inserted safely without damaging the crochet structure or losing shape over time.
Facial features, including eyes, nose, and mouth, are added next. Using either safety eyes or embroidery techniques, the Crochet Piggy Bank tutorial demonstrates precise placement for an expressive and endearing face. Optional details such as rosy cheeks or eyelashes are included to allow further personalization.
Finally, assembly and finishing touches complete the piggy bank. Loose ends are woven in, stuffing is adjusted for firmness, and optional embellishments are added. Following the Crochet Piggy Bank tutorial ensures a polished, durable, and functional result that is both cute and practical.
The Crochet Piggy Bank tutorial includes several tips to help beginners succeed. Counting stitches accurately is essential for maintaining symmetry and proportion, especially when shaping the body, head, and limbs.
Maintaining consistent tension is another key factor. Even stitches ensure that the piggy bank is firm and holds its shape, preventing gaps where stuffing or coins might show through. Practicing on a small swatch before beginning the project can help beginners maintain even tension.
Adding the coin slot requires careful attention. The tutorial recommends using reinforcement materials and stitching securely to prevent wear and tear. This ensures the piggy bank remains functional even with frequent use.
Personalization is encouraged. Beginners can add small bows, contrasting colors, or simple embroidery to make their pig unique. Customization allows creativity while making each piggy bank special and distinct.
Patience is emphasized throughout the assembly process. Carefully placing limbs, ears, and tail ensures the piggy bank remains balanced and visually appealing. Rushing these steps may result in uneven parts or misalignment.
Finally, finishing touches such as trimming excess threads, adjusting stuffing, and checking the coin slot are critical for durability and appearance. Following the Crochet Piggy Bank tutorial carefully will result in a high-quality, functional, and adorable piggy bank.
The Crochet Piggy Bank can be easily personalized. Different yarn colors, facial expressions, and embellishments allow crafters to create unique pigs that reflect individual style or match home décor. You can make a collection of piggy banks in various sizes and colors for display or gifting.
These piggy banks are perfect for gifts. Handmade pigs are thoughtful presents for children, birthdays, holidays, or special occasions, combining charm with practical use. A crochet piggy bank becomes a keepsake that recipients will treasure.
Piggy banks are also useful for teaching children about saving money. Encouraging kids to deposit coins in a handmade piggy bank makes the process fun and interactive.
Decoratively, the Crochet Piggy Bank can be displayed on shelves, desks, or mantels as a cute accent piece. Pairing it with other amigurumi items adds a whimsical touch to any room.
For crafters interested in selling handmade items, the Crochet Piggy Bank is ideal for online shops, craft fairs, or local boutiques. Its combination of functionality, cuteness, and personalization makes it a highly appealing product.
Sharing your completed piggy banks with friends, family, or crafting communities promotes inspiration and feedback. The tutorial encourages creativity, skill development, and enjoyment among crocheters.
Q1: Is this pattern suitable for beginners?
Yes, the Crochet Piggy Bank tutorial provides clear, step-by-step instructions for all skill levels.
Q2: What yarn is recommended?
Soft cotton or acrylic yarn is ideal for durability, firmness, and maintaining shape.
Q3: Can I customize the piggy bank?
Absolutely! You can change colors, add accessories, or adjust facial expressions for a unique piggy bank.
Q4: How do I create a functional coin slot?
Reinforce the opening with plastic canvas or felt, and stitch securely to prevent damage.
Q5: Is this piggy bank safe for children?
Yes, embroidery techniques or safety eyes can be used depending on the intended age group.
Q6: How do I care for the finished piggy bank?
Spot cleaning or gentle hand washing is recommended to preserve shape and appearance.
The Crochet Piggy Bank tutorial provides a comprehensive guide for making a cute, functional, and handmade item. From materials and tools to step-by-step instructions and finishing touches, this tutorial equips crafters with the skills needed to create a professional-looking piggy bank.
Personalization options allow each pig to be unique, making it suitable for gifts, décor, or educational purposes. By following the tutorial carefully and adding creative touches, you can create a charming, functional crochet piggy bank that will be enjoyed for years.
We encourage readers to share their experiences, leave feedback, and offer suggestions to inspire the crochet community and foster creativity.


