
Ballerina pencil case with zipper Pattern


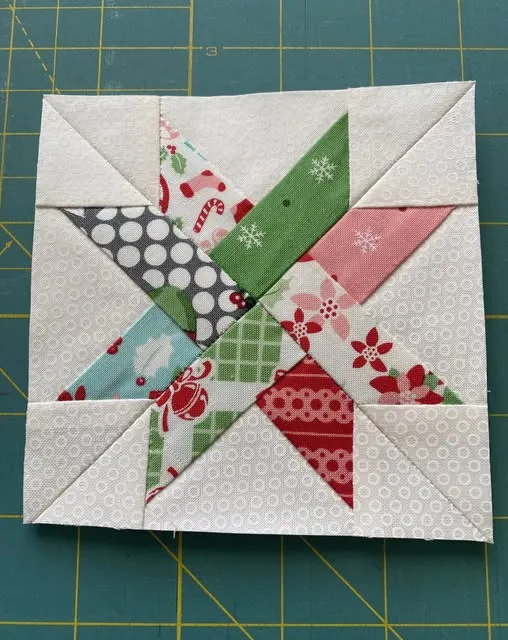
Liberty Star – Tutorial is a comprehensive guide for creating one of the most timeless and beloved quilt blocks in the world of quilting.
The Liberty Star – Tutorial introduces quilters to a classic star pattern that can be used in a variety of projects, from full-sized quilts to wall hangings, table runners, and decorative pieces.
This tutorial is designed to be accessible to both beginners and experienced crafters, providing step-by-step instructions that ensure precision, creativity, and a polished final result.
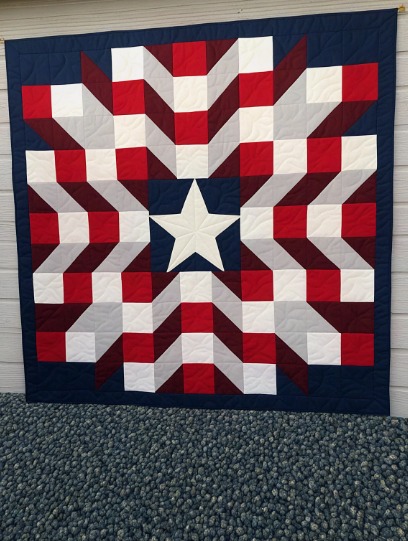
The Liberty Star is known for its elegance, symmetry, and the ability to highlight beautiful fabric choices, making it a perfect centerpiece for any quilting project.
The beauty of the Liberty Star – Tutorial lies in its versatility and the opportunity it gives quilters to personalize their projects. Choosing the right fabrics is the first step in achieving a stunning star block. Cotton fabrics are recommended because they are durable, easy to work with, and maintain their shape throughout the quilting process. The tutorial emphasizes using contrasting fabrics to make the star stand out against the background. Solids, subtle prints, or even a combination of both can be used to create a visually striking block. The Liberty Star – Tutorial encourages quilters to think creatively about color combinations, whether opting for a traditional red, white, and blue palette, soft pastels for a delicate look, or bold modern prints for a contemporary feel. Each fabric selection adds character and uniqueness to the final quilt.
Before beginning the cutting process, the Liberty Star – Tutorial highlights the importance of careful planning. Accurate measurements are essential because even small deviations can affect the alignment of the star points. Using a rotary cutter, ruler, and cutting mat ensures precision. Pre-washing and ironing fabrics helps prevent shrinkage and makes the pieces easier to handle. The tutorial recommends organizing and labeling all pieces before assembly to create a smooth workflow and avoid mistakes. These preparatory steps set the foundation for a successful and enjoyable quilting experience.
Selecting the right fabrics is crucial in the Liberty Star – Tutorial. Cotton is the preferred material due to its stability, durability, and ease of stitching. The star blocks can be made with solids, prints, or a combination, but contrasts are necessary to make the star shape pop. When choosing fabrics, consider the mood and style you want for your quilt. Traditional color schemes like red, white, and blue evoke patriotism, while pastel or neutral shades give a soft, cozy feel. Bold, bright prints create a modern and eye-catching effect.
Other essential materials include scissors or a rotary cutter, cutting mat, pins, and a ruler for accurate measurements. A sewing machine can be used for faster stitching, but hand-sewing is also an option for those who prefer a slower, more meditative approach. Pre-washing fabrics and ironing them before cutting is recommended to prevent shrinkage and achieve precise shapes. The Liberty Star – Tutorial also emphasizes using high-quality thread and sharp needles to ensure smooth sewing and professional results. Additional embellishments like embroidery thread or decorative stitching can be used for customization. Preparing all materials in advance streamlines the assembly process and ensures that the quilter has everything needed at hand.
The assembly process in the Liberty Star – Tutorial begins with creating the star points. Triangles are cut and pieced together to form each point of the star. Consistent ¼-inch seam allowances are crucial for accuracy and alignment. Pressing seams as you go helps the pieces lay flat and maintain sharp, crisp points. Once the star points are complete, they are joined to a central square, forming the core of the star. Background squares or rectangles are then added around the star to finish the block. The tutorial highlights the importance of double-checking alignment at each step, as precise assembly ensures a professional-looking final quilt. Consistency across multiple blocks is key for a cohesive quilt layout.
After individual blocks are assembled, the Liberty Star – Tutorial guides quilters in arranging them for the final quilt top. A design wall or flat surface can be used to visualize the overall pattern and make adjustments to color balance and block placement. Proper spacing and alignment ensure that star points match perfectly at the intersections. This step is crucial for maintaining symmetry and achieving a polished finished quilt. The tutorial also provides tips for efficiently joining blocks and creating even rows, ensuring a smooth and satisfying assembly process.
Once the quilt top is complete, the Liberty Star – Tutorial moves on to quilting. Layers of the quilt, including the top, batting, and backing, are prepared and basted together using safety pins or temporary adhesive. Quilting can be done using straight-line stitching for a clean, classic finish, or free-motion quilting for added texture and creativity. The choice of quilting design can enhance the star pattern and highlight the beauty of the fabrics. Proper quilting techniques ensure durability and help the quilt maintain its shape over time.
Trimming excess fabric and carefully preparing the edges is an important part of the finishing process in the Liberty Star – Tutorial. Binding is added to frame the quilt, and hand-stitching is recommended for a neat and durable finish. Optional decorative elements, such as embroidery or applique, can be added to personalize the quilt further. The tutorial emphasizes attention to detail in this stage, ensuring that each quilt is polished, elegant, and ready for display or gifting. Completing the quilt provides a sense of accomplishment and the satisfaction of creating a handmade, high-quality textile piece.
The Liberty Star – Tutorial encourages quilters to experiment with creativity and personalization. Adjusting the size of the blocks allows for mini quilts, table runners, or large bed quilts. Background fabric choices can dramatically affect the visual impact of the star, with dark backgrounds creating a bold, striking contrast and light backgrounds producing a soft, subtle effect. Metallic threads or subtle embellishments can add sparkle and dimension to the quilt. Adding embroidery, applique, or small decorative accents can make the quilt truly one-of-a-kind. The tutorial also suggests mixing Liberty Star blocks with other traditional blocks to create dynamic and visually engaging quilts. By personalizing each block, quilters can produce a unique piece that reflects their personality and style while maintaining the classic elegance of the Liberty Star design.
The Liberty Star – Tutorial also includes practical advice for beginners. Accurate cutting, careful seam allowances, and consistent stitching are emphasized as essential skills for achieving professional results. Templates for triangles and squares simplify the cutting process, and stitch markers can help maintain alignment. Beginners are encouraged to practice pressing seams for crisp points and to take their time assembling each block. Simplifying the design with fewer fabrics or larger pieces makes the Liberty Star – Tutorial accessible for those new to quilting, while still providing a satisfying and beautiful finished project.
The versatility of the Liberty Star – Tutorial makes it suitable for a variety of applications. Finished quilt blocks can be used to create full-sized quilts, wall hangings, pillow covers, or table runners. Miniature versions of the blocks can serve as gifts, ornaments, or decorative items. This flexibility allows quilters to experiment and explore their creativity while using a classic, beloved pattern. Completing a Liberty Star quilt provides a sense of accomplishment and the opportunity to share handmade beauty with others.
Q1: What size should I cut my fabric pieces for the Liberty Star block? The size depends on your project, but a common finished block is 12 inches. Adjust measurements proportionally for smaller or larger blocks.
Q2: Can I sew the Liberty Star by hand? Yes, hand sewing is possible, but it requires patience and precision. Small, even stitches and strong thread are recommended.
Q3: What type of batting works best? Cotton or cotton-blend batting is ideal for warmth, structure, and ease of quilting.
Q4: How can I keep star points sharp and precise? Accurate cutting, consistent ¼-inch seam allowances, and careful pressing of seams are essential for sharp points.
Q5: Is the Liberty Star pattern suitable for beginners? Yes, the Liberty Star – Tutorial can be simplified with fewer fabrics or larger pieces to make it more approachable for beginners.
Q6: How can I display a Liberty Star quilt creatively? Use it as a bedspread, wall hanging, table topper, or create mini quilts for gifts and decorations.
In conclusion, the Liberty Star – Tutorial is a complete guide for quilters who want to create a classic, elegant, and versatile quilt block.
From selecting fabrics to precise cutting, careful assembly, quilting, and finishing, this tutorial provides everything needed to create professional-looking quilt blocks.
By following the steps in the Liberty Star – Tutorial, quilters can produce stunning quilts that reflect their personal style and craftsmanship. Whether making a full-sized quilt, a decorative wall hanging, or a small gift project, the Liberty Star design offers endless possibilities for creativity and satisfaction.
We encourage readers to try this tutorial, share their results, provide feedback, and offer suggestions to inspire a community of quilters dedicated to preserving tradition while exploring innovative designs.


