
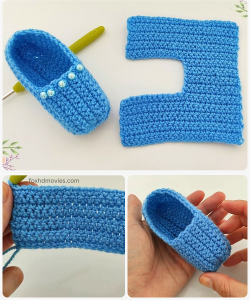
Ballerina pencil case with zipper Pattern


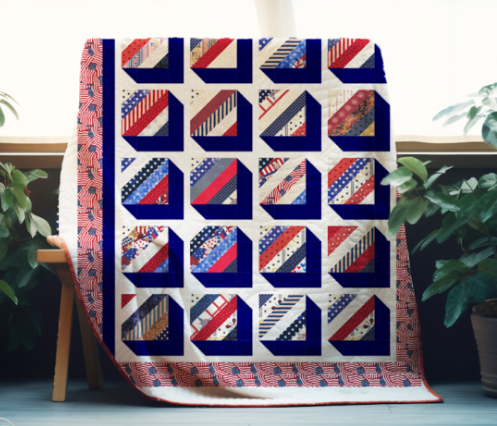
The Stars and Stripes Forever – Quilt Pattern celebrates timeless American heritage through the beauty of fabric and craftsmanship. Inspired by the iconic flag of the United States, this quilt brings together bold stripes, radiant stars, and symbolic colors that embody freedom, unity, and pride.
Whether you are creating a patriotic centerpiece for your home, a thoughtful gift for a veteran, or simply want to explore a classic quilting design, this project captures the spirit of tradition with a modern twist.
The beauty of this pattern lies not only in its striking visual appeal but also in the emotions it carries — a quilt that represents both artistry and identity.
This Stars and Stripes Forever – Quilt Pattern is perfect for all quilting enthusiasts, from beginners eager to learn the fundamentals to advanced makers looking for a creative challenge.
With each stitch, you’ll create a story that resonates with strength and devotion. Using vibrant red, crisp white, and deep navy blue fabrics, the design pays tribute to the flag’s symbolism while offering room for personal interpretation. Whether you opt for solid hues, subtle textures, or vintage prints, the result will be a one-of-a-kind masterpiece that radiates pride.
Before diving into the cutting and sewing, take time to visualize the finished look of your Stars and Stripes Forever – Quilt Pattern. Think about the layout, scale, and tone you want to achieve. Planning ahead helps ensure harmony between your color choices and fabric patterns. You can experiment with traditional arrangements or add a creative flair with unique placements of stars and varied stripe widths. Each choice reflects your personal style, making your quilt a meaningful piece that tells your story through needle and thread.
Selecting the right fabrics is the foundation of a successful Stars and Stripes Forever – Quilt Pattern. To capture the patriotic essence, stick with the classic palette: red, white, and blue. For a rich and timeless look, use solid cotton fabrics that showcase clean lines and contrast beautifully. If you prefer a softer or rustic feel, consider incorporating faded tones or vintage-style prints that bring character and warmth.
Mixing different textures adds depth and movement to your quilt. Combine smooth cottons with slightly textured fabrics like linen or chambray to create visual interest. A touch of metallic thread or star-patterned fabric can also enhance the sparkle of your quilt, symbolizing the shining stars of the flag. The key is to balance boldness and subtlety — allowing the stars and stripes to stand out without overwhelming the overall design.
When choosing your background fabric, opt for something that complements the main colors while allowing the stars to shine. A creamy white or light gray background offers a soft contrast to the bolder hues, keeping the design elegant and balanced. Always pre-wash your fabrics to prevent shrinking and color bleeding later. Iron each piece before cutting to maintain accuracy in your pattern layout.
After your fabric selection, cut all pieces according to the template or measurements provided in your Stars and Stripes Forever – Quilt Pattern guide. Organize your strips and star shapes by color and size. Keeping everything neatly labeled will make the assembly process much smoother, especially when working on larger quilt blocks. Proper preparation ensures a professional finish that will last for generations.
If you wish to personalize your quilt further, consider using fabrics that tell a story — perhaps a print that represents your family’s history, a loved one’s favorite color, or a fabric that reminds you of a special place. The beauty of quilting lies in its ability to blend creativity with emotion, transforming fabric into a meaningful keepsake.
The Stars and Stripes Forever – Quilt Pattern follows a straightforward block structure inspired by the American flag. Begin by preparing your stripe sections, alternating between red and white strips. Use a rotary cutter and ruler to ensure precise and straight edges. Accurate cutting is vital to achieving a clean, balanced look once all pieces are stitched together.
Start by sewing your stripe pieces using a ¼-inch seam allowance, pressing each seam flat as you go. This helps keep the fabric layers even and prevents puckering. Once your stripe panel is complete, measure it carefully to ensure it aligns with the star block dimensions. Consistency across all sections is essential for smooth assembly later on.
Next, move on to the star blocks. Traditionally, stars are made using the half-square triangle (HST) technique. This method provides clean, sharp points and gives your quilt a polished, geometric appeal. Arrange your triangles to form star shapes, alternating colors to create contrast. Sew carefully and press your seams toward the darker fabric to maintain sharp edges.
When joining the star and stripe sections, double-check the alignment of seams to keep your quilt visually balanced. Use pins or clips to hold pieces in place before stitching, especially when connecting larger panels. The key to a professional finish is patience — take your time to align, sew, and press each piece properly.
After assembling all sections, lay out your quilt top on a flat surface to inspect for consistency. Make adjustments where necessary and trim uneven edges. Once satisfied with the layout, join the sections together to complete your quilt top. The transformation from separate pieces to a unified pattern is incredibly rewarding, and seeing your Stars and Stripes Forever – Quilt Pattern come to life is a moment worth celebrating.
Now that your quilt top is complete, it’s time to layer and quilt your masterpiece. Place the backing fabric on a flat surface with the wrong side facing up, then layer the batting (the soft inner layer) and finally your quilt top, right side up. Smooth out all wrinkles and pin the layers securely using quilting safety pins or basting spray.
You can quilt your Stars and Stripes Forever – Quilt Pattern using straight-line stitching for a clean, modern look or try free-motion quilting for a more creative touch. Straight diagonal lines mimic the structure of the flag, while wavy or star-shaped patterns add dynamic flair. Choose a quilting design that complements the patriotic theme and matches your skill level.
Select a thread color that blends well with your design. White thread often enhances the overall contrast, while red or blue adds boldness. Test your tension and stitch length on a scrap piece before quilting the main project. This ensures smooth, even stitches that won’t distort the fabric.
Once quilting is complete, trim the excess batting and backing fabric evenly around the edges. Then, attach your binding — the finishing border that frames your quilt. For a cohesive look, use red or blue binding, or alternate both colors for a unique patriotic border. Secure the binding by machine or hand-stitching, depending on your preference.
After binding, give your quilt a final press to smooth out any wrinkles. Step back and admire your finished Stars and Stripes Forever – Quilt Pattern — a symbol of creativity, patience, and pride. Your handmade quilt can be used as a decorative wall hanging, a cozy throw, or a treasured gift passed down through generations.
A quilt as meaningful as the Stars and Stripes Forever – Quilt Pattern deserves proper care and display. If you plan to use it as a wall hanging, attach a sleeve to the back for easy mounting. For home décor, drape it elegantly over a couch, bed, or chair to showcase the vibrant design.
When it comes to cleaning, always follow gentle washing techniques. Hand wash or machine wash on a delicate cycle using mild detergent, and avoid harsh chemicals that may damage the fabric colors. Air dry your quilt flat to maintain its shape and prevent shrinking.
Store your quilt in a cool, dry place away from direct sunlight to preserve the colors. Rolling it loosely in acid-free tissue paper helps avoid permanent creases. Never store quilts in plastic bags for long periods, as fabric needs to breathe.
Over time, your quilt may soften and age gracefully, developing a beautiful texture that enhances its charm. Regularly inspect it for loose threads or worn edges, repairing small areas as needed to keep your quilt in excellent condition.
Most importantly, enjoy your creation. Whether you use it for special occasions like Independence Day celebrations or as a daily reminder of dedication and artistry, your Stars and Stripes Forever – Quilt Pattern will remain a cherished piece of craftsmanship for years to come.
What size is the finished Stars and Stripes Forever – Quilt Pattern?
The final size depends on your chosen layout, but a common version measures around 60” x 70”. You can easily adjust the dimensions by adding or removing stripe sections or star blocks.
Can I make this quilt as a beginner?
Yes! This pattern is beginner-friendly. With basic sewing skills and careful attention to cutting and piecing, anyone can successfully complete this quilt.
What type of fabric works best for this project?
100% cotton quilting fabric is ideal. It’s durable, easy to handle, and holds shape beautifully through multiple washes.
Can I use different colors instead of red, white, and blue?
Absolutely. While the classic palette symbolizes patriotism, you can personalize it with your preferred color scheme to suit any theme or décor.
What kind of batting should I use?
A medium-weight cotton or cotton-blend batting works perfectly. It provides warmth without being too heavy and allows the quilt to drape nicely.
How should I quilt the layers together?
You can use straight-line quilting, echo quilting around the stars, or even free-motion designs. The choice depends on your comfort level and desired effect.
Creating the Stars and Stripes Forever – Quilt Pattern is more than just a sewing project — it’s an expression of artistry, tradition, and pride.
Through each step, from selecting fabrics to stitching stars, you’ve built a meaningful work of art that reflects your dedication and creativity.
This tutorial showed you how to plan, piece, quilt, and care for your masterpiece, ensuring that it lasts for generations to come.


