Crochet Pig In A Granny Square Blanket Pattern


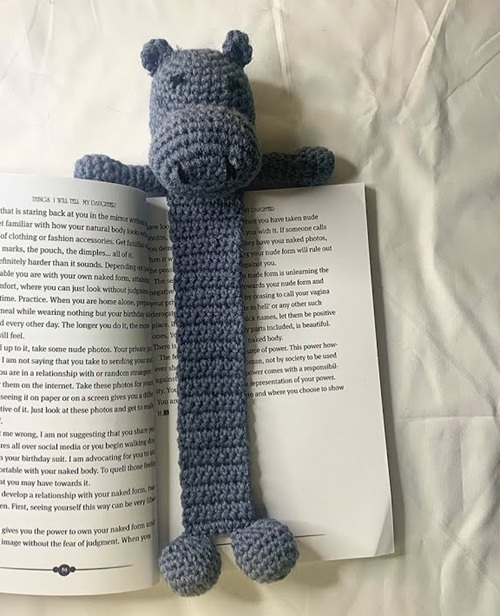
How to Crochet a Hippo Bookmark is a fun and creative project for crochet enthusiasts of all levels. The How to Crochet a Hippo Bookmark tutorial guides you step by step to create a cute and functional bookmark shaped like an adorable hippo.
This project is perfect for beginners looking to practice basic crochet techniques or experienced crocheters wanting a quick, whimsical accessory.
A handmade hippo bookmark makes reading more enjoyable, adds a personal touch to your books, and also makes a thoughtful gift for friends, family, or book clubs.
Crocheting a hippo bookmark is more than just making a cute accessory. It’s an opportunity to explore crochet techniques like single crochet, slip stitch, and color changes, while also developing skills in shaping and detail work.
By following this tutorial, you will learn how to create a compact, durable, and charming bookmark that stands out. Each step ensures your stitches are neat, your proportions are accurate, and the final product resembles a friendly, smiling hippo.
The How to Crochet a Hippo Bookmark tutorial also emphasizes creativity and personalization. You can experiment with colors, yarn types, and facial expressions to give your hippo its own personality. This project is ideal for using leftover yarn scraps and is quick to complete, making it perfect for a weekend craft. By following this guide carefully, you’ll have a fully functional and adorable crochet hippo bookmark that enhances any reading experience.
To crochet a hippo bookmark, you will need a few basic materials. Choose yarn in shades that reflect the classic hippopotamus, such as gray or lavender for the body, and pink or white for accent details. Using a smooth, worsted-weight yarn works well for small amigurumi-like projects.
A suitable crochet hook, typically 3.5–4 mm, is ideal for achieving tight stitches that hold the bookmark’s shape. You will also need a yarn needle for weaving in ends and sewing parts together. Scissors are essential for cutting yarn cleanly, and stitch markers can help keep track of rounds if you prefer.
Optional materials include safety eyes for the hippo, felt pieces for facial features, or embroidery thread to add details like nostrils and a smile. These small touches elevate the appearance of your hippo bookmark and make it more expressive and appealing.
Lastly, a blocking mat and pins can be useful if you want to shape the bookmark precisely before use. While not mandatory, this step helps ensure that the hippo lays flat and functions properly when inserted in a book.
Start by crocheting the body of your hippo bookmark. Typically, you will begin with a magic ring or chain loop and work in rounds using single crochet stitches. Gradually increase the number of stitches to form a rounded body shape suitable for a bookmark.
Once the body is complete, work on the head and facial details. Crochet small circles for the ears and snout, and attach them securely to the body using a yarn needle. Embroider or attach the eyes, nostrils, and mouth to give your hippo its friendly expression.
Create the bookmark tail or elongated section by crocheting a flat strip attached to the body. This part allows the hippo to function as a bookmark, sliding easily between book pages without damaging them. Ensure the strip is sturdy and proportional to the body for best results.
If desired, add embellishments such as a tiny bow, scarf, or spots to personalize your hippo bookmark. These decorations not only enhance appearance but also provide a fun way to experiment with color changes and creative techniques.
Weave in all loose ends carefully to prevent unraveling. Trim any excess yarn neatly. The final step is to check all attachments and reinforcements to ensure your hippo bookmark is durable enough for regular use.
Finally, test your bookmark in a book. The hippo should sit comfortably at the top or side of a page, while the body and tail keep it in place without slipping. This final check ensures functionality and durability.
Personalization is a key aspect of creating your hippo bookmark. Consider changing yarn colors to create a playful or themed version, such as a pink hippo for a whimsical look or gray with blue accents for a more classic appearance.
Experiment with facial expressions by adjusting eye placement, embroidering different mouth shapes, or adding accessories. Small changes can dramatically alter the personality of your hippo, making it uniquely yours.
Adjust the bookmark strip’s length depending on the size of your books. Longer strips work well for large novels, while shorter strips are ideal for pocket-sized books or journals.
Try using textured yarns or cotton blends to add dimension and tactile interest. This makes the hippo bookmark not only visually appealing but also enjoyable to touch while reading.
Reinforce all joints, especially the ears, snout, and tail. Even though this is a small project, durability is important so the bookmark maintains its shape during repeated use.
Finally, consider making a set of hippo bookmarks in different colors or sizes. These can be great gifts, classroom rewards, or fun additions to a book-themed gift package.
To keep your hippo bookmark looking great, hand wash gently with mild soap and cold water. Avoid wringing or twisting, as this can distort the shape.
Air dry the bookmark flat on a clean towel. Avoid high heat or direct sunlight, which may fade colors or damage the yarn fibers.
Check for loose stitches or unraveling periodically. Repair any minor issues promptly using a yarn needle to maintain durability.
If your bookmark becomes slightly misshapen, gentle blocking with pins on a flat surface can restore its original form.
Store the bookmark safely when not in use, ideally in a drawer or book, to prevent crushing or snagging. With proper care, your hippo bookmark can last for years, providing both charm and functionality.
Q1: Is this project suitable for beginners?
Yes, the tutorial uses basic crochet stitches and simple techniques, making it accessible for beginners.
Q2: What yarn is best for a hippo bookmark?
Worsted-weight or DK yarn works well. Cotton or acrylic blends provide durability and smooth stitches.
Q3: Can I make the bookmark larger or smaller?
Yes, adjust hook size or stitch count to change the overall size while maintaining proportions.
Q4: How do I attach the eyes and facial features?
Use safety eyes, felt pieces, or embroidery thread, securely stitched to prevent detachment.
Q5: Can the hippo bookmark be washed?
Yes, hand wash gently and air dry flat to maintain shape and color.
Q6: How long does it take to make one hippo bookmark?
Depending on skill level, it usually takes 2–4 hours to complete one.
Q7: Can I customize the design?
Absolutely! Change colors, expressions, and accessories to personalize your hippo bookmark.
The How to Crochet a Hippo Bookmark project is a delightful and rewarding craft for all crochet enthusiasts. By following this tutorial, you can create a functional and adorable bookmark that adds charm to any book.
With customization options for colors, facial features, and accessories, each hippo bookmark can be a unique reflection of your creativity.
Whether for personal use, gifts, or sharing with friends, this crochet project is quick, fun, and provides a sense of accomplishment. Share your creations, leave honest feedback, and inspire others in the crochet community to make their own hippo bookmarks.


